Tr
oublesho
oting
W
ar
ran
ty
Made in China
Imported by
Noma Canada, Toronto, Canada M4S 2B8
DATE CODE: 22320
For pre-lit trees, if the tree does not illuminate:
1. Please check to make sure that all plugs are properly connected and that the power cord is plugged into the wall outlet. Refer to
assembly guide for instructions. (If the tree comes with a foot pedal, try stepping on the ON/OFF button.)
2. When multiple products are connected together, do not exceed the lowest of the indicated maximum wattage on the cord tag
near the connected product's receptacle.
Each tree includes hinge pins and washers.
If extra parts are needed, please contact our customer service centre.
SPARE PARTS
Loose Hinge Pin
1. Extra hinge pins are included for repairing the hinges. Place the branch into
the slot of the bracket.
2. Insert a new hinge pin through the hole and secure using the retainer
washer. (See Fig. E)
1. This product is powered by a lithium battery. Due to their small size, lithium batteries can easily be swallowed by children.
Ingestion of such batteries has been known to cause death.
2. Do not expose light set to moisture.
3. Remove battery when not used for an extended period of time, or when depleted.
4. Dispose of used battery properly.
5. Use only CR2032 battery for the remote controller.
6. Clean the battery contacts prior to battery installation.
7. Do not dispose of batteries in fire. Batteries may explode or leak.
8. Small parts. Keep batteries out of reach of children.
WARNING
This product carries a five (5) year warranty against defects in workmanship and materials. Noma Canada agrees to replace a
defective product, within the stated warranty period, when returned to the place of purchase with proof of purchase. This
product is not guaranteed against wear or breakage due to misuse and/or abuse.
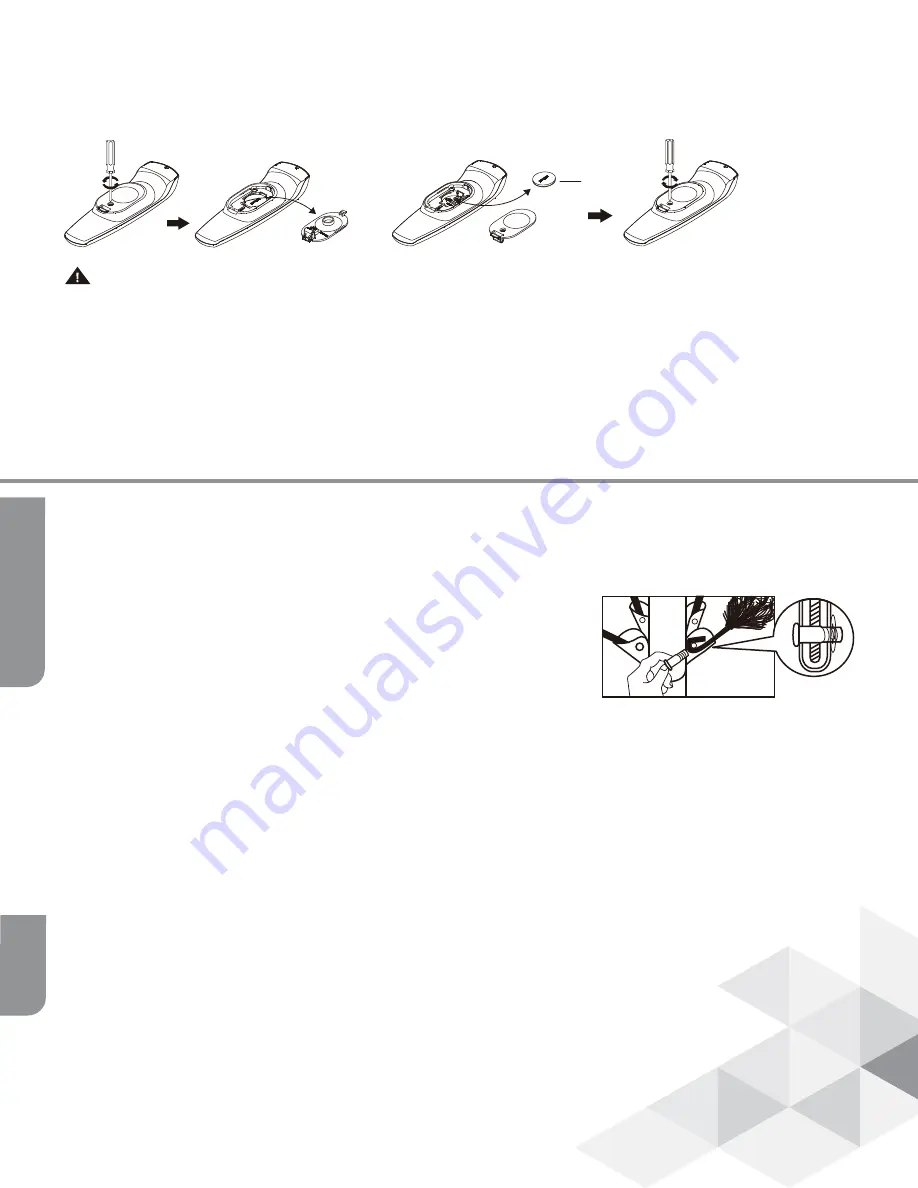
BATTERY REPLACEMENT OF REMOTE CONTROL
1. Loosen the screw of the battery cover with a screwdriver (not included).
2. Replace the used battery with a new CR2032 button cell battery (not included). Make sure that the battery is installed with the
correct polarity (+ and -).
3. Retighten the screw to close and secure the battery cover.
Cover
Battery
CR2032
Fig. E
CAUTION:
To reduce the risk of fire and electric shock:
a) Use only the power supply that was provided with this product. Using a different adaptor will damage the lights and may
cause fire, or electric shock hazard.
b) Do not install on trees having needles, leaves or branch covering of metal or materials which look like metal.
c) Do not mount or support strings in a manner that can cut or damage wire insulation.


