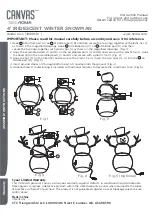
2. Hook the assembled parts (C and D) on the assembled parts (A and B) and secure with a plastic tie (I). Hook
3. Hook the hat (F) on the head (E) and secure with a plastic tie (I). Insert the two arms (G, H) into the 3 on
middle part (D). (Fig. 3)
Fig. 2
Fig. 4
the head (E) on the assembled parts (C and D) and secure with a plastic tie (I). (Fig. 2)
1. Hook 2 of bottom part (A) on 1 of bottom part (B) and then secure the top rings together with plastic ties (I)
secure the top rings together with plastic ties (I) as shown in the magnified drawings. (Fig. 1)
Fig. 1
Fig. 3
4' IRIDESCENT WINTER SNOWMAN
For indoor and outdoor use
Retain carton for storage purposes
Instruction Manual
IMPORTANT
: Please read this manual carefully before assembly and save it for reference.
W
arr
anty
A
S
SEMBL
Y INS
TRUCTIONS
1-year Limited Warranty
4. Insert ground stakes (J) through bottom part of snowman into the ground. (Fig. 4)
5. Optional Step: A material bag is included with optional features to decorate the snowman’s face. (Fig. 5)
Fig. 5 (Optional)
as shown in the magnified drawings. Hook 2 of middle part (C) on 1 of middle part (D) and then
1
2
1
2
3
model no. CTI1513936 | www.noma.com
Made in China
Imported by
CTC Triangle (USA) LLC, 14000 24th Street E, Sumner, WA, USA 98390
This CANVAS product carries a one-year warranty against defects in workmanship and materials.
Noma agrees to replace a defective product, within the stated warranty period, when returned to the place
of purchase with proof of purchase. This product is not guaranteed against wear or breakage due to misuse
and/or abuse.


