background image


 1

1  

INTRODUCTION 

Congratulations on your purchase of the NORAC UC4+ Spray Height Control System.  This 

system is manufactured with top quality components and is engineered using the latest 
technology to provide operating features and reliability unmatched for years to come. 

When properly used the system can provide protection from sprayer boom damage, improve 
sprayer efficiency, and ensure chemicals are applied correctly.  

Please take the time to read this manual completely before attempting to install the system.  A 
thorough understanding of this manual will ensure that you receive the maximum benefit from 
the system. 

YOUR INPUT CAN HELP MAKE US BETTER!  If you find issues or have 
suggestions regarding the parts list or the installation procedure, please don’t 
hesitate to contact us. 


Summary of Contents for UC4+ Apache 1010 2005+

Page 1: ...Apache 1010 2005 Enhanced Stability Installation Manual Spray Height Control System Improving the competitiveness of Industry and Agriculture through Precision Measurement ...

Page 2: ...Systems International Inc reserves the right to improve products and their specifications without notice and without the requirement to update products sold previously Every effort has been made to ensure the accuracy of the information contained in this manual The technical information in this manual was reviewed at the time of approval for publication ...

Page 3: ...e Assembly 18 4 6 2 Valve Mounting 19 4 6 3 Hydraulic Plumbing 19 4 7 ELECTRICAL INSTALLATION 20 4 8 COMPLETING THE INSTALLATION 23 5 ELECTRICAL REFERENCE CABLE DRAWINGS 24 5 1 ITEM C02 44668 CABLE SENSOR BRANCH 24 5 2 ITEM C02B 44664 CABLE UC4 CAN NODE DUAL 25 5 3 ITEM C03 44656D CABLE VALVE VARIABLE RATE DT 26 5 4 ITEM C05 44674 CABLE UC4 SENSOR ROLL BIAS 27 5 5 ITEM C10 44650 39 CABLE POWER GEN...

Page 4: ... the system can provide protection from sprayer boom damage improve sprayer efficiency and ensure chemicals are applied correctly Please take the time to read this manual completely before attempting to install the system A thorough understanding of this manual will ensure that you receive the maximum benefit from the system YOUR INPUT CAN HELP MAKE US BETTER If you find issues or have suggestions...

Page 5: ...er NORAC cannot guarantee all parts fit as intended due to the variations of the sprayer by the manufacturer Please read this manual in its entirety before attempting installation ATTENTION When installing the UC4 Spray Height Control system please be aware that at a point in the installation your sprayer booms will be inoperative until the installation is complete Any installation procedure requi...

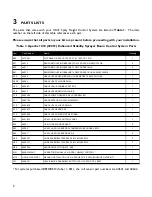
Page 6: ... 44656D CABLE VALVE VARIABLE RATE DT 1 C05 44674 CABLE UC4 SENSOR ROLL BIAS 1 C10 44650 39 CABLE POWER GENERIC SELF PROPELLED 1 C11 44651 03 CABLE EXTENSION VALVE GENERIC 1 C12 44658 18 CABLE UC4 VALVE AP2 MAIN 1 C13 44658 17 CABLE UC4 SENSE AP2 1 C14 44658 99 CABLE UC4 POWER PIGTAIL FUSED 1 E01 4461BC UC4 PLUS BOOM CONTROL PANEL 1 E02 44631 UC4 ULTRASOUND SENSOR 3 E03 45000 UC4 PLUS ROLL SENSOR W...

Page 7: ... SIZE IN 1 16TH S GENDER MALE OR FEMALE 90 ANGLE SWIVEL TYPE GENDER SIZE TYPE B ORB J JIC OR FLAT FACE P PIPE Fitting Name Example The use of dielectric grease is not recommended on any NORAC electrical connections To ensure all stainless steel hardware does not gall or seize apply a light coating of the supplied Permatex Anti seize grease to all threaded parts upon installation Permatex Anti seiz...

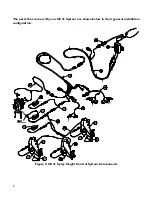
Page 8: ...5 The parts that come with your UC4 System are shown below in their general installation configuration Figure 2 UC4 Spray Height Control System Components ...

Page 9: ...6 Figure 3 Hydraulic Plumbing Schematic ...

Page 10: ...ield working RPM on the throttle and mark this value in Table 4 You will need a stopwatch or a watch that displays seconds for the next step 3 Raise the LEFT boom from its extreme LOW position to the very TOP of its travel Record the time this takes in Table 4 Trial 1 for Left UP 4 Lower the LEFT boom from its extreme HIGH position to the BOTTOM of its travel Record this time in Table 4 Trial 1 fo...

Page 11: ...2 Sec Trial 3 Sec Avg Time Sec Left UP Left DOWN Right UP Right Down Main UP Main DOWN Roll CW Roll CCW Table 5 Boom Test Record WITH UC4 Spray Height Control system Working RPM Boom Trial 1 Sec Trial 2 Sec Trial 3 Sec Avg Time Sec Left UP Left DOWN Right UP Right Down Main UP Main DOWN Roll CW Roll CCW ...

Page 12: ...k away For optimal boom tip protection it is recommended that the sensor be mounted within approximately two feet 60cm of the boom tip Please refer to the UC4 system warranty at the end of the UC4 Sprayer Boom Control Operator s Manual M01 for implications 2 Mount the NORAC UC4 ultrasonic sensors E02 into the sensor brackets The sensors should be oriented forward ahead of the boom When installing ...

Page 13: ...igure 7 Figure 7 Align Rainflap Rod 6 Bend the hinge tab inward over the rainflap rod until the hinge tab fits securely in the detent groove on the backside of the sensor bracket Figure 8 Figure 8 Bend Rainflap Hinge Tab 7 Ensure the rainflap actuates smoothly when the bracket is turned upside down and returns to the open position when the sensor bracket is returned to its operating position senso...

Page 14: ...stance between the boom structure and the angled flange Figure 10 Bracket Mounting Guidelines General Mounting Rules for UC4 Ultrasonic Sensors a In its lowest position the sensor must be 9 inches 23 cm or more from the ground b Ensure that there are no obstructions within a 12 inch diameter circle projected directly below the center of the sensor c The sensor should be approximately vertical at n...

Page 15: ...12 Apply a light coating of the supplied Permatex Anti seize grease to all threaded parts upon installation Figure 12 Sensor Serial Number Installation Location ...

Page 16: ...re 13 Main Lift Sensor Bracket Mounting The General Mounting Rules for Low Profile Brackets and the General Mounting Rules for UC4 Ultrasonic Sensors from the previous section must be followed 2 Mount the sensor into the bracket Figure 14 Main Lift Sensor Bracket Mounting Position Top View Figure 15 Main Lift Sensor Bracket Mounting Position Side View ...

Page 17: ... a The intermediate frame roll sensor must have the lowest serial number and the chassis roll sensor must have the highest serial number b The smaller the distance between A and B in Figure 17 the better the performance will be c Ensure the roll sensors are sitting relatively level when the sprayer chassis and boom are level d All roll sensors must be mounted with the circular AMP connector facing...

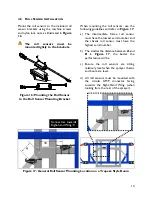
Page 18: ...over the roll sensor should be level with respect to the sprayer chassis d It is best to mount the roll sensor to the left hand trapeze link when looking from the rear of the sprayer e The roll sensor AMP circular connector MUST exit towards the right hand wing when looking from the rear of the sprayer Figure 18 Boom Frame Roll Sensor Mounted to a Trapeze Link 2 Cable tie the sensor connector to t...

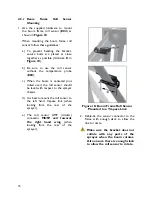
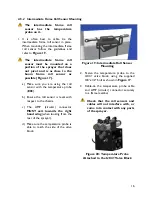
Page 19: ...th the temperature probe E03 b Ensure the roll sensor is level with respect to the chassis c The AMP circular connector MUST exit towards the right hand wing when looking from the rear of the sprayer d Make sure the temperature probe is able to reach the side of the valve block Figure 19 Intermediate Roll Sensor Mounting 2 Fasten the temperature probe to the UC4 valve block using the supplied 3 8 ...

Page 20: ...1 The reference frame chassis roll sensor mounts on the left side of the rear axle below the main up down coils Figure 21 The AMP circular connector MUST exit towards the right hand wing 2 Ensure the sensor is mounted adequately and that the cable provides enough slack Figure 21 Reference Frame Roll Sensor Mounting ...

Page 21: ...UC4 Spray Height Control system warranty It is recommended that a qualified technician does the hydraulic installation 4 6 1 Valve Assembly 1 On a clean surface remove all plastic plugs from the NORAC hydraulic Valve V01 Figure 22 Figure 22 NORAC Valve Block 2 Install the orifices F08 into the B ports with the notch facing outward as shown in Figure 23 3 Install the 6MB 6MJ fittings F05 into the B...

Page 22: ...ill be inoperative until the electronics are fully installed 1 After the NORAC valves are mounted the hydraulic hoses and fittings can be plumbed The plumbing for the hydraulic circuit is shown schematically in Figure 3 2 Connect a 6FJX90 hose end on the NORAC supplied hose H02 to the Pressure port on the NORAC valve block 3 Tee the P line to the pressure port on the sprayer valve block using the ...

Page 23: ...d spot to mount the UC4 control panel is on the right hand rear side of the cab near the side window An adapter for the flexible panel mount that has a 3 8 NC threaded stud on the end to bolt through an existing mount can also be purchased You can find these at your local outdoor store as a RAM mount part number RAM B 236 See http www ram mount com Figure 25 Control Panel Mounting ROP ...

Page 24: ...tion Bottom of switch pressed IN 3 Connect the 3 pin AMP plug P3 on C10 to the 3 pin AMP receptacle R3 on the power pigtail interface cable C14 Connect the pigtails on C14 to a 12V power connection Cable C14 may not be needed if there is an auxiliary power connector to connect the 3 pin AMP plug P3 of C10 to 4 Route the receptacle end R16 of C10 out of the cab 5 Connect the 16 pin AMP plug P16 of ...

Page 25: ...d of C12 to the vicinity of the Apache main lift valve and insert the 2 pin tees between the matching Apache valve connections For each tee the function e g Main Up is labeled on the branch wire 11 Connect the 6 pin tower on the valve cable C3 onto the mating connector S6A on C11 Figure 27 12 Route the free end of C03 to the vicinity of the NORAC valve block 13 The connectors on the valve cable C0...

Page 26: ...r and test the sprayer s functionality The NORAC Control Panel does not need to be powered up for the original switches to function Unfold the booms and raise lower each boom and main section Confirm that the cabling hoses are agreeable to the entire range of motion 2 If any functions do not work review the hydraulic and electrical portions of this manual to check for proper installation If you st...

Page 27: ...24 5 ELECTRICAL REFERENCE CABLE DRAWINGS 5 1 ITEM C02 44668 CABLE SENSOR BRANCH ...

Page 28: ...25 5 2 ITEM C02B 44664 CABLE UC4 CAN NODE DUAL ...

Page 29: ...26 5 3 ITEM C03 44656D CABLE VALVE VARIABLE RATE DT ...

Page 30: ...27 5 4 ITEM C05 44674 CABLE UC4 SENSOR ROLL BIAS ...

Page 31: ...28 5 5 ITEM C10 44650 39 CABLE POWER GENERIC SELF PROPELLED L 100 2 54m ...

Page 32: ...29 5 6 ITEM C11 44651 03 CABLE VALVE EXTENSION GENERIC 365 9 27m ...

Page 33: ...30 5 7 ITEM C12 44658 18 CABLE UC4 VALVE AP2 MAIN ...

Page 34: ...31 5 8 ITEM C13 44658 17 CABLE UC4 SENSE AP2 ...

Page 35: ...32 5 9 ITEM C14 44658 99 CABLE UC4 INTERFACE POWER PIGTAIL FUSED ...

Page 36: ...S 3702 Kinnear Place Saskatoon SK S7P 0A6 United States NORAC Inc CALL TOLL FREE 1 866 306 6722 952 224 4142 SHIPPING ADDRESS 6667 West Old Shakopee Road Suite 111 Bloomington MN 55438 Europe NORAC Europe sarl 33 0 4 26 47 04 42 SHIPPING ADDRESS Rue de l hermitage 01090 Guereins France www norac ca ...

Reviews: