background image

www.norco.com

34

5. As required: If either brake lever fails the Mechanical Safety Check  

(Section 1.C), don’t ride the bike. Have your dealer check the brakes.

If the chain won’t shift smoothly and quietly from gear to gear, the derailleur is 

out of adjustment. See your dealer.

6. Every 25 (hard off-road) to 50 (on-road) hours of riding: Take your bike to 

your dealer for a complete checkup.

B. If Your Bicycle Sustains an Impact

First, check yourself for injuries, and take care of them as best you can. Seek 

medical help if necessary.

Next, check your bike for damage, and fix what you can so you can get home. 

Then, take your bicycle to your dealer for a thorough check.

 WARNING:  A crash or other impact can put extraordinary stress on bicycle components, causing 

them to fatigue prematurely. Components suffering from stress fatigue can fail suddenly and cata-

strophically, causing loss of control, serious injury or death. 

5. Service

Summary of Contents for multi-speed bicycles

Page 1: ...for multi speed bicycles 7th Edition www norco com ...

Page 2: ......

Page 3: ...ad this entire manual but also to con sider it as just a start in your bicycle education We also suggest that you learn as much as you possibly can through other credible sources like books maga zines your Norco dealer and select websites that cater to your specific style of cycling Be sure to visit our website at www norco com for regular updates and tech tips Norco recommends that all bicycle as...

Page 4: ... position C Handlebar height and angle D Control position adjustment E Brake reach 4 Tech A Wheels 1 Wheel quick release 2 Removing and installing quick release wheels 3 Removing and installing Bolt On Wheels B Seatpost quick release C Brakes D Shifting gears E Pedals F Bicycle Suspension G Tires and tubes 5 Service A Service intervals B If your bicycle sustains an impact IMPORTANT This manual con...

Page 5: ... it is impossible to anticipate every situation or condition which can occur while riding this Manual makes no representation about the safe use of the bicycle under all conditions There are risks associated with the use of any bicycle which cannot be predicted or avoided and which are the sole responsibility of the rider A Special Note for Parents As a parent or guardian you are responsible for t...

Page 6: ...irst ride have your dealer explain any functions or features which you do not understand B Safety first 1 Always wear an approved helmet when riding your bike and follow the helmet manufacturer s instructions for fit use and care of your helmet 2 Do you have all the other required and recommended safety equipment See Section 2 It s your responsibility to familiarize yourself with the laws of the a...

Page 7: ...heck the brakes for proper operation see Sections 4 C Squeeze the brake levers Are the brake quick releases closed All control cables seated and securely engaged Do the brake pads touch the wheel rim with in an inch of brake lever movement Can you apply full braking force at the levers without having them touch the handlebar If not your brakes need adjustment Do not ride the bike until the brakes ...

Page 8: ...akes too hard can lock up a wheel which could cause you to lose control and fall If your bicycle has toeclips or clipless pedals practice getting in and out of the pedals See paragraph B 4 above If your bike has suspension familiarize yourself with how the suspension responds to brake application and rider weight shifts See paragraph B 5 above and Section 4 F Practice shifting the gears see Sectio...

Page 9: ...g extreme terrain WARNING Failure to wear a helmet when riding may result in serious injury or death 2 Always do the Mechanical Safety Check Section 1 C before you get on a bike 3 Be thoroughly familiar with the controls of your bicycle brakes Section 4 C pedals Section 4 E shifting Section 4 D 4 Be careful to keep body parts and other objects away from the sharp teeth of chainrings the moving cha...

Page 10: ...traffic sounds and emergency vehicle sirens distract you from concentrating on what s going on around you and their wires can tangle in the moving parts of the bicycle causing you to lose control 8 Never carry a passenger unless it is a small child wearing an approved helmet and secured in a correctly mounted child carrier or a child carrying trailer 9 Never carry anything which obstructs your vis...

Page 11: ...ce with your bike read and understand Section 2 F Off Road Respect Obey the local laws regulating where and how you can ride offroad and respect private property You may be sharing the trail with others hikers equestrians other cyclists Respect their rights Stay on the designated trail Don t contribute to erosion by riding in mud or with unnecessary sliding Don t disturb the eco system by cutting ...

Page 12: ...risk Consult your dealer about night riding safety equipment WARNING Reflectors are not a substitute for required lights Riding at dawn at dusk at night or at other times of poor visibility without an adequate bicycle lighting system and without reflectors is dangerous and may result in serious injury or death Bicycle reflectors are designed to pick up and reflect street lights and car lights in a...

Page 13: ... s manufacturer about the suitability of your bicycle before engaging in extreme riding When riding fast down hill you can reach speeds seen on motorcycles and therefore face similar hazards and risks Have your bicycle and equipment carefully inspected by a qualified mechanic and be sure it is in perfect condition Consult with expert riders and race officials on conditions and equipment advisable ...

Page 14: ...the comfort performance and appearance of your bicycle However if you change compo nents or add accessories you do so at your own risk The bicycle s manufac turer may not have tested that component or accessory for compatibility reli ability or safety on your bicycle Before installing any component or accessory including a different size tire make sure that it is compatible with your bicycle by ch...

Page 15: ... bike is too big for you Don t even ride the bike around the block A bike which you ride only on paved surfaces and never take off road should give you a minimum standover height clearance of 5 centimeters A bike that you ll ride on unpaved surfaces should give you a minimum of 7 5 centimeters of standover height clearance And a bike that you ll use for real mountain biking on difficult rough terr...

Page 16: ...ther adjustments 3 Saddle angle adjustment Most people prefer a horizontal saddle but some riders like the saddle nose angled up or down just a little Your dealer can adjust saddle angle or teach you how to do it Note If your bicycle is equipped with a suspension seat post periodically ask your dealer to check it Small changes in saddle position can have a substantial effect on performance and com...

Page 17: ... bicycle WARNING The stem s Minimum Insertion Mark must not be visible above the top of the headset If the stem is extended beyond the Minimum Insertion Mark the stem may break or damage the fork s steerer tube which could cause you to lose control and fall Your dealer can also change the angle of the handlebar or bar end extensions WARNING An insufficiently tightened stem binder bolt handlebar bi...

Page 18: ...e bike s wheel in place see fig 6 Because of its adjustable nature it is critical that you understand how it works how to use it properly and how much force you need to apply to secure the wheel WARNING The full force of the cam action is needed to clamp the wheel securely Holding the nut with one hand and turning the lever like a wing nut with the other hand until everything is as tight as you ca...

Page 19: ...hrough 15 2 Move the wheel s quick release lever from the locked or CLOSED position to the OPEN position figs 7a b 3 If your front fork does not have a secondary retention device go to step 5 4 If your front fork has a clip on type second ary retention device disengage it and go to step 5 If your front fork has an integral secondary retention device loosen the ten sion adjusting nut enough to allo...

Page 20: ...t leave a clear imprint in the palm of your hand the tension is insufficient Open the lever turn the tension adjusting nut clockwise a quarter turn then try again 5 If the lever cannot be pushed all the way to a position parallel to the fork blade return the lever to the OPEN position Then turn the tension adjust ing nut counterclockwise one quarter turn and try tightening the lever again 6 Re eng...

Page 21: ...To apply enough clamping force you should have to wrap your fingers around a frame tube for leverage and the lever should leave a clear imprint in the palm of your hand WARNING Securely clamping the wheel takes considerable force If you can fully close the quick release without wrapping your fingers around the seatstay or chainstay for leverage and the lever does not leave a clear imprint in the p...

Page 22: ...l firmly to the top of the slots in the fork dropouts and at the same time centering the wheel rim in the fork use the correct size wrench to tighten the axle nuts as tight as you can 3 Re engage the brake quick release mechanism to restore correct brake pad to rim clearance spin the wheel to make sure that it is centered in the frame and clears the brake pads then squeeze the brake lever and make...

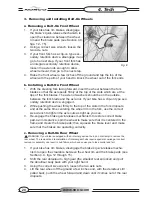
Page 23: ...0 b With a correctly sized socket box open end or adjustable wrench loosen the two axle nuts c Push the wheel forward to slacken the chain and remove the chain from the chainring and wheel sprocket d Pull the wheel out of the frame 5 Installing a Bolt On Rear Wheel with Coaster Brake a Put the chain on to the wheel sprocket Then insert the wheel into the frame dropouts and push it all the way in t...

Page 24: ...cam squeezes the seat collar around the seat post to hold the seat post securely in place The amount of clamping force is controlled by the tension adjusting nut Turning the tension adjusting nut clock wise while keeping the cam lever from rotating increases clamping force turning it counterclockwise while keeping the cam lever from rotating reduces clamping force Less than half a turn of the tens...

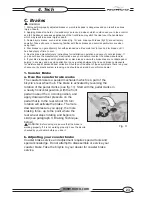
Page 25: ... attention to any junctions between the line and brake components for moisture and or darkened dust collection Should you find either of these symptoms there is a good chance your hydraulic system is leaking and should be serviced by your Norco dealer 1 Coaster Brake a How the coaster brake works The coaster brake is a sealed mechanism which is a part of the bicycle s rear wheel hub The brake is a...

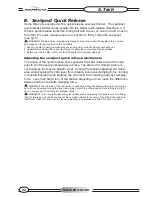
Page 26: ...e adjustable or you may need a different brake lever design Most brakes have some form of quick release mechanism to allow the brake pads to clear the tire when a wheel is removed or reinstalled When the brake quick release is in the open position the brakes are inopera tive Ask your dealer to make sure that you understand the way the brake quick release works on your bike see figs 12 15 and check...

Page 27: ...up a wheel with less weight will lock up with less brake pressure So as you apply brakes and your weight is transferred forward you need to shift your body toward the rear of the bike to transfer weight back on to the rear wheel and at the same time you need to both decrease rear braking and increase front braking force This is even more important on descents because descents shift weight forward ...

Page 28: ...ownshift in one of two ways shift the chain down the gear steps to a smaller gear at the front or up the gear steps to a larger gear at the rear So at the rear gear cluster what is called a downshift looks like an upshift The way to keep things straight is to remember that shifting the chain in towards the centerline of the bike is for accelerating and climbing and is called a downshift Moving the...

Page 29: ...ice shifting where there are no obstacles hazards or other traffic until you ve built up your confidence If you have difficulties with shifting the problem could be mechanical adjustment See your Norco dealer for help WARNING Never shift a derailleur onto the largest or the smallest sprocket if the derailleur is not shifting smoothly The derailleur may be out of adjustment and the chain could jam ...

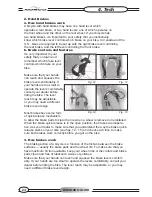
Page 30: ...nt the inside pedal from striking the ground in a turn WARNING Toe Overlap could cause you to lose control and fall Ask your dealer to help you deter mine if the combination of frame size crank arm lenght pedal design and shoes you will use results in pedal overlap If you have toe overlap you must keep the inside pedal down and the outside pedal up when making sharp turns 2 Some bicycles come equi...

Page 31: ...have the manufacturer s instruc tions see your dealer or contact the manufacturer For more information on maintaining and adjusting the specific pedal system supplied with your Norco bicycle please refer to the technical documents supplied by their manufacturer If you did not receive them with your bicycle return to your dealer and request them as they contain crucial safety and maintenance inform...

Page 32: ...pressure is with a bicycle pump with a built in pressure gauge WARNING There is a safety risk in using gas station air hoses or other air compressors They are not made for bicycle tires They move a large volume of air very rapidly and will raise the pressure in your tire very rapidly which could cause the tube to explode Tire pressure is given either as maximum pressure or as a pressure range How ...

Page 33: ...he valve stem with the end of a key or other appropriate object The Presta valve fig 19 has a narrower diameter and is only found on bicycle tires To inflate a Presta valve tube using a Presta headed bicycle pump remove the valve cap unscrew counterclockwise the valve stem lock nut and push down on the valve stem to free it up Then push the pump head on to the valve head and inflate To inflate a P...

Page 34: ...ycle repair 3 Ask your Norco dealer about the availability of bicycle repair courses in your area Regardless of which option you select we recommend that you ask your dealer to check the quality of your work the first time you work on something and before you ride the bike just to make sure that you did everything correctly Since that will require the time of a mechanic there may be a modest charg...

Page 35: ...er pedal Anything feel loose If so have your dealer check it Take a look at the brake pads Starting to look worn or not hitting the wheel rim squarely Time to have the dealer adjust or replace them Carefully check the control cables and cable housings Any rust Kinks Fraying If so have your dealer replace them Squeeze each adjoining pair of spokes on either side of each wheel between your thumb and...

Page 36: ...r for a complete checkup B If Your Bicycle Sustains an Impact First check yourself for injuries and take care of them as best you can Seek medical help if necessary Next check your bike for damage and fix what you can so you can get home Then take your bicycle to your dealer for a thorough check WARNING A crash or other impact can put extraordinary stress on bicycle components causing them to fati...

Page 37: ... outlined above for a period of five years of the original ownership following the date of purchase Suspension forks and rear shocks are not considered part of the frame and are therefore not covered under the terms of the frame warranty Each fork manu facturer designates a specific warranty policy for their product which is written in the specific Suspension Fork Owners Manual included with your ...

Page 38: ...e warranty for the model year of your bike Please visit our website at www norco com for warranty information on previous years and updates safety tips maintenance tips and recall notices monthly newsletter signup online registration of your bicycle for inclusion in our database coming soon Owner Idenification and Information FOR YOUR INFORMATION We suggest you fill in these details for your futur...

Reviews: