Owner’s Manual 4
Temperature control system:
Although the refrigerator is not frost -free, it is made to limit frost
on the cooling fins. At regular intervals, the temperature control
system automatically melts most of the frost from the cooling
fins. The water from the cooling fins drains into a collection cup
that is attached to the back of the refrigerator. The heat of the
cooling system evaporates the water from the collection cup.
Operating the Refrigerator Controls
Control panel:
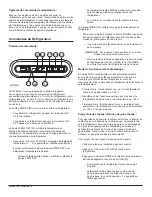
The refrigerator control panel (see Art01562) is above the
refrigerator door. A 12 volt DC power supply is necessary for the
control functions of the refrigerator to operate. The refrigerator
receives DC power from the 12 volt system of the vehicle; either
an auxiliary battery, a converter, or the vehicle engine battery.
The ON / OFF button [30] starts and shuts down the refrigerator:
- To turn on the refrigerator, push and release the ON / OFF
button.
- To turn off the refrigerator, push the ON / OFF button for one
second and then release.
The TEMP SET button [32] controls the temperature adjustment
of the freezer and the fresh food compartment. The temperature
adjustment that you select does not change if the mode of
operation of the refrigerator changes.
- Push the TEMP SET button and the temperature setting “1-9”
appears in the center display [33].
- Push and hold the TEMP SET button and the temperature
setting changes.
- When the desired temperature setting shows, release
the TEMP SET button.
Art01562
AC
LP GAS
AUTO
DC
1-COLD 9-COLDEST
TEMP SET
MODE
ON/OFF
30
33
31
32
35
36
164
34
- The temperature setting shows for ten seconds and then
the current operation mode of the refrigerator shows.
- The number “9” is the coldest temperature setting.
The MODE button [31] controls the operation mode of the
refrigerator.
- Push and hold the MODE button and a light bar shows in the
center display beside each of the four operating modes of
the refrigerator, one at a time.
- There is one automatic mode of operation and two
manual modes of operation.
NOTE: On 3-way models only, there are three manual
modes of operation.
- When the light bar shows beside the mode of operation
that you choose, release the MODE button to operate
the refrigerator in that mode.
Automatic mode operation:
When the refrigerator is in AUTO mode, it automatically uses
the most efficient energy source that is available for operation.
During operation, if a more efficient energy source becomes
available, the refrigerator controls change from the current
energy source to the more efficient energy source as follows:
- The first choice is AC operation if 120 volts AC is available to
the refrigerator.
- The second choice is propane gas operation if 120 volts AC
is not available to the refrigerator.
- The third choice is DC operation (3-way models only) if
neither 120 volts AC nor propane gas is available to the
refrigerator.
Removing air from the propane gas supply lines:
For safety reasons, the burner is made to ignite on propane gas
within a specified amount of time. When starting the refrigerator
for the first time, after storage, or after replacing propane gas
tank, the propane gas supply lines can have air in them. Due
to the air in the gas supply lines, the burner may not ignite on
propane gas within the specified amount of time.
To remove the air from the propane gas supply lines:
- Make sure that all of the gas valves are open.
- Push the ON / OFF button to turn the refrigerator on.
- Push and hold the MODE button until the light bar beside LP
GAS [36] shows.
- This means that the refrigerator is operating on propane
gas.
- If the air in the propane gas supply lines prevents the
burner from ignition on propane gas, the fault code “F”
will appear in the center display.


