background image


APPLIANCE 

Rev. 01 of 01/07/2019 

Translation of the original instructions in Italian 


SOLL. 

1.2


Unpacking and positioning 

Before starting installation, follow this unpacking procedure very carefully. 

1.


Place the appliance, still packed, near the place where it will be installed. To do 
this, it is advisable to use a roller trolley, avoiding dragging the appliance in order 
not to damage people or property. 

2.


When the place has been chosen, make sure there is enough space to open the 
main door. 

3.


Install the appliance in a dry, well-ventilated place, away from sources of heat (for 
example  a  radiator,  hob,  etc.)  and  in  a  place  where  it  is  not  exposed  to  direct 
sunlight. If necessary, use an insulating panel. 

4.


Insufficient ventilation at the back of the appliance increases power consumption 
and reduces the cooling efficiency. 

5.


Cut the straps and remove the cardboard packaging upwards. Do not blades, to 
avoid scratching the steel panels of the appliance. 

6.


Remove the protective box and place the appliance in the final position. 

7.


Remove the PVC film from all sides. 

8.


Remove the plastic protection from the core probe. 

9.


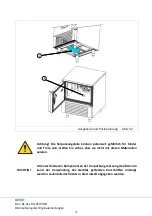
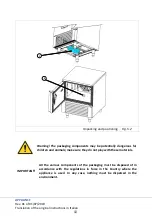
Place  the  plastic  condensate  collection  tray,  which  can  be  found  inside  the  cell 
when it is opened for the first time, under the technical compartment, sliding it 
into the dedicated rails (ref. Fig. 5.2). 

10.


Using the plug that can be found inside the cell when it is opened for the first time, 
close the drain hole inside the cell (ref. Fig. 5.2). 

11.


Level the appliance vertically by means of the adjustable feet to ensure its stability, 
correct air circulation and condensate drainage. 

12.


Keep a minimum distance of 10 cm from the sides and the back to ensure correct 
air circulation. 

13.


After unpacking the unit, make sure that it is not damaged. Any damage must be 
reported to the dealer within 24 hours of delivery. 

14.


Wait at least two hours before activating the appliance, to allow the refrigerant 
circuit to be perfectly efficient. 

15.


Clean the inside of the appliance before using it. 


Summary of Contents for 433000006

Page 1: ...Aufbauanleitung Schnellk hler Schockfroster SKF 15 GN 1 1 Art 433000006 2019 07...

Page 2: ...korrekten Transport und die anschlie ende Handhabung des Ger tes wird empfohlen die folgenden Anweisungen sorgf ltig zu befolgen 1 Das Ger t unter Verwendung von solchen Mitteln und Vorsichtsma nahmen...

Page 3: ...Stahlpaneele des Ger tes zu vermeiden 6 Die Schutzverkleidung entfernen und das Ger t in seiner endg ltigen Position aufstellen 7 Die PVC Schutzfolie von allen Seiten entfernen 8 Den Kunststoffschutz...

Page 4: ...teile k nnen potenziell gef hrlich f r Kinder und Tiere sein stellen Sie sicher dass sie nicht mit diesen Materialien spielen WICHTIG Alle verschiedenen Komponenten der Verpackung m ssen gem den im La...

Page 5: ...Leistung ausgelegt ist 4 Im Falle eines Austausches sind elektrische Kabel zu verwenden deren Eigenschaften nicht unter denen der urspr nglichen Kabel liegen Achtung Stellen Sie sicher dass der Steck...

Page 6: ...al zur berpr fung der korrekten Installation verpflichtet 1 Die korrekte Funktionsweise des elektrischen Anschlusses berpr fen 2 Die Absorptionen auf die bereinstimmung mit den Normen berpr fen 3 berp...

Page 7: ...Installation Blast Chiller SKF 15 GN 1 1 Art 433000006 2019 07...

Page 8: ...by the manufacturer 1 1 Transportation and handling To transport and then handle the appliance it is recommended to carefully follow these instructions 1 Transport the appliance carefully using appro...

Page 9: ...d scratching the steel panels of the appliance 6 Remove the protective box and place the appliance in the final position 7 Remove the PVC film from all sides 8 Remove the plastic protection from the c...

Page 10: ...ng components may be potentially dangerous for children and animals make sure they do not play with these materials IMPORTANT All the various components of the packaging must be disposed of in accorda...

Page 11: ...lations in force 3 Make sure that the system is dimensioned to the electrical power to be installed 4 In case of replacement use electrical cables with characteristics not inferior to the original one...

Page 12: ...appliance the technician must make sure that it has been installed correctly 1 Check that the electrical connection works correctly 2 Check that the absorption complies with the standards 3 Check tha...

Reviews: