Stufa camino / Chimney stove
/ Kaminofen
FALO
Istruzioni uso e manutenzione / Instructions for installation / Aufstell- und Bedienungsanleitung
– IT – EN – DE – Rev.00
43
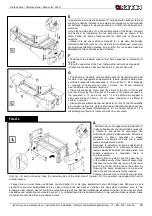
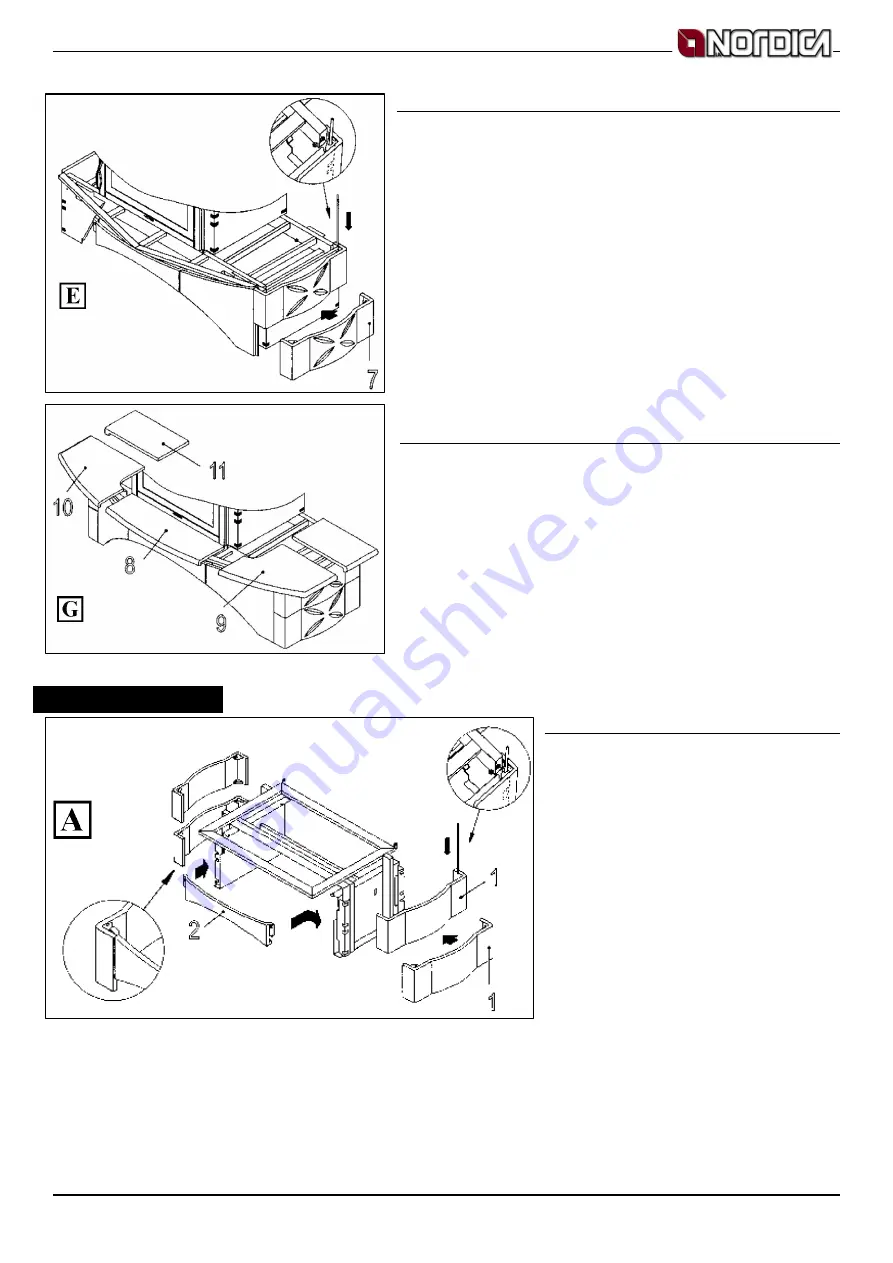
E
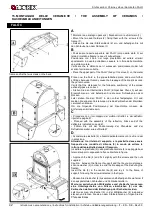
• Agganciare le due piastrelle laterali (7) nelle apposite cavità del telaio di
supporto e fissarle infilando le due astine di ancoraggio, come mostrato
nel dettaglio. Seguire la stessa procedura con l’altro lato della panca in
ceramica.
• Hook the two side tiles (7) in the suitable cavity of the frame of support
and fix them by introducing the two anchoring rods, as shown in the
detail. Follow the same procedure with the other side of the seat in
ceramics.
• Hängen Sie die zwei seitlichen Kacheln (7) in die dazu bestimmten
Höhlungen des Rahmens an. Um die Kacheln zu befestigen, muss man
die zwei Ankerstäbchen stecken, wie im Bild. Für die andere Seite der
Majolikabank folgen Sie das selbe Verfahren.
F
• Posizionare le piastrelle superiori del Falo’ seguendo le indicazioni di
pag. 48.
• Place the upper tiles of the Falo’ following the instructions of page 48.
• Stellen Sie die oberen Kacheln des Falo’ ein, wie auf Seite 48.
G
• Posizionare la piastrella centrale della panca (8) davanti alla porta del
focolare e poi appoggiare semplicemente le altre piastrelle della panca
sul telaio di supporto nella sequenza: 9, 10, e alla fine 11. Per il fissaggio
si consiglia di usare alcune gocce i silicone, non troppo, altrimenti
diventa difficile un’eventuale rimozione.
• Place the central tile of the seat (8) in front of the door of the hearth
and then simply lay the other tiles of the seat on the frame of support in
the sequence: 9, 10, and in the end 11. For the fixation we suggest to
use some drops of silicone, not too many, otherwise it is difficult to
perform a removal.
• Stellen Sie die mittlere Kachel der Bank (8) vor die Tür der Feuerstätte
ein und dann lehnen Sie einfach die anderen Kacheln der Bank auf den
Stützerahmen mit dieser Reihenfolge an: 9, 10, und zum Schloss 11. Für
die Befestigung rät man Tropfen von Silikon zu benutzen.
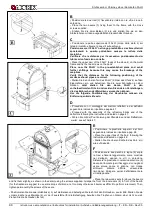
A
• Partendo da un lato agganciare la piastrella (1)
in alto nelle apposite cavità del telaio di supporto
e infilare le due astine di ancoraggio fino
all’estremità inferiore della piastrella. Montare la
piastrella in basso seguendo la stessa
procedura e assicurarsi che alla fine le astine
siano completamente inserite.
Seguendo le indicazioni di figura posizionare la
piastrella anteriore (2) e continuare fissando le
restanti piastrelle dell’altro lato della panca. Per
questa operazione è consigliato l’aiuto di
un’altra persona.
• Starting from one side, hook the upper tile (1)
in the suitable cavity of the frame of support and
introduce the two anchoring rods up to the lower
end of the tile. Mount the tile on the bottom by
following the same procedure and make sure
that in the end the rods are totally inserted.
Following the instructions of the figure, place the
front tile (2) and continue by fixing the remaining tiles of the other side of the seat. For this operation we suggest the help of
another person.
• Fangen Sie von einer Seite und hängen Sie die Kachel (1) in die dazu bestimmten hohen Höhlungen des Rahmens an und
stecken Sie die zwei Ankerstäbchen bis zu der unteren Ende der Kachel. Verfolgen Sie den selben Verfahren auch für die
Einsetzung der unteren Kachel. Am Ende versichern Sie sich alle Kacheln vollständig eingefügt zu haben. Folgen Sie die Pfeile
des Bildes und setzen Sie die vordere Kachel ( 2 ) und befestigen Sie die anderen Kacheln in der anderen Seite der Bank. Diese
Verfahren braucht die Hilfe einer anderen Person.
FALÒ L


