background image

20

 HOW TO SET UP THE CONSOLE

Before using the elliptical for the first time, set up the 
console. 

1.  Connect to your wireless network.


 Note: In order to access the Internet, download iFit 
workouts, and use some other features of the con-
sole, you must be connected to a wireless network. 
See HOW TO USE THE WIRELESS NETWORK 
MODE on page 27 to connect the console to 
your wireless network.

2.  Check for firmware updates. 


 First, see step 1 on page 25 and step 2 on page 
26 and select the maintenance mode. Then, 
see step 3 on page 26 and check for firmware 
updates.

3.  Create an iFit account.


 Touch the globe button near the lower left corner of 
the screen and then touch the iFit button. 


 Note: For information about navigating in the 
Internet browser, see page 28.  


 The browser will open to the iFit.com home page. 
Touch the Join iFit button in the upper-right corner 
of the screen.


 The Internet browser will open to the iFit.com 
account creation page. Then, fill in the information 
fields on the screen to create your iFit account.

The console is now ready for you to begin working out. 
The following pages explain the various workouts and 
other features that the console offers.

To use the manual mode,

 see this page. 

To use 

an onboard workout,

 see page 22. 

To use a 

set-a-goal workout,

 see page 23. 

To use an iFit 

workout,

 see page 24.

To use the equipment settings mode,

 see 

page 25. 

To use the maintenance mode,

 see page 

26. 

To use the wireless network mode, 

see 

page 27.

 To use the sound system,

 see page 

28. 

To use the Internet browser,

 see page 28.

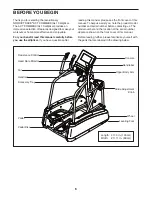
Note: If there is a sheet of plastic on the screen, 
remove the plastic. 

Note: The console can display speed and distance in 
either miles or kilometers. To find which unit of mea-
surement is selected, see step 8 on page 25. For 
simplicity, all instructions in this section refer to miles.

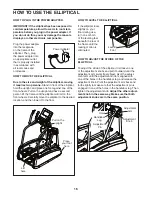
 HOW TO USE THE MANUAL MODE

 1.   Touch the screen or press any button on the 

console to turn on the console.


 See HOW TO ACTIVATE THE CONSOLE on 
page 19.

 2.   Select the main menu.


 When you activate the console, the main menu will 
appear on the screen after the console boots up. 


 Touch the home button in the lower left corner of 
the screen to return to the main menu at any time. 

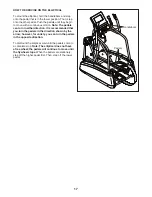
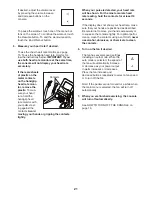
 3.   Change the resistance of the pedals as desired.


 Press the Start button or begin pedaling. 


 As you pedal, you can change the resistance of the 
pedals. To change the resistance, press one of the 
numbered 1 Step Resistance buttons on the con-
sole, press the Resistance increase and decrease 
buttons on the console, or press the Resistance 
increase and decrease buttons on the upper body 
arms.


 Note: After you press a button, it will take a 
moment for the pedals to reach the selected resis-
tance level. 

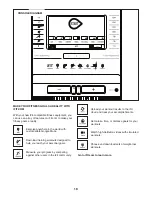
 4.  Follow your progress.


 The console offers several display modes. The 
display mode that you select will determine which 
workout information is shown. 


 To select the desired display mode, simply flick or 
slide the screen. You can also view additional work-
out information by touching the red boxes on the 
screen.


 If desired, keep your pedaling speed near the 
target rpm. The target zone meter will prompt you 
to increase, decrease, or maintain your pedaling 
speed.

Summary of Contents for A.c.t. 10 Elliptical

Page 1: ...number in the space above for reference www nordictrack com To register your product and activate your warranty today go to www nordictrackservice com registration For service at any time go to www no...

Page 2: ...Note The decal s may not be shown at actual size NORDICTRACK is a registered trademark of ICON IP Inc WARNING DECAL PLACEMENT 2 IMPORTANT PRECAUTIONS 3 BEFORE YOU BEGIN 6 PART IDENTIFICATION CHART 7 A...

Page 3: ...each side To protect the floor or carpet from dam age place a mat under the elliptical 7 Inspect and properly tighten all parts regu larly Replace any worn parts immediately 8 Keep children under age...

Page 4: ...4...

Page 5: ...5 all STANDARD SERVICE PLANS...

Page 6: ...see the front cover of this manual To help us assist you note the product model number and serial number before contacting us The model number and the location of the serial number decal are shown on...

Page 7: ...T Use the drawings below to identify the small parts needed for assembly The number in parentheses below each drawing is the key number of the part from the PART LIST near the end of this manual The n...

Page 8: ...d damaging parts do not use power tools ASSEMBLY 1 Go to www nordictrackservice com registration on your computer and register your product activates your warranty saves you time if you ever need to c...

Page 9: ...right 2 into the Frame 1 3 2 1 Holes Avoid pinching the wires 81 81 82 54 4 Identify the Left and Right Upright Covers 20 21 and orient them as shown While a second person holds the Left and Right Upr...

Page 10: ...Attach the Right Handrail 5 to the Upright 2 with four M8 x 13mm Screws 62 Do not tighten the Screws yet Attach the Left Handrail 4 in the same way 5 19 17 6 6 Attach the Right Handrail 5 to the Frame...

Page 11: ...ching the Right Extension Wire 80 Slide the Right Handlebar Leg 13 onto the axle on the Upright 2 Attach the Right Handlebar Leg with an M10 x 20mm Screw 61 and an M10 Washer 64 Attach the Left Handle...

Page 12: ...asher 64 Tip Avoid damaging the Pedal Axle Cover when tightening the Screw Attach the Right Pedal Arm not shown in the same way 12 61 64 14 Grease 10 10 Apply a small amount of grease to the axle on t...

Page 13: ...he Right Handlebar 11 and orient it as shown See the inset drawing While a second person holds the Right Handlebar 11 near the Right Handlebar Leg 13 connect the Right Extension Wire 80 to the Right C...

Page 14: ...res Attach the Console 3 to the Upright 2 with four M4 x 16mm Screws 67 3 81 99 67 2 80 100 Avoid pinching the wires 14 14 Plug the Power Adapter 84 into the receptacle on the frame of the elliptical...

Page 15: ...tures above 122 F 50 C or below 14 F 10 C Do not excessively bend or stretch the sensor when using or storing the heart rate monitor To clean the sensor use a damp cloth and a small amount of mild soa...

Page 16: ...move the elliptical to the desired location and then lower it to the floor HOW TO LEVEL THE ELLIPTICAL If the elliptical rocks slightly on your floor during use turn one or both of the leveling feet...

Page 17: ...in either direction It is recommended that you turn the pedals in the direction shown by the arrow however for variety you can turn the pedals in the opposite direction To dismount the elliptical wait...

Page 18: ...stomizable Google Maps Download training workouts designed to help you reach your personal goals Measure your progress by competing against other users in the iFit community Upload your workout result...

Page 19: ...ole will be ready for use HOW TO TURN OFF THE CONSOLE If the pedals do not move for several seconds a tone will sound and the console will pause If the pedals do not move for several minutes and the b...

Page 20: ...system see page 28 To use the Internet browser see page 28 Note If there is a sheet of plastic on the screen remove the plastic Note The console can display speed and distance in either miles or kilo...

Page 21: ...tly When your pulse is detected your heart rate will be shown For the most accurate heart rate reading hold the contacts for at least 15 seconds If the display does not show your heart rate make sure...

Page 22: ...ower than the target rpm Make sure to pedal at a speed that is comfortable for you If the resistance level for the current segment is too high or too low you can manually override the setting by press...

Page 23: ...aintain your pedal ing speed To view the target zone meter flick or slide the screen IMPORTANT The target rpm is intended only to provide motivation Your actual pedaling speed may be slower than the t...

Page 24: ...ur Workout History touch the Track button To use a set a goal workout touch the Set A Goal button see page 23 Note You can also press one of the iFit buttons on the console Before some workouts will d...

Page 25: ...ouch Save to use this passcode Touch Cancel to return to the equipment settings mode and not use a passcode To disable the passcode touch the Disable checkbox Note If a passcode is enabled the console...

Page 26: ...Wait for several seconds and then plug in the power adapter Note It may take a few minutes for the console to be ready for use 4 Calibrate the screen If the screen is not properly calibrated it will...

Page 27: ...etworks appears touch the desired network Note You will need to know your network name SSID If your network has a password you will also need to know the password An information box will ask if you wa...

Page 28: ...uttons will still function but the workout buttons will not function Note If you have questions after following these instructions go to support iFit com for assistance FCC INFORMATION This equipment...

Page 29: ...CH If the console does not display correct feedback the reed switch should be adjusted See EXPLODED DRAWING C on page 35 First remove the Right Rail Cover 93 and the Right Rail Cover Cap 7 Then remove...

Page 30: ...c Exercise If your goal is to strengthen your cardiovascular system you must perform aerobic exercise which is activity that requires large amounts of oxygen for prolonged periods of time For aerobic...

Page 31: ...ring 39 2 Pedal Axle Cover 40 1 Crank 41 1 Right Crank Bracket 42 1 Left Crank Bracket 43 1 Left Pedal Arm Bracket 44 8 Crank Bearing 45 6 Thrust Washer 46 2 Pedal Arm Roller 47 2 Crank Spacer 48 2 Cr...

Page 32: ...1 Left Extension Wire 101 2 M8 Jam Nut 102 1 M6 Washer 103 1 Idler Screw 104 1 Right Pedal Insert 105 1 Left Pedal Insert 106 2 Axle Washer Assembly Tool Grease Packet User s Manual Key No Qty Descri...

Page 33: ...67 31 33 33 34 34 35 35 49 38 60 61 90 61 61 61 68 68 61 62 62 64 64 56 14 95 105 36 78 78 74 67 74 67 67 67 67 67 67 67 70 67 73 67 67 67 67 73 67 67 39 61 64 37 37 59 75 85 60 98 98 98 98 77 98 98 9...

Page 34: ...25 26 27 28 78 96 91 31 33 33 34 34 35 35 37 59 39 56 49 38 60 61 68 92 61 61 61 77 64 64 64 67 67 67 67 67 67 67 60 9 104 15 36 78 78 75 74 74 37 98 98 98 98 98 98 2 3 67 59 80 59 100 67 89 99 58 67...

Page 35: ...4 45 45 45 45 45 45 46 47 46 47 48 48 50 50 50 50 79 51 51 76 76 52 52 52 52 53 54 55 59 59 61 61 62 69 69 62 62 65 66 65 66 73 67 67 67 73 67 67 67 67 71 71 59 59 57 98 81 82 83 84 61 61 67 87 102 97...

Page 36: ...for a minimal trip charge This warranty does not extend to freight damage to the product This warranty will automatically be voided if the product is used as a store display model if the product is p...

Reviews: