background image

7

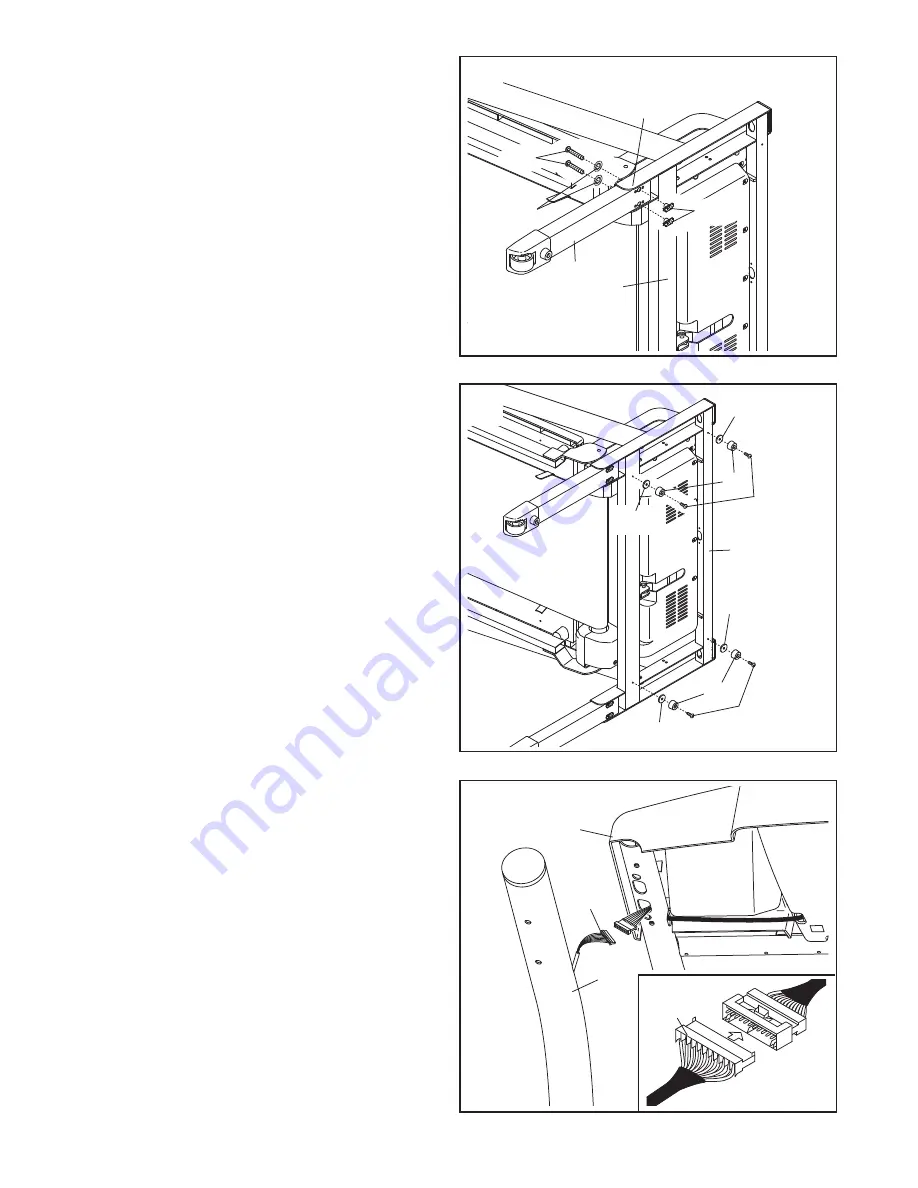
2. Insert the other Extension Leg (97) into the indi-

cated bracket on the base of the Uprights (85) as
shown. 

Attach the Extension Leg (97) with two Extension
Leg Bolts (87), two Star Washers (67), and two
Extension Leg Nuts (91) as shown. 

Firmly

tighten the Extension Leg Bolts.

85

Bracket

97

91

87

67

2

3. Attach the four Base Pads (81) to the base of the

Uprights (85) in the indicated locations with four
1" Tek Screws (82) and four Plastic Washers
(101). Note: One replacement Base Pad may be
included. Use the Base Pad to replace any Base
Pad that becomes worn.

With the help of a second person, carefully tip
the treadmill down so that the Base Pads (81)
are resting on the floor and the Uprights (85) are
in the vertical position.

82

85

81

82

81

101

101

101

3

4. Remove the band securing the Upright Wire

Harness (73) to the right Upright (85). Have a
second person hold the console assembly near
the right Upright. 

Connect the Upright Wire Harness (73) to the
wires extending from the console assembly. 

Make

sure to connect the connectors properly (see
the inset drawing). The connectors should
slide together easily and snap into place.

If

the connectors do not slide together easily and
snap into place, turn one connector and try
again. 

IF THE CONNECTORS ARE NOT CON-

NECTED PROPERLY, THE CONSOLE MAY
BE DAMAGED WHEN THE POWER IS
TURNED ON. 

Insert the connectors into the right

Upright (85). 

73

85

Console 

Assembly

73

4

101

Summary of Contents for C2255 Treadmill

Page 1: ...w Write the serial number in the space above for reference Visit our website at www nordictrack com new products prizes fitness tips and much more QUESTIONS As a manufacturer we are com mitted to prov...

Page 2: ...EMBLY 6 OPERATION AND ADJUSTMENT 9 HOW TO FOLD AND MOVE THE TREADMILL 20 TROUBLESHOOTING 22 CONDITIONING GUIDELINES 25 PART LIST 26 ORDERING REPLACEMENT PARTS 27 EXPLODED DRAWING 28 LIMITED WARRANTY B...

Page 3: ...to use a properly functioning surge suppressor could result in damage to the con trol system of the treadmill If the control sys tem is damaged the walking belt may change speed accelerate or stop un...

Page 4: ...before cleaning the treadmill and before performing the main tenance and adjustment procedures de scribed in this manual Never remove the motor hood unless instructed to do so by an authorized service...

Page 5: ...ng this manual see the front cover of this manual To help us assist you please note the product model number and serial number before calling The model number of the treadmill is NTL07806 5 The serial...

Page 6: ...ssembly is completed Note The underside of the treadmill walking belt is coated with high performance lubricant During shipping a small amount of lubricant may be transferred to the top of the walking...

Page 7: ...treadmill down so that the Base Pads 81 are resting on the floor and the Uprights 85 are in the vertical position 82 85 81 82 81 101 101 101 3 4 Remove the band securing the Upright Wire Harness 73 to...

Page 8: ...the Access Door 95 with the Screw 7 Discard the other wires included with the re ceiver 5 With the help of a second person set the con sole assembly on the Uprights 85 Make sure that no wires are pinc...

Page 9: ...alfunc tion or break down grounding provides a path of least resistance for electric current to reduce the risk of elec tric shock This product is equipped with a cord having an equipment grounding co...

Page 10: ...IT Interactive Workout Cards containing workout programs designed to help you achieve spe cific fitness goals For example lose unwanted pounds with the 8 week Weight Loss program or train for a long d...

Page 11: ...elt as desired by pressing the 1 Step Speed increase and decrease buttons Each time a button is pressed the speed set ting will change by 0 1 mph if a button is held down the speed setting will change...

Page 12: ...setting The Speed Pace dis play This display will show the speed of the walking belt and your pace pace is measured in minutes per mile The display will change from one number to the other every few s...

Page 13: ...appear in the matrix Note If the fan is left on when the walking belt is stopped the fan will automatically turn off after a few minutes When you are finished exercising remove the key Step onto the f...

Page 14: ...about to change the speed setting and or the incline setting will flash in the displays to alert you When the first segment is completed all speed settings will move one column to the left The speed s...

Page 15: ...ls and begin walking See the matrix Each custom pro gram is divided into one minute segments One speed setting and one incline set ting can be programmed for each segment The speed setting for the fir...

Page 16: ...e incline setting will flash in the displays to alert you When the first segment is completed all speed settings will move one column to the left The speed setting for the second segment will then be...

Page 17: ...ly adjust to the first speed and incline settings of the program Hold the handrails and begin walking During the program a personal trainer will guide you through the workout You can adjust the vol um...

Page 18: ...hange the unit of measure ment if desired When you use an iFIT Card a personal trainer will guide you through your workouts and give detailed instructions if P is selected as the audio setting If you...

Page 19: ...ct as you walk or run on the treadmill To increase the firmness of the walking platform step off the treadmill and slide the cushion adjustors toward the front of the treadmill To decrease the firmnes...

Page 20: ...Raise the frame until the pin is aligned with the hole in the latch catch Then carefully release the latch knob Make sure that the frame is held securely by the pin To protect the floor or carpet fro...

Page 21: ...and hold it Pivot the frame down until it is past the pin on the latch knob 2 Hold the metal frame firmly with both hands and lower it to the floor CAUTION To decrease the possibility of injury do not...

Page 22: ...s tripped To reset the circuit breaker wait for five minutes and then press the switch to the reset position PROBLEM The power turns off during use SOLUTION a Check the reset off circuit breaker see t...

Page 23: ...wer cord insert the key and run the treadmill for a few minutes Repeat until the walking belt is properly tightened c If the walking belt still slows when walked on please see the front cover of this...

Page 24: ...e key in the console press one of the Incline buttons While the incline is changing re move the key After a few seconds re insert the key The treadmill will automatically rise to the maximum incline l...

Page 25: ...e must be aerobic Aerobic exercise is activity that requires large amounts of oxygen for prolonged periods of time This increases the demand on the heart to pump blood to the muscles and on the lungs...

Page 26: ...er 44 1 Reset Off Circuit Breaker 45 1 Belly Pan 46 2 Wheel Housing Screw 47 1 Power Cord 48 1 Incline Wire Harness 49 1 Allen Wrench 50 1 Tie Holder 51 1 Releasable Tie 52 10 Plastic Tie 53 1 Front R...

Page 27: ...ns are subject to change without notice ORDERING REPLACEMENT PARTS To order replacement parts see the front cover of this manual When ordering parts please be prepared to give the following informatio...

Page 28: ...1 12 13 5 62 60 15 55 5 16 11 17 14 10 13 12 60 49 62 57 57 64 23 56 104 104 28 6 27 39 29 39 27 3 4 8 8 8 61 61 104 1 2 2 2 104 54 4 8 8 8 2 2 2 3 2 2 102 102 9 7 EXPLODED DRAWING A Model No NTL07806...

Page 29: ...36 33 7 7 7 34 34 34 38 20 19 37 40 41 32 45 7 43 51 23 50 52 23 47 94 48 53 96 23 24 24 21 22 58 69 74 75 20 59 66 68 35 44 20 32 7 7 32 32 106 7 23 65 42 32 32 EXPLODED DRAWING B Model No NTL07806...

Page 30: ...100 103 98 105 78 70 90 78 95 99 7 99 99 99 99 83 83 83 99 99 99 99 99 86 90 7 7 7 7 93 23 30 EXPLODED DRAWING C Model No NTL07806 5 R0207B...

Page 31: ...6 77 84 73 81 82 81 82 30 80 72 71 67 72 71 72 67 72 97 87 87 67 91 79 79 92 7 7 80 81 46 101 101 101 81 82 101 30 67 73 84 97 89 88 88 89 63 63 91 81 46 101 101 31 EXPLODED DRAWING D Model No NTL0780...

Page 32: ...on and your continued satisfaction HOW TO GET PARTS AND SERVICE Simply call our Customer Service Department at 1 888 825 2588 and tell them your name and address and the serial number of your Product...

Reviews: