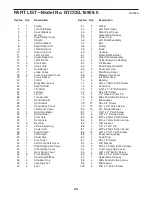
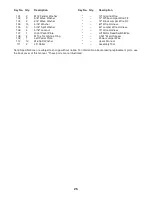
background image

21

Inspect and tighten all parts of the elliptical exerciser

regularly. Replace any worn parts immediately.

To clean the elliptical exerciser, use a damp cloth and

a small amount of mild soap.

IMPORTANT: To avoid

damage to the console, keep liquids away from

the console and keep the console out of direct

sunlight.

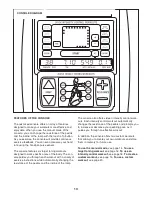
CONSOLE TROUBLESHOOTING

If the console does not turn on, make sure that the

power cord is fully plugged in.

If the console does not display your heart rate when

you hold the handgrip pulse sensor, or if the displayed

heart rate appears to be too high or too low, see step

5 on page 15.

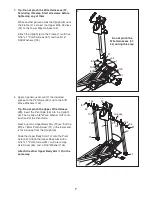
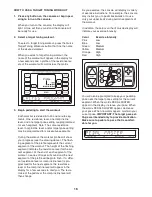
HOW TO CALIBRATE THE RAMP

If the ramp is not functioning properly, the ramp may

need to be calibrated. To calibrate the ramp, hold

down the Start button and the Resistance increase

button for about 5 seconds until the display on the

console changes.

Next, press the Start button once, and then press the

Ramp increase button. The ramp will move upward

and downward as it calibrates. When the ramp stops

moving, the ramp is calibrated. Then, press the Start

button repeatedly to return to the manual mode.

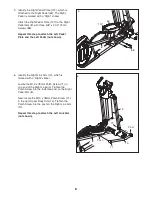
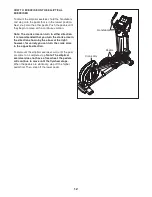
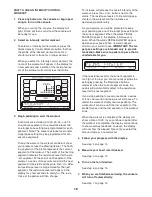
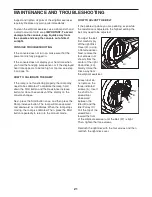
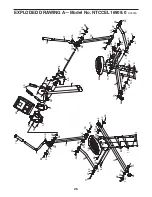
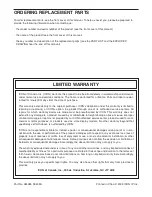
HOW TO ADJUST THE BELT

If the pedals slip while you are pedaling, even while

the resistance is adjusted to the highest setting, the

belt may need to be adjusted.

To adjust the belt,

first carefully pry

off the right Disc

Cover (41) using

a flat screwdriver.

Next, remove the

four screws (not

shown) from the

center of the right

Pedal Disc (40).

Gently rotate the

Disc away from

the elliptical exerciser.
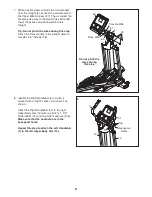
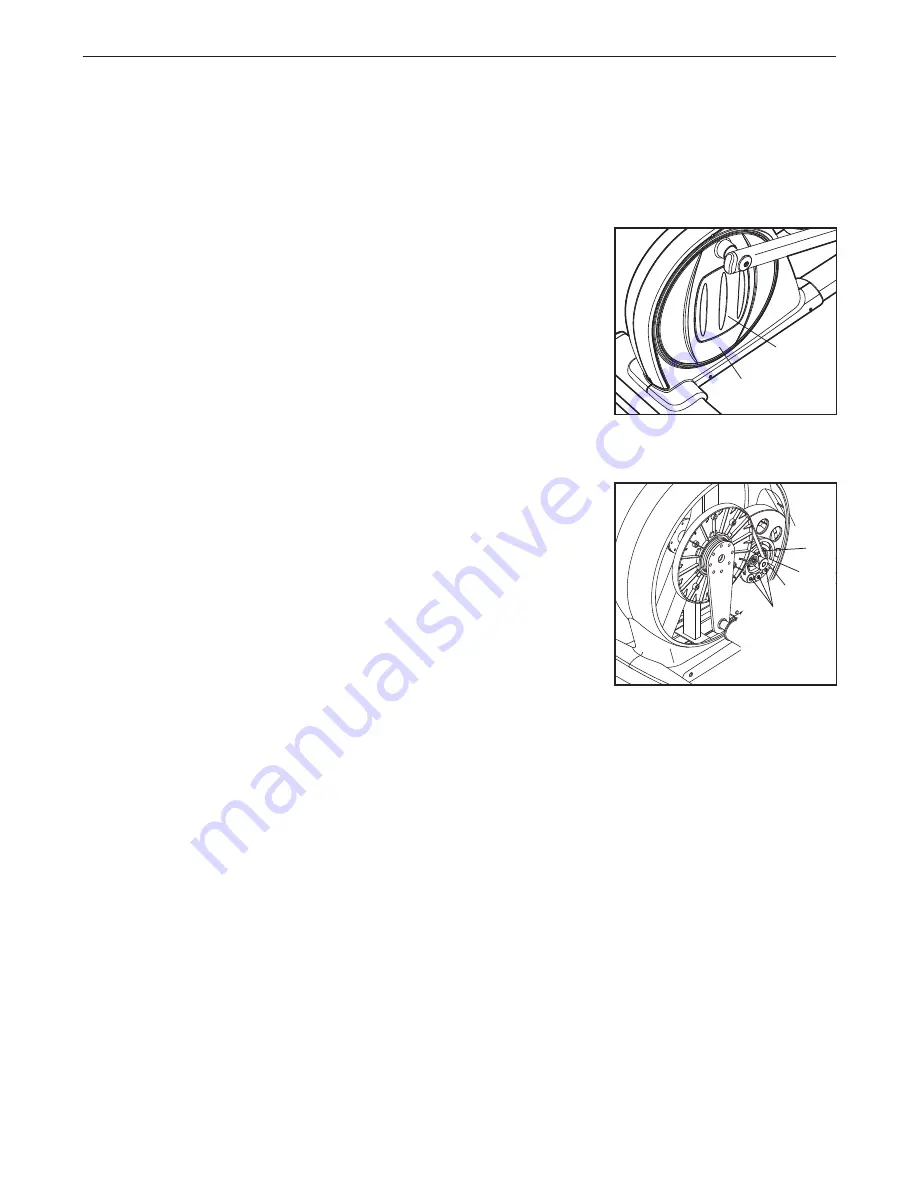
Loosen, but do

not remove, the

three indicated

screws (A). Insert

the shaft of a

screwdriver

downward

between the

Idler (B) and the

Idler Pulley (C).

Pull the top of the

screwdriver

toward the front

of the elliptical exerciser until the Belt (57) is tight.

Then, tighten the three screws.

Reattach the right disc with the four screws and then

reattach the right disc cover.

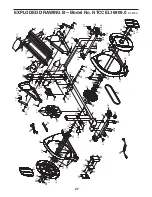
MAINTENANCE AND TROUBLESHOOTING

41

40

B

C

A

57

Summary of Contents for NTCCEL16909.0

Page 1: ...nce www nordictrack com Model No NTCCEL16909 0 Serial No Write the serial number in the space above for reference QUESTIONS If you have questions or if parts are damaged or missing PLEASE CONTACT OUR...

Page 2: ...TED WARRANTY Back Cover WARNING DECAL PLACEMENT 2 NordicTrack is a registered trademark of ICON IP Inc Keep hands and fingers clear of this area A ATTENTION TTENTION Gardez vos mains et vos doigts loi...

Page 3: ...ear of your ellipti cal exerciser and 2 ft 0 6 m on each side 5 Inspect and properly tighten all parts regu larly Replace any worn parts immediately 6 Keep children under age 12 and pets away from you...

Page 4: ...tical exerciser If you have ques tions after reading this manual please see the front cover of this manual To help us assist you note the product model number and serial number before con tacting us T...

Page 5: ...tical exerciser use the drawings below to identify small parts The number in parenthe ses below each drawing is the key number of the part from the PART LIST near the end of this manual The number fol...

Page 6: ...packing inserts and lower the Front Stabilizer 2 and the Frame 1 2 With the help of another person place the pack ing inserts under the rear of the Frame 1 as shown Have the other person hold the elli...

Page 7: ...ttach the Upper Body Arm with a 5 16 x 1 Patch Screw 81 an Outer Large Axle Cover 94 and a 5 16 Washer 104 Attach the other Upper Body Arm 12 in the same way 4 3 Tip Do not pinch the Wire Harnesses 97...

Page 8: ...per Body Arm 12 Tighten the Patch Screw into the post on the Right Link Arm 10 Repeat this step to attach the Left Link Arm not shown 6 10 12 Post 71 71 8 5 5 Identify the Right Pedal Plate 107 which...

Page 9: ...pright 6 with four 8 x 3 4 Screws 78 7 Do not pinch the wires during this step Console Wire 6 97 78 60 8 Identify the Right Handlebar 31 which is marked with a Right sticker and orient it as shown Att...

Page 10: ...first time see HOW TO PLUG IN THE POWER CORD on page 11 the Ramp not shown will calibrate automati cally The Ramp will move upward and down ward as it calibrates When the Ramp stops moving the Ramp i...

Page 11: ...covers are not grounded Contact a quali fied electrician to determine if the outlet box cover is grounded before using an adapter HOW TO MOVE THE ELLIPTICAL EXERCISER Due to the size and weight of the...

Page 12: ...ction It is recommended that you turn the crank arms in the direction shown by the arrow at the right however for variety you can turn the crank arms in the opposite direction To dismount the elliptic...

Page 13: ...gh each workout with a variety of exercise instructions while automatically changing the resistance of the pedals and the incline of the ramp The console also offers sixteen intensity control work out...

Page 14: ...incline level 4 Follow your progress with the display The far left section of the display This section of the display will show your pedaling pace in revolutions per minute and the ramp incline level...

Page 15: ...tightly For optimal performance clean the metal contacts using a soft cloth never use alcohol abrasives or chemi cals to clean the contacts 6 Turn on the fan if desired The fan has high and low speed...

Page 16: ...e flashing segment indicates the resistance level for the cur rent segment At the end of each segment of the workout a series of tones will sound and the next segment of the profile will begin to flas...

Page 17: ...s a series of tones will sound and the workout will pause To restart the workout simply resume pedaling The workout will continue until the last segment of the profile flashes and the last segment of...

Page 18: ...en change To increase or decrease the overall intensity of the workout press the and buttons next to the matrix The resistance levels of all remaining seg ments in the workout will then increase or de...

Page 19: ...evel and one target pace setting for each seg ment To program a resistance level for the first segment simply adjust the resistance of the pedals by pressing the Resistance buttons To program a tar ge...

Page 20: ...you will be prompted to keep your pedaling pace near the target pace setting for the current segment When the words PEDAL FASTER appear in the display increase your pace When the words PEDAL SLOWER a...

Page 21: ...t press the Start button once and then press the Ramp increase button The ramp will move upward and downward as it calibrates When the ramp stops moving the ramp is calibrated Then press the Start but...

Page 22: ...ur goal is to strengthen your cardiovascular system you must perform aerobic exercise which is activity that requires large amounts of oxygen for prolonged periods of time For aerobic exercise adjust...

Page 23: ...lles Stretch With one leg in front of the other reach forward and place your hands against a wall Keep your back leg straight and your back foot flat on the floor Bend your front leg lean forward and...

Page 24: ...Wheel 52 1 Left Pivot Cover 53 1 Right Pivot Cover 54 1 Lower Wire Harness 55 1 Power Cord 56 1 Left Pedal Assembly 57 1 Belt 58 1 Clamp 59 4 E clip 60 1 Console 61 1 Water Bottle Holder 62 1 Right P...

Page 25: ...Roller 10 Ground Wire 12 White Jumper Wire F F 12 Black Jumper Wire F F 60 Wire Harness 60 Jumper Wire Harness 70 Wire Harness Lift Motor Reed Switch Wire 0 531 Metal Spacer Power Jumper Wire User s...

Page 26: ...72 12 12 66 11 10 8 62 18 94 63 63 71 93 67 89 71 18 94 63 63 93 71 67 89 89 68 70 70 100 81 46 46 94 46 46 81 46 46 79 80 80 94 106 106 78 78 78 73 78 78 104 104 102 102 92 107 110 66 9 68 70 70 100...

Page 27: ...41 41 43 42 44 45 74 74 75 91 78 78 78 78 78 78 78 78 87 84 84 98 98 75 86 101 99 76 76 54 97 55 57 69 103 92 92 21 77 1 3 48 48 49 49 88 8 8 82 82 2 48 48 50 50 51 51 78 78 96 85 85 96 8 8 88 83 83...

Page 28: ...ributable to freight damage abuse misuse improper or abnormal usage or repairs not provided by an ICON authorized service center products used for com mercial or rental purposes or products used as st...

Reviews: