background image

25

 Key  No.  Qty. 

Description

 Key  No.  Qty. 

Description

Note: Specifications are subject to change without notice. For information about ordering replacement parts, see 

the back cover of this manual. *These parts are not illustrated. 

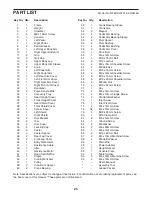
PART LIST

Model No. NTEVEL57019.0 R0419A

 1  1  Frame

 2  1  Upright

 3  2  Stabilizer

  4 

M8 x 10mm Screw

 5  1  Console

  6 

Left Pedal

  7 

Right Pedal

  8 

Pedal Bracket

  9 

Left Upper Body Arm

  10 

Right Upper Body Arm

 11  2  Grip

  12 

Grip Cap

  13 

Upper Body Leg

  14 

Upper Body Arm Sleeve

 15  2  Knob

  16 

Left Pedal Arm

  17 

Right Pedal Arm

  18 

Left Rear Arm Cover

  19 

Left Front Arm Cover

  20 

Right Rear Arm Cover

  21 

Right Front Arm Cover

 22  1  Handlebar

  23 

Pulse Sensor/Wire

  24 

Accessory Tray

  25 

Rear Upright Cover

  26 

Front Upright Cover

  27 

Rear Shield Cover

  28 

Front Shield Cover

  29 

Access Cover

  30 

Left Shield

  31 

Right Shield

  32 

Disc Bracket

 33  2  Disc

  34 

Disc Cover

  35 

Leveling Cap

 36  4  Caster

  37 

Caster Spacer

  38 

Rear Leg Cover

  39 

Front Leg Cover

  40 

Eddy Mechanism

  41 

Resistance Cable

 42  1  Idler

  43 

Resistance Motor

  44 

Reed Switch/Wire

 45  1  Clamp

  46 

Crank/Crank Arm

 47  1  Pulley

  48 

Crank Arm Spacer

  49 

Crank Bearing

  50 

Crank Bearing Sleeve

  51 

Crank Arm

 52  2  Magnet

  53 

Pedal Arm Bearing

  54 

Pedal Arm Bearing Sleeve

  55 

Pivot Spacer

  56 

Pivot Bushing

  57 

Pedal Arm Bushing

  58 

Pedal Arm Cover

  59 

Drive Belt

  60 

M3 x 12mm Screw

  61 

M10 x 75mm Bolt

  62 

M10 Locknut

  63 

M8 x 76mm Shoulder Screw

  64 

M6 Bolt Set

  65 

M10 x 55mm Screw

  66 

M8 x 14mm Shoulder Screw

  67 

M10 x 15mm Screw

  68 

M10 x 25mm Shoulder Screw

  69 

M8 Jam Nut

  70 

M10 x 82mm Screw

 71  1  Key

  72 

M8 x 15mm Screw

  73 

M4 x 12mm Flange Screw

  74 

Crank/Idler Washer

  75 

Idler Screw

  76 

Idler Pivot Screw

  77 

M4 x 12mm Screw

  78 

32 

M4 x 16mm Screw

  79 

M10 x 20mm Screw

  80 

M10 Clamp Bolt

  81 

M6 x 12mm Screw

  82 

Ground Screw

  83 

M8 Washer

  84 

M8 x 20mm Screw

  85 

M6 x 14mm Screw

  86 

M10 x 80mm Bolt

  87 

M4 x 15mm Machine Screw

  88 

M8 Split Washer

  89 

Main Wire

  90 

Power Adapter

  91 

Upright Spacer

  92 

Console Plate

  93 

Tablet Holder

  94 

M4 x 16mm Machine Screw

  95 

M4 x 10mm Screw

  * 

– 

User’s Manual


– 

Assembly Tool

  * 

– 

Grease Packet
Summary of Contents for NTEVEL57019.0

Page 1: ...anual for future reference USER S MANUAL iconeurope com CUSTOMER SERVICE UNITED KINGDOM Call 0330 123 1045 From Ireland 053 92 36102 Website iconsupport eu E mail csuk iconeurope com Write ICON Health Fitness Ltd Unit 4 Westgate Court Silkwood Park OSSETT WF5 9TT UNITED KINGDOM AUSTRALIA Call 1800 993 770 E mail australiacc iconfitness com Write ICON Health Fitness PO Box 635 WINSTON HILLS NSW 215...

Page 2: ...al is missing or illegible see the front cover of this manual and request a free replacement decal Apply the decal in the location shown Note The decal s may not be shown at actual size NORDICTRACK and IFIT are registered trademarks of ICON Health Fitness Inc App Store is a trademark of Apple Inc registered in the U S and other countries Android and Google Play are trademarks of Google LLC The Blu...

Page 3: ...l surface with at least 3 ft 0 9 m of clearance in the front and rear of the elliptical and 2 ft 0 6 m on each side To protect the floor or carpet from damage place a mat under the elliptical 8 Inspect and properly tighten all parts each time the elliptical is used Replace any worn parts immediately 9 Keep children under age 13 and pets away from the elliptical at all times 10 The elliptical shoul...

Page 4: ...or your benefit read this manual carefully before you use the elliptical If you have questions after reading this manual please see the front cover of this manual To help us assist you note the product model number and serial number before contacting us The model number and the location of the serial number decal are shown on the front cover of this manual Before reading further please familiarize...

Page 5: ...mm Screw 95 4 M4 x 16mm Machine Screw 94 4 PART IDENTIFICATION CHART Use the drawings below to identify the small parts needed for assembly The number in parentheses below each drawing is the key number of the part from the PART LIST near the end of this manual The number following the key number is the quantity needed for assembly Note If a part is not in the hardware kit check to see if it has b...

Page 6: ...bly may be easier if you have a set of wrenches To avoid damaging parts do not use power tools ASSEMBLY 1 1 To register your product and activate your warranty in the UK go to iconsupport eu If you do not have internet access call Customer Service see the front cover of this manual To register your product and activate your warranty in Australia email or post the following information to the email...

Page 7: ...h the other Stabilizer to the Frame 1 with two M10 x 82mm Screws 70 Then remove the packing materials from under the front of the Frame 1 3 1 70 3 17 3 70 1 2 2 If there is a shipping tube not shown attached to the Frame 1 remove the screws not shown and then remove the shipping tube Discard the screws and the shipping tube With the help of a second person place some of the packing materials not s...

Page 8: ...a second person raise the Upright 2 to the vertical position Secure the Upright 2 to the Frame 1 with an M10 x 75mm Bolt 61 an M10 x 80mm Bolt 86 and two M10 Locknuts 62 insert both Bolts and then tighten the Locknuts Then tighten the indicated M10 Locknut A 61 86 62 62 A 1 2 25 78 78 24 6 6 Attach the Rear Upright Cover 25 to the Upright 2 with three M4 x 16mm Screws 78 start all the Screws and t...

Page 9: ... Then identify the Right Upper Body Arm 10 orient it as shown and slide it onto the right axle on the Upright Attach the Right Upper Body Arm 10 with an M8 x 20mm Screw 84 and an M8 Washer 83 Repeat this step on the other side of the elliptical 10 20 21 78 9 9 Identify the Right Rear and Front Arm Covers 20 21 and orient them as shown Press the Right Rear and Front Arm Covers 20 21 together around...

Page 10: ...13 17 63 Grease 11 11 Apply a small amount of grease to an M8 x 76mm Shoulder Screw 63 Attach the front end of the Right Pedal Arm 17 inside the bracket on the right Upper Body Leg 13 with the M8 x 76mm Shoulder Screw 63 Next use an adjustable wrench to tighten a Knob 15 into the Right Upper Body Arm 10 Then pull the Knob slide the Upper Body Leg 13 farther into the Right Upper Body Arm and releas...

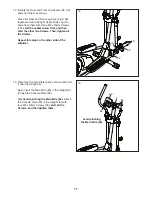
Page 11: ...then start the other two Screws Then tighten all the Screws Repeat this step on the other side of the elliptical 2 92 89 13 13 Orient the Console Plate 92 as shown and hold it near the Upright 2 Next insert the Main Wire 89 in the Upright 2 through the Console Plate 92 Tip Avoid pinching the Main Wire 89 Attach the Console Plate 92 to the Upright 2 with four M4 x 10mm Screws 95 start all the Screw...

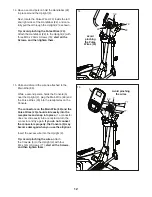
Page 12: ...the Main Wire 89 While a second person holds the Console 5 near the Upright 2 plug the Main Wire 89 and the Pulse Wires 23 into the receptacles on the Console The connectors on the Main Wire 89 and the Pulse Wires 23 should slide easily into the receptacles and snap into place If a connector does not slide easily into a receptacle turn the connector and try again If you do not connect the connecto...

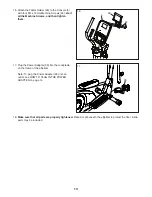
Page 13: ...hten them 93 94 5 17 17 Plug the Power Adapter 90 into the receptacle on the frame of the elliptical Note To plug the Power Adapter 90 into an outlet see HOW TO PLUG IN THE POWER ADAPTER on page 14 90 18 Make sure that all parts are properly tightened Place a mat beneath the elliptical to protect the floor Extra parts may be included ...

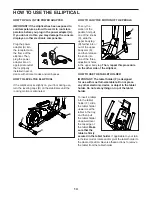
Page 14: ...ull one of the knobs C slide the upper body leg D farther into or out of the upper body arm E and then release the knob into one of the three adjustment holes in the upper body leg Then repeat this procedure on the other side of the elliptical HOW TO USE THE TABLET HOLDER IMPORTANT The tablet holder F is designed for use with most full size tablets Do not place any other electronic device or objec...

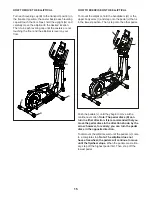
Page 15: ... I and step onto the pedal J that is in the lowest position Then step onto the other pedal Push the pedals J until they begin to move with a continuous motion Note The pedal discs K can turn in either direction It is recommended that you move the pedal discs in the direction shown by the arrow however for variety you can turn the pedal discs in the opposite direction To dismount the elliptical wai...

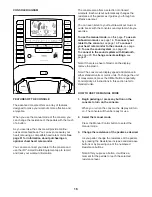
Page 16: ...see page 18 To connect your tablet to the console see page 19 To connect your heart rate monitor to the console see page 20 To use the sound system see page 20 To connect to the sound system with Bluetooth see page 20 To change console settings see page 21 Note If there is a sheet of plastic on the display remove the plastic Note The console can display speed and distance in either standard units ...

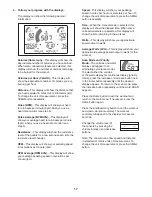
Page 17: ...will show your pedaling speed in miles per hour or kilometers per hour To change the unit of measurement press the St Met button repeatedly Time When the manual mode is selected this display will show the elapsed time When some onboard workouts are selected this display will show the time remaining in the workout Watts This display will show your approximate power output in watts Average Watts AVG...

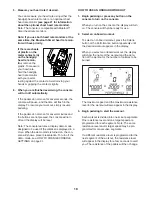
Page 18: ... mode designed to be used if the elliptical is displayed in a store When the demo mode is turned on the con sole will show a preset presentation To turn off the demo mode see HOW TO CHANGE CONSOLE SETTINGS on page 21 HOW TO USE AN ONBOARD WORKOUT 1 Begin pedaling or press any button on the console to turn on the console When you turn on the console the display will turn on The console will then be...

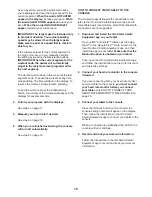
Page 19: ...sole will turn off automatically See step 6 on page 18 HOW TO CONNECT YOUR TABLET TO THE CONSOLE The console supports Bluetooth connections to tab lets via the iFit Smart Cardio Equipment app and to compatible heart rate monitors Note Other Bluetooth connections are not supported 1 Download and install the iFit Smart Cardio Equipment app on your tablet On your iOS or Android tablet open the App St...

Page 20: ...connected HOW TO USE THE SOUND SYSTEM To play music or audio books through the console sound system while you exercise plug a 3 5 mm male to 3 5 mm male audio cable not included into the jack on the console and into a jack on your personal audio player make sure that the audio cable is fully plugged in Note To purchase an audio cable see your local electronics store Next press the play button on y...

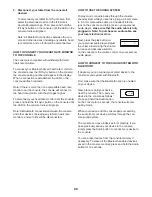
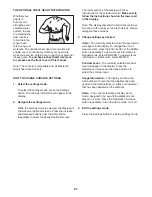
Page 21: ...w instructions for the selected screen Make sure to follow the instructions shown in the lower part of the display Note The display test and the button test optional screens are for use by service technicians Please disregard these screens 3 Change settings as desired Units The currently selected unit of measurement will appear in the display To change the unit of measurement press the Enter butto...

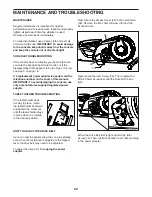
Page 22: ...id damaging the console use only a manufacturer supplied regulated power adapter TABLET HOLDER TROUBLESHOOTING If the tablet holder does not stay in place rotate the tablet holder backward and tighten the screw A until the tablet holder stays in place when it is rotated to the desired position HOW TO ADJUST THE DRIVE BELT If you can feel the pedals slip while you are pedaling even when the resista...

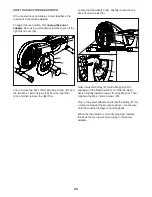
Page 23: ...ove the right Disc Locate the Reed Switch 44 Slightly loosen the two M4 x 16mm Screws 78 Next rotate the Pulley 47 until a Magnet 52 is aligned with the Reed Switch 44 Slide the Reed Switch slightly toward or away from the Magnet Then retighten the M4 x 16mm Screws 78 Plug in the power adapter and rotate the Pulley 47 for a moment Repeat the procedure above if necessary until the console displays ...

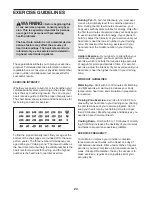
Page 24: ...bic Exercise If your goal is to strengthen your cardiovascular system you must perform aerobic exercise which is activity that requires large amounts of oxygen for prolonged periods of time For aerobic exercise adjust the intensity of your exercise until your heart rate is near the highest number in your training zone WORKOUT GUIDELINES Warming Up Start with 5 to 10 minutes of stretching and light...

Page 25: ...er 40 1 Eddy Mechanism 41 1 Resistance Cable 42 1 Idler 43 1 Resistance Motor 44 1 Reed Switch Wire 45 1 Clamp 46 1 Crank Crank Arm 47 1 Pulley 48 2 Crank Arm Spacer 49 2 Crank Bearing 50 1 Crank Bearing Sleeve 51 1 Crank Arm 52 2 Magnet 53 4 Pedal Arm Bearing 54 2 Pedal Arm Bearing Sleeve 55 2 Pivot Spacer 56 4 Pivot Bushing 57 4 Pedal Arm Bushing 58 2 Pedal Arm Cover 59 1 Drive Belt 60 1 M3 x 12...

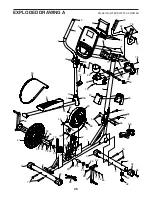
Page 26: ... 37 40 41 43 51 46 48 50 52 52 45 42 47 49 48 62 56 59 55 55 68 65 82 69 69 70 70 72 72 71 74 74 76 78 78 78 78 78 79 79 73 75 77 49 80 89 88 88 35 90 85 44 28 61 86 62 91 60 27 77 77 95 92 94 93 5 Scale 75 to fit assembly EXPLODED DRAWING A Model No NTEVEL57019 0 R0419A ...

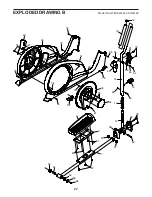
Page 27: ...8 10 12 7 11 14 13 15 17 20 21 30 32 29 31 34 38 39 33 54 56 56 58 53 53 57 57 63 66 64 64 67 78 78 78 78 78 78 78 78 87 78 81 81 78 78 78 87 78 78 83 84 78 EXPLODED DRAWING B Model No NTEVEL57019 0 R0419A ...

Page 28: ...ST and the EXPLODED DRAWING near the end of this manual ORDERING REPLACEMENT PARTS This electronic product must not be disposed of in municipal waste To preserve the environment this product must be recycled after its useful life as required by law Please use recycling facilities that are authorized to collect this type of waste in your area In doing so you will help to conserve natural resources ...

Reviews: