background image

Removing the collected water

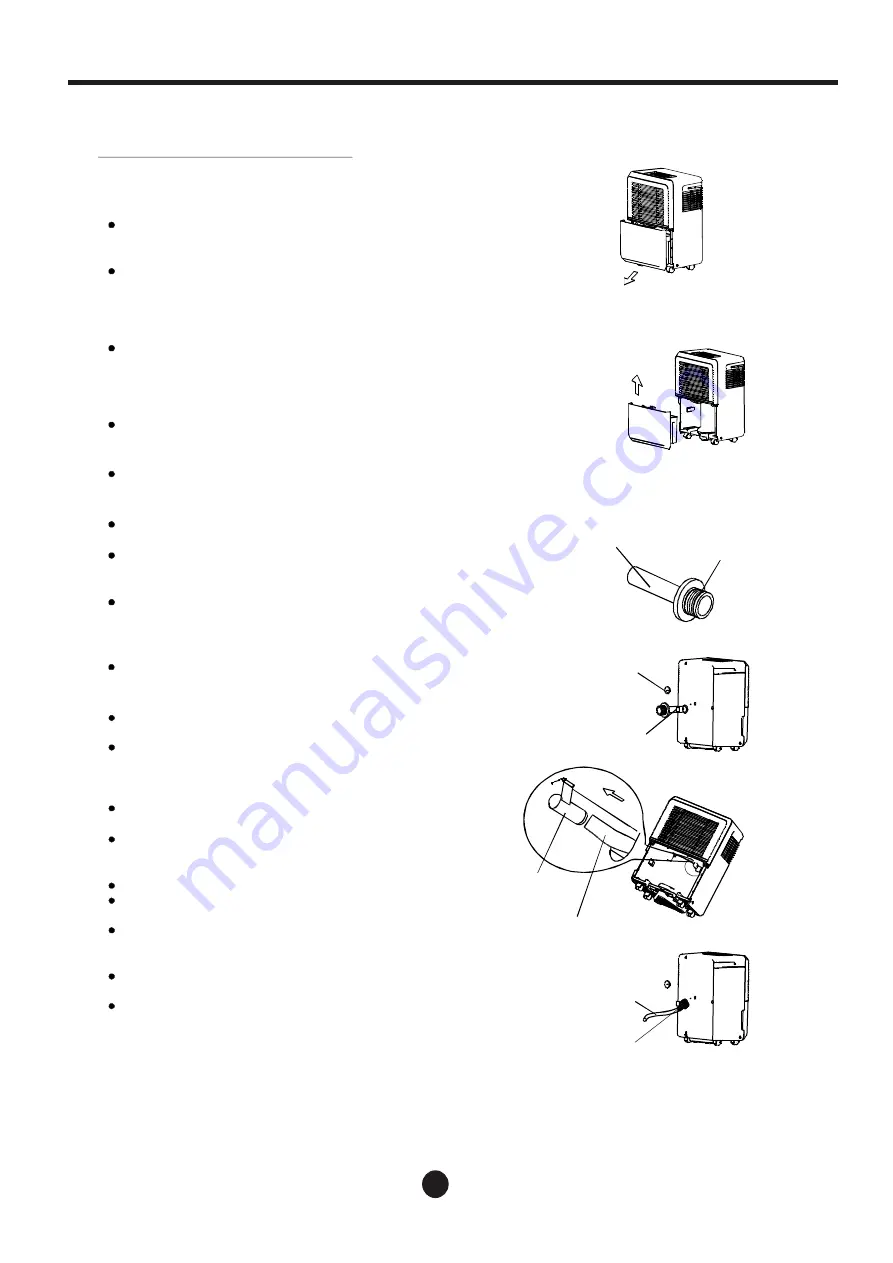
1. Pull out the bucket a little.

3. Pour the water out.

There are two ways to remove collected water.

1. Use the bucket

When the unit is off and the bucket is full, the unit will

beep 8 times, the Full indicator light will flash and the

digital display will indicate P2.

When the unit is on and the bucket is full, the compressor

turns off and the fan turns off after 30 seconds for to dry 

the water on the condenser coils. Then the unit will  

beep 8 times, the Full indicator light will flash and the 

digital display will indicate P2.

Slowly pull out the bucket. Grip the left and right

handles securely, and carefully pull out straight so

water does not spill. Do not put the bucket on the floor

because the bottom of the bucket is uneven. Otherwise

the bucket will fall and cause the water to spill.

Pour out the water and reinstall the bucket. The bucket

must be in place and securely positioned for the

dehumidifier to operate.

The machine will re-start when the bucket is

in its correct position.

NOTES:

When you remove the bucket, do not touch any parts

inside the unit. Doing so may damage the product.

Be sure to push the bucket gently all the way into the

unit. Banging the bucket against anything or failing to

push it in securely may prevent the unit from operating.

Any water found in the bucket at removal must be dried.

Fig.5

Fig.6

2. Continuous draining

Water can be automatically emptied into a floor drain 

Fig.8

Plastic cover

Drain hose

Adaptor

Fig.7

Drain hose

subassembly

Fig.9

Connector

Drain hose

Fig.10

Water hose

Female threaded end                                                         

OPERATING THE UNIT

(5/16˝)

(1˝)

8mm

,not included

)

with a

end (I.D.

,not included

)

.

Make sure the hose is secure so there are no leaks.

Direct the hose toward the drain, making sure that

there are no kinks that will stop the warter from flowing.

Place the end of the hose into the drain and make sure

level with the dehumidifier or lower so the water flows

smoothly.

Place the bucket back in the unit and make sure

that it is positioned correctly.

Select the desired humidity setting and fan speed

on the unit for continuous draining to start.

the drain hose is attached to adaptor A (See Fig. 7,

placed in the bucket

).

Remove the plastic cover from the back drain outlet of

the unit and remove bucket, then insert the drain hose

into the drain outlet of the unit and securely press it

onto the connector on the front of the unit.(See.Fig. 9

)

Tighten the adaptor A and the unit by using two screws

(placed in the bucket

).

Install the female threaded end of the water hose

adaptor A (See.Fig. 10

),

then place the

water hose in  the floor drain or a suitable drainage

NOTE:

When the continuous drain feature

is not being used, remove the drain hose

from the outlet.

via a drain hose( I.D.

26mm

opening.

Make sure it is not pointing upwards.

(not included)

8

,

A

Make sure

d

2. Holding both sides of the bucket, 

    pull it out from the unit while  

    keeping it level. . 

female

Summary of Contents for 87795065

Page 1: ...n a safe dry place for future reference Notre personnel du service à la clientèle est disponible pour vous aider En cas de problème avec votre achat ou pour obtenir plus d information à propos de ce produit veuillez composer notre numéro sans frais CONSERVEZ CE GUIDE Conservez ce manuel avec la facture originale dans un endroit sûr et sec pour consultation ultérieure Model modèle 87795065 MDCK 30A...

Page 2: ...TABLE OF CONTENTS SAFETY PRECAUTIONS CONTROL PADS ON THE DEHUMIDIFIER CARE AND MAINTENANCE TROUBLESHOOTING TIPS WAR ANTY R 1 2 2 3 4 5 6 7 7 8 9 10 11 PARTS IDENTIFICATION ...

Page 3: ...s gasoline benzene thinner etc CAUTION Do not use the unit in small spaces Lack of ventilation can cause overheating and fire Do not put in places where water may splash onto the unit Water may enter the unit and degrade the insulation It may cause an electric shock or fire Place the unit on a level sturdy section of the floor If the unit falls over it may cause water to spill and damage belonging...

Page 4: ...ct the power Contact a qualified service technician Do not place flower vases or other water on top of the unit e unit and contains electrical and other specific to this unit Be sure the unit is properly grounded To minimize shock and fire hazards proper grounding is important The power cord is equipped with a three prong grounding plug for protection against shock hazards Your unit must be used i...

Page 5: ...midity to85 RH in 5 increments For drier air press the pad and set to a lower percent value For damper air press the pad and set a higher percent value Press to initiate the Auto Start and Auto stop feature Low fan indicator light High fan indicator light Bucket full indicator light Continuous operation on indicator light Timer on off indicator light Continuous Operation Pad Press to activate the ...

Page 6: ...ed Press the pad again The Timer Off indicator light turns on indicating that Auto Stop has begun Press or hold the UP or DOWN pad to change the Auto time in 0 5 hour incre ments up to 10 hours then in 1 hour increments up to 24 hours The system counts down the time remaining until start The selected time will register in 5 seconds and the system will automatically revert back to display the previ...

Page 7: ...rille Water bucket 1 2 3 4 5 1 2 3 4 All pictures in the manual are for explanation purposes only The actual shape of the unit you purchased may be slightly different but its operations and functions are the same 5 1 2 3 4 6 6 Handle both sides 1 2 3 Front Accessories NOTE crew 2pcs Aa A S 6 PARTS IDENTIFICATION P arts Identification Power cord and plug ...

Page 8: ... residential A dehumidifier operating in a basement will have little to no effect in drying an adjacent enclosed storage area such as a closet unless there is adequate air circulation in and out of the area applications only This dehumidifier should not be used for commercial or industrial applications enough to support the unit with a full bucket of water level floor strong for good air circulati...

Page 9: ...Fig 5 Fig 6 2 Continuous draining Water can be automatically emptied into a floor drain Fig 8 Plastic cover Drain hose Adaptor Fig 7 Drain hose subassembly Fig 9 Connector Drain hose Fig 10 Water hose Female threaded end OPERATING THE UNIT 5 16 1 8mm not included with a end I D not included Make sure the hose is secure so there are no leaks Direct the hose toward the drain making sure that there a...

Page 10: ...re and cleaning of the dehumidifier Turn the dehumidifier off and remove the plug from the wall outlet before cleaning 1 Clean the grille and housing Use water and a mild detergent Do not use bleach or abrasives Do not splash water directly onto the main unit Doing so may cause an electrical shock cause the insulation to deteriorate or cause the unit to rust The air intake and outlet grilles get s...

Page 11: ...s too low below 5 C 41 F There is a kerosene heater or something giving off water vapour in the room O O The unit is loud when operating The air filter is clogged The unit is tilted instead of upright as it should be The floor surface is not level Frost appears on the coils This is normal The dehumidifier has an auto defrost feature Water on floor Hose to connector or hose connection may be loose ...

Page 12: ...rvice technicians at our toll free service line at 1 866 206 0888 from 8 AM to 6 PM Monday to Friday Eastern Standard Time RONA reserves the right to repair or replace the defective product at its discretion The product is guaranteed for 60 months if used for normal trade purposes All warranties are invalid if the product has been overloaded or subject to neglect improper use or an attempted repai...

Page 13: ...il 18 tilisation de U U I appareil Attention Renseignements liés à l électricité TOUCHES DE COMMANDE DU DÉSHUMIDIFICATEUR Retrait de I eau recueillie ENTRETIEN ET MAINTENANCE CONSEILS EN MATIÈRE DE DÉPANNAGE 21 ...

Page 14: ...er l appareil l éteindre et le débrancher AVERTISSEMENT ATTENTION électrique ou un incendie peut survenir en raison de la production de chaleur électrique peut survenir Les pièces en plastique peu vent fondre et causer un incendie Un manque d aération peut un incendie L eau peut pénétrer à l inté rieur de l appareil et Unchoc électrique ou un incendie peut survenir Si l appareil bascule l eau peut...

Page 15: ...és Un manque de débit d air peut entraîner une sur chauf fe ou un incendie L appareil se détériorerait en raison des produits chi miques et des solvants présents dans l air ATTENTION Ne pas monter ou s asseoir sur l appareil Vous pouvez vous blesser si vous tombez de l appareil ou Ne pas placer d objets lourds sur le cordon d alimentation et s assurer qu il n est pas compressé l Toujours insérer l...

Page 16: ...ilation Appuyez pour choisir la vitesse HAUTE ou NORMALE Réglez la vitesse à HAUTE pour maximiser la déshumidification Quand l humidité a été réduite et que le fonctionnement silencieux est préférable réglez le ventilateur à la vitesse NORMALE 4 Touchemarche arrêt Appuyez pour mettre l appareil en marche ou l arrêter plus et moins s e h c u o T 7 5 Touchesde réglagede l humidité Le taux d humidité...

Page 17: ...est allumé appuyez d abord sur la touche de minuterie Le voyant de laminuterie d arrêt s allume indiquant que l arrêt automatique est activé voyant de la minuterie de démarrage s allume indiquant que le démarrage automatique est lancé Lorsque l appareil est éteint appuyez d abord sur la touche de minuterie Le voyant de la minuterie de démarrage s allume indiquant que le démarrage automatique est a...

Page 18: ... Roulettes 3 Cordon d alimentation avec fiche 4 Crochet utilisé seulement pour ranger l appareil REMARQUE Toutes les figures dans le manuel sont fournies à titre explicatif seulement La forme réelle de l appareil que vous avez acheté peut être légèrement différente mais les opérations et les fonctions sont les mêmes Accessoires IDENTIFICATION DES COMPOSANTES vidange Vis 2 pcs 17 Fig 2 5 1 2 3 4 6 ...

Page 19: ...tes peuvent se déplacer librement Ne forcez pas les roulettes à rouler sur du tapis et ne déplacez pas l appareil quand le réservoir est plein Il risquerait de basculer et l eau se renverserait Utilisation de l appareil Lorsque vous utilisez le déshumidificateur pour la première fois faites le fonctionner 24 heures Cet appareil est conçu pour fonctionner entre 5 41 et 35 95 Si après avoir été étei...

Page 20: ... plastique Sous ensemble du tuyau de vidange Connecteur Tuyau de vidange Tuyau d eau Bout femelle fileté UTILISATION DE L APPAREIL n éclabousse Installez le tuyau de vidange sur l adaptateur A voir fig 7 placé Retirez le couvercle en plastique de la sortie de vidange à l arrière de l appareil et retirez le bac puis insé re de vidange z le tuyau à travers la sortie de vidange de l appareilet enf on...

Page 21: ...on dans le bac videz le puis rincez le REMARQUE Ne lavez pas le bac au lave vaisselle Replacez le bac comme il se doit pour que l appareil fonctionne 3 Nettoyage du filtre à air Dans des conditions normales de fonctionnement retirez le filtre toutes les deux semaines pour le nettoyer Pour retirer le filtre enlevez d abord le bac puis tirez le filtre vers le bas Lavez le filtre avec de l eau propre...

Page 22: ...d il fonctionne Du givre s accumule sur les serpentins Le filtre à air est bloqué L appareil est incliné alors qu il devrait se trouver en position verticale Le plancher n est pas droit Il y a de l eau sur le plancher ES AS EC et P2 apparaît à l écran Quoi vérifier C est normal Le déshumidificateur comporte une fonction de dégivrage automatique Le raccord du tuyau peut être dévissé Le bac devait ê...

Page 23: ...r parler à un technicien au 1 866 206 0888 du lundi au vendredi de 8 h à 18 h heure standard de l Est RONA se réserve le droit de réparer ou de remplacer le produit défectueux à sa discrétion Ce produit est garanti durant 60 mois si utilisé de façon normale Toute garantie est non valable si le produit a été utilisé en surcharge ou de façon non recommandée ou a fait l objet de négligence ou de répa...

Reviews: