background image

UNDER COUNTER 

installation


-

 DOU415

IX

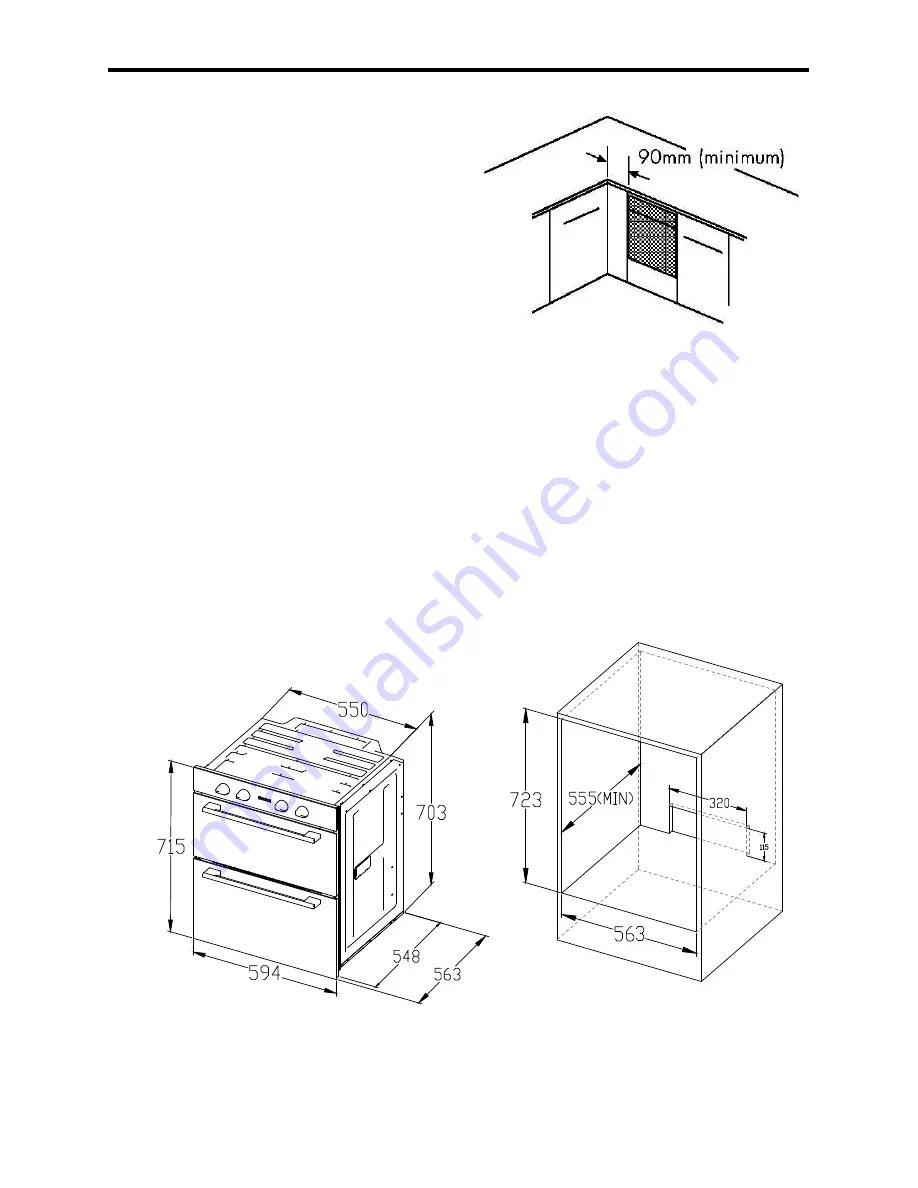
Housing dimensions

The appliance is designed to fit into a


standard 600mm wide housing unit with


minimum internal dimensions as shown.
590mm is to the underside of the worktop


when the appliance is built under, or to 

the underside of the panel above, when 

the appliance is installed into a tall 

h

ousing unit.

do not lift the appliance by the door 

handle.
Whilst every care is taken to eliminate 
burrs and raw edges from this product,


please take care when handling -


we 

recommend the use of protective


gloves 

during installation.
please note that the weight of this


appliance is approximately 

45

kg

(unpacked). Take care when lifting it


into 

the housing unit - always use an


appropriate method of lifting

L

eave the 

fixing screws

 in the base


tray 

packaging until you are ready to


install it.


If this appliance is to be installed near to


a corner where the adjacent cabinets run


at right angles forward of the appliance,


there must be a gap of at least 90mm


between the appliance and the cabinets,


to prevent overheating of the cabinets.

25

Summary of Contents for DOI415IX

Page 1: ...lt in Built Under Electric Oven Read these instructions carefully before using your oven and keep it carefully If you follow the instructions your oven will provide you with many years of good service SAVE THESE INSTRUCTIONS CAREFULLY ...

Page 2: ......

Page 3: ... using your product as we have endeavored to answer as many questions as possible and provide you with as much support as we can Alternatively general information spares and service information are available from our website www nordmende ie ww nordmende co Keep this manual in a safe place for future reference Ensure that other people using the product are familiar with these instructions as well ...

Page 4: ...aces WaRnInG Servicing should only be carried out only by authorised personnel The appliance must never be disconnected from the mains supply during use as this will seriously affect the safety and performance of the appliance particularly in relation to surface temperatures becoming hot The cooling fan is designed to run on after the control knob has been switched off Do not spray aerosols in the...

Page 5: ...s to clean this appliance WARNING The appliance must not be installed behind a decorative door in order to avoid overheating Always take care when removing food from the oven as the area around the cavity may be hot Always use oven gloves when handling any utensils that have been in the oven as they will be hot Always make sure that the oven shelves are resting in the correct position between two ...

Page 6: ...ain Cavity Fan Only DOI415IX Eye Level Double Oven Top Oven Grill Conventional Oven Main Cavity Multi Function This user manual is used for an eye level built in double oven DOI415IX which is multi functional and an under counter double oven which is fan only in the main cavity 5 ...

Page 7: ...f the shelf to position it under the grill Turn the temperature knob to the MAX position or adjust the heat by selecting a higher or lower shelf position For toasting and for grilling foods such as bacon sausages or steaks use a higher shelf position For thicker foods such as chops or chicken joint pieces use a middle to low shelf position To switch off turn the control knob to the off position Us...

Page 8: ...oven must be preheated when cook ing frozen or chilled foods and we rec ommend preheating for yeast mixtures batters soufflés and whisked sponges preheat the oven until the indicator light switches off for the first time this will take up to 15 minutes depending on the temperature selected If you are not preheating the oven the cooking times in the following guide may need to be extended as they a...

Page 9: ...5 mins 20 25 mins 8 12 mins 2 2 hours 10 15 mins 2 3 hours Shortcrust pastry Puff flaky pastry Choux pasrty 200 210 200 210 200 210 1 1 1 Depends on size type of cook ing dish also the filling Biscuits Sponge pudding Milk pudding 160 200 150 140 2 1 1 10 20 mins 30 45 mins 2 2 hours cooking temperatures The temperature settings and time given in the baking guide table below are based on dishes mad...

Page 10: ... oven When cooking sensitive items such as soufflé and Yorkshire puddings or when cooking bread we recommend that the oven is preheated until the light switches off for the first time For any other types of cooking preheating may not be required conventional oven preheating is always required Manual operation fan only the cooling fan The cooling fan may operate when the main oven is on and may con...

Page 11: ...to be reduced please refer to the conversion chart preheating is generally not necessary as a fan oven warms up quickly When batch baking foods that will rise during cooking eg bread always ensure that enough space has been left between the shelves to allow for the rise Notes When 2 or more shelves are being used it may be necessary to increase the cooking time slightly Because the 2 oven shelves ...

Page 12: ...od in a single layer will reduce the thawing time A medium sized casserole or stew will take approximately 3 4 hours A 1 kg 3lb oven ready chicken will take approximately 5 hours remove the giblets as soon as possible Be safe Do not defrost stuffed poultry using this method Do not defrost larger joints of meat and poultry over 2kg 4lb using this method Never place uncooked food for defrosting next...

Page 13: ... cooked at the A efficiency temperature of 160 C Conventional temperature C A Efficiency Oven C 100 110 130 140 150 160 180 190 200 220 230 250 100 110 120 130 140 150 160 170 180 190 200 Food Type Temperature settings C Time Approx Shelf Position Cakes Small cakes Victoria sandwich Semi rich fruit cake Christmas cake Conv 170 180 150 150 fan 160 160 125 125 15 25 20 30 2 5HRS 3HRS 2 5HRS 3HRS 3 3...

Page 14: ...ipe Always use the correct size and shape of tin for the recipe quantities Roast turkey Roasting turkey involves cooking two different types of meat the delicate light breast meat which must not be allowed to dry out and the darker leg meat which takes longer to cook The turkey must be roasted long enough for the legs to cook so frequent bast ing is necessary The breast meat can be covered once br...

Page 15: ...at or poultry calculate the cooking time from the total weight of the meat plus the stuffing For joints cooked in foil or covered roasters and for lidded casseroles add 5 minutes per 450g 1lb to the calculated cooking time Smaller joints weighing less than 1 25kg 2 lb may require 5 minutes per 450g 1lb extra cooking time position the oven shelf so that the meat or poultry is in the centre of the o...

Page 16: ...middle of the oven roast potatoes towards the top bake only The base heat can be used to provide additional brown ing for pizzas pies and quiche Use this function towards the end of cooking Fanned Oven The even temperature in the oven makes this function suitable for batch baking or batch cooking foods Intensive Bake Suitable for food with a high moisture content such as quiche bread and cheese ca...

Page 17: ...er must be set to manual operation before the main oven or grill functions can be used to turn on the main oven step 1 select the function Turn the selector control knob in either direction until the function you require appears in the window step 2 set the main oven control Once you have selected a cooking function then simply turn the main oven temperature control knob to the required temperatur...

Page 18: ...equired temperature using the OVEN GRILL multi function automatic operation See programmer clock section Using the main oven Caution Accessible parts may be hot when the appliance is in use keep children away from the vicinity of the oven Never put items directly on the base of the oven or cover the oven base with foil as this can cause the base element to overheat Manual operation Set the program...

Page 19: ...st symbol ii Turn the main oven control to the light symbol To defrost frozen foods place food in the centre of the oven and close the door To cool foods after cooking prior to refrigeration or freezing place food in the centre of the oven with the door open Be safe Do not defrost stuffed poultry using this method Do not defrost larger joints of meat or poultry over 2kg 4lb using this method Never...

Page 20: ...and the Duration icon will flash to get your attention Also 0 00 will be shown on the screen and it will start buzzing 2 times every 5 seconds Press any button to stop 2 During the cooking duration by pressing you can check and change the the cooking duration 20 Duration End Time Button 2 Minus Button 3 Plus Button 4 Lock Set alarm 1 Press and the alarm icon will begin to flash which means the ala...

Page 21: ...ll turn off 2 If the time setting is changed after setting the alarm duration and end time the alarm will not be changed and duration and end time will reset Lock function Press lock button for 3 seconds any time the lock function will active and lock icon will display Press lock button for 3 seconds again it will be unlock The icon turns off While in lock mode if any button is pressed it will cau...

Page 22: ...ed using a stainless steel cleaner Sharp objects can mark the surface of stainless steel but will become less noticeable with time Wipe any spillage immediately taking care to avoid burning your hands Some foods are corrosive eg vinegar fruit juices and especially salt they can mark or damage the metal if they are left on the surface Baby oil can be used to restore stainless steel finishes but onl...

Page 23: ...lly into the stop position To remove the glass panel open the door wide push the clips on the left and right sides of door bracket Then remove the plastic top cover Hold the glass and slide it out along the door bracket 1 PUSH 2 PULL OUT Glass To remove the door open the door to the maximum angle Then pull the buckle at the door hinge backward Close the door to an angle approximately 30 Hold the d...

Page 24: ...lass panel be damaged we strongly recommend that it is replaced immediately Shelf Runners Shelf runners can be removed to enable you to clean them thoroughly Make sure they are cool to touch and then grasp the runners and slide out of their hanging holes Pull out to clean CLEANING BULB REPLACEMENT For replacement process as follows 1 Disconnect power from the mains outlet or switch off the circuit...

Page 25: ...urrs and raw edges from this product please take care when handling we recommend the use of protective gloves during installation please note that the weight of this appliance is approximately 45kg unpacked Take care when lifting it into the housing unit always use an appropriate method of lifting Leave the fixing screws in the base tray packaging until you are ready to install it If this applianc...

Page 26: ...STALLATION SECURING THE OVEN TO THE CABINET 1 Fit oven into the cabinet recess 2 Open the oven door 3 Secure the oven to the kitchen cabinet with two distance holders A which fit the holes in the oven frame and fit the two screws B 26 ...

Page 27: ... The symbol on the product indicates that this product may not be treated as household waste Instead it shall be handed over to the applicable collection point for the recycling of electrical and electronic equipment Disposal must be carried out in accordance with local environmental regulations for waste disposal For more detailed information about treatment recovery and recycling of this product...

Page 28: ......

Reviews: