background image

UK - 4 -

Installation and Switching On The Appliance

• This appliance is connecting to 220-240V and 50 Hz.

• You can offer help from the service to install and switching on the appliance.

• Before making the connection to the power supply,ensure that the voltage on the

name plate corresponds to the voltage of electrical system in your home.

• Insert the plug into a socket with an efficient ground connection. If the socket has no

ground contact or the plug does not match, we suggest you to call an authorised
electrician for assistance.

• The plug should be accessible after the appliance is positioned.

• Manufacturer is not responsible for failure to complete the

ground connection as described in this booklet.

• Do not place the appliance in direct sunlight.

• Do not use in open air and shall not be exposed to the rain.

• Place the appliance far from heat sources and in a well-ventilated

position. The freezer should be at least 50 cm from radiators,
gas or coal stoves and 5 cm far from electrical stoves.

• Keep the top free for at least 15 cm.

• Do not place heavy and lots of things on the appliance.

• If the appliance is installed next to another freezer, observe a

minimum distance of 2 cm to prevent condensation.

• Fit the plastic wall spacers to the condenser at the back of the

refrigerator in order to prevent leaning to the wall for good
performance.

• The appliance must be stand firmly and level on the floor Use

the two front levelling-feet to compensate for an even floor.

• The outside of the appliance and the accessories inside should

be cleaned with a solution of water and liquid soap; the inside
of the appliance with sodium bicarbonate dissolved in lukewarm
water. After drying replace all the accessories.

Before Switching On

• Wait 3 hours before plugging the appliance in to the main power

to ensure proper performance.

• There can be an odour when you first switch on the appliance.

It will disappear after the appliance starts to cool.

Summary of Contents for RUF146WHA+

Page 1: ...TM FREEZER Instruction booklet STAND GEFRIERSCHRANK Bedienungsanleitung RUF146WHA...

Page 2: ......

Page 3: ...VARIOUS FUNCTION AND POSSIBILITIES 5 Thermostat Setting 5 Ice Tray 6 ARRANGING FOOD IN THE APPLIANCE 6 CLEANING AND MAINTENANCE 7 Defrosting the Freezer compartment 8 TRANSPORTATION AND CHANGING OF I...

Page 4: ...remove the lock as a safety measure before storing it to protect children while playing might lock themselves inside Old refrigerators and freezers contain insulation gases and refrigerant which must...

Page 5: ...e the plastic scraper provided Do not plug the power supply with wet hands Do not place containers glass bottles or tin containers of liquids into the freezer especially gassy liquids as they could ca...

Page 6: ...ventilated position The freezer should be at least 50 cm from radiators gas or coal stoves and 5 cm far from electrical stoves Keep the top free for at least 15 cm Do not place heavy and lots of thing...

Page 7: ...of the compartments By rotating the knob from position 1 to 5 colder temperatures can be obtained Freezer Thermostat Setting 0 This position shows thermostat is closed and no cooling is available 1 2...

Page 8: ...riod of time Turning On The Appliance Once the appliance has been connected to the power supply make sure that the RED lamp is on Then turn the freezer thermostat dial to position 5 SUPER FREEZING unt...

Page 9: ...ces of the unit in the shortest possible time If a package of frozen food shows the sign of humidity and abnormal swelling it is probable that it has been previously stored at an unsuitable temperatur...

Page 10: ...t with dry hands You should clean the condenser back of the appliance with broom once a year in order to provide energy saving and increase the productivity THE POWER SUPPLY MUST BE DISCONNECTED After...

Page 11: ...cold Defrosting will be most effective if carried out when the freezer is nearly empty and it should be carried out as quickly as possible to prevent undue increase in temperature of the contents Do...

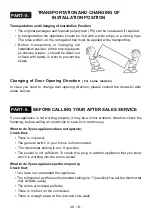
Page 12: ...c after sales service For some models PART 6 BEFORE CALLING YOUR AFTER SALES SERVICE If your appliance is not working properly it may be a minor problem therefore check the following before calling an...

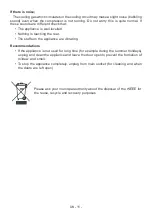
Page 13: ...s touching the rear The stuffs on the appliance are vibrating Recommendations If the appliance is not used for long time for example during the summer holidays unplug and clean the appliance and leave...

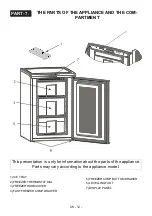
Page 14: ...E TRAY 2 FREEZER THERMOSTAT DIAL 3 FREEZER ROOM COVER 4 FAST FREEZER COMP DRAWER 5 FREEZER COMP BOTTOM DRAWER 6 LEVELLING FOOT 7 DISPLAY PANEL This presentation is only for information about the parts...

Page 15: ...proved to BS1362 for any other reason please follow the instructions below on how to wire a 13 amp 3 pin plug How to wire a 13 amp plug Important The wires in the mains lead on this appliance are colo...

Page 16: ...HIEDENE FUNKTIONEN UND M GLICHKEITEN 18 Thermostat einstellen 18 Anzeigelampen 19 Einschalten des Ger ts 19 Eisschale 20 LEBENSMITTEL IN DEN GEFRIERSCHRANK LEGEN 20 REINIGUNG UND WARTUNG 21 Gefrierrau...

Page 17: ...u ver hindern dass spielende Kinder sich selbst einsperren und in Lebensgefahr geraten Alte K hlschr nke und Gefrierger te enthalten Isolier und K hlmittel die sachgerecht entsorgt werden m ssen Ihre...

Page 18: ...ab Legen Sie keine Beh lter z B Glasflaschen oder Blechbeh lter mit Fl ssigkeiten in den Gefrierschrank insbesondere wenn diese kohlen s urehaltig sind da die Beh lter beim Einfrieren platzen k nnten...

Page 19: ...5 cm Abstand zu Elektroherden aufgestellt werden ber dem Ger t m ssen Sie mindestens 15 cm Abstand einhalten Sorgen Sie daf r dass keine schweren Gegenst nde auf dem Ger t platziert werden und dass si...

Page 20: ...halten Sie tiefere Temperaturen Thermostat Einstellungen f r den Gefrierschrank 0 In dieser Position ist das Thermostat geschlossen und die K hlung ist ausgeschaltet 1 2 F r die Kurzzeitlagerung von L...

Page 21: ...Gr ne Lampe Rote Lampe Einschalten des Ger ts Wenn der Netzstecker an die Steckdose angeschlossen ist vergewissern Sie sich dass die ROTE Lampe leuchtet Stellen Sie dann den Thermostatregler auf Posit...

Page 22: ...den Wenn die Verpackung der Tiefk hlkost Feuchtigkeit aufweist bzw auff llig gew lbt ist besteht die M glichkeit dass diese bereits unsachgem gelagert wurde und der Inhalt verdorben ist Die Lagerdauer...

Page 23: ...g beendet ist stecken Sie den Netzstecker wieder mit trockenen H nden in die Steckdose ein Reinigen Sie den Kondensator R ckwand des Ger tes einmal j hrlich mit einem Besen um eine bessere Leistung zu...

Page 24: ...inem sauberen Tuch trocken Wenn das Ger t abgetaut ist legen Sie das Gefriergut wieder in den Gefrierschrank Diese Lebensmittel sollten dann in kurzer Zeit aufgebraucht werden TEIL 5 TRANSPORTIEREN UN...

Page 25: ...nd in diesem Fall stellen Sie das Thermostat auf den geeigneten h heren Wert die T ren einwandfrei geschlossen sind der Kondensator staubfrei ist ausreichender Abstand zu R ckwand und Seiten vorhanden...

Page 26: ...ISSCHALE 2 THERMOSTATREGLER 3 GEFRIERRAUMABDECKUNG 4 SCHNELLGEFRIERFACH SCHUB 5 GEFRIERRAUM UNTERES SCHUBFACH 6 SCHRAUBF SSE 7 ANZEIGELAMPEN Diese Abbildung dient lediglich der Veranschaulichung Die T...

Page 27: ......

Page 28: ...52076886...

Reviews: