background image

Installation

A 1-37

E

2000 Nordson Corporation

All rights reserved

41-3000

V

Issued 5/00

A3EN-04-[3V-A-AAXP]-12

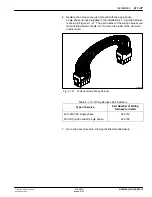
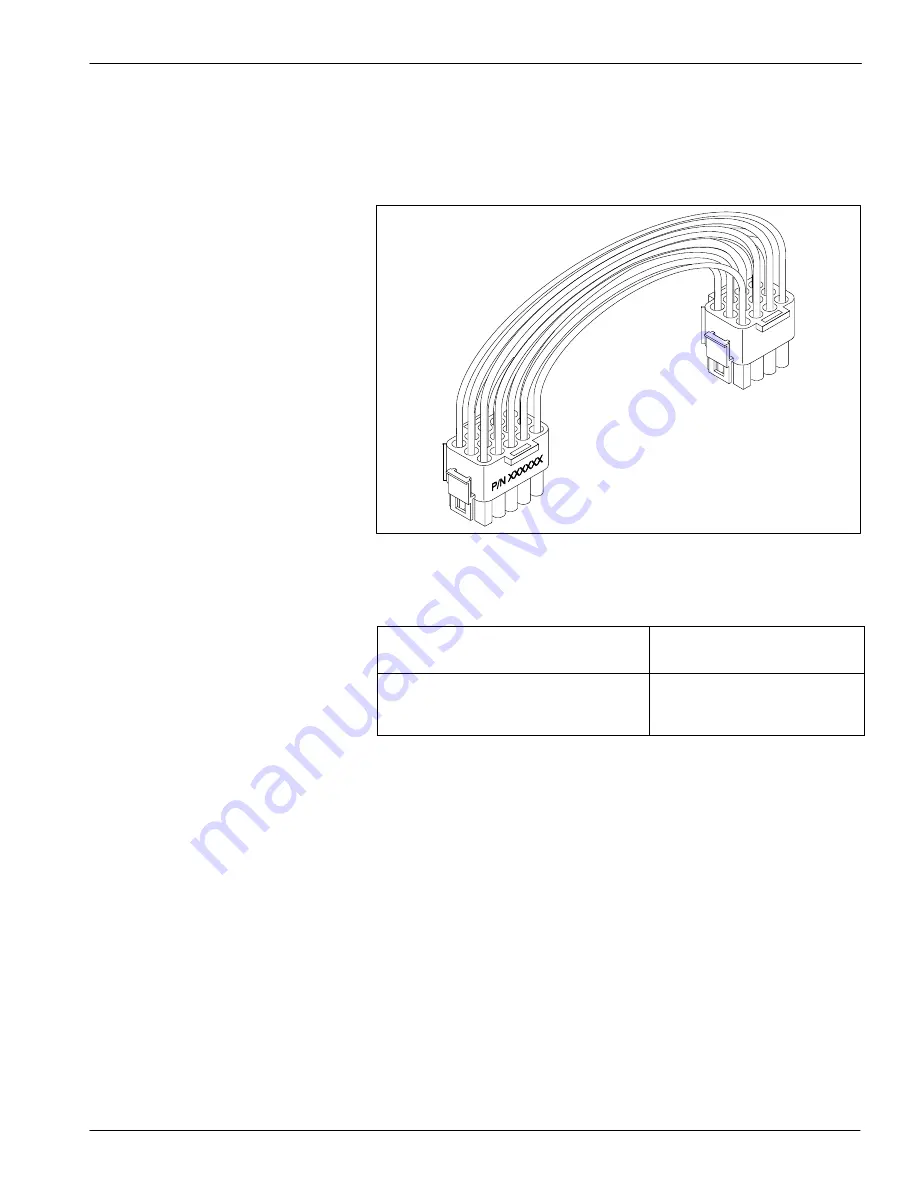
6. Replace the harness you just removed with the appropriate

single-phase harness supplied in the installation kit. A wiring harness

is shown in Figure A 1-27. The part number of the wiring harness you

must install is listed in Table A 1-10 and on the label of the electrical

enclosure lid.

4130428

Fig. A 1-27 Contactor Board Wiring Harness

Table A 1-10 Wiring Harness Part Numbers

Type of Service

Part Number of Wiring

Harness to Install

200--240 VAC single phase

232 719

230 VAC (with neutral) single phase

232 709

7. Go to the next procedure,

Closing the Electrical Enclosure

.

Summary of Contents for 3000V Series

Page 1: ...tion All rights reserved 41 3000V Issued 5 00 A3EN 04 3V A AAXP 12 Part A Section 1 Installation This section Covers the following unit configurations Model All Voltage 1 2 3 Pump All Manifold All Con...

Page 2: ...Installation A 1 0 E 2000 Nordson Corporation All rights reserved 41 3000V Issued 5 00 A3EN 04 3V A AAXP 12...

Page 3: ...nstructions Besides using normal care you need no special instructions to unpack the unit or the equipment you purchased with it All hoses and guns are shipped in separate packages After unpacking the...

Page 4: ...ion section of this manual S An operator can reach all controls S Maintenance personnel have room to service and repair the unit S Installers can route the hoses without bending them The minimum bend...

Page 5: ...th the minimum length of wire needed A long wire can act as an antenna for electrical noise The power requirements of your hoses and guns must be determined to make sure that you do not overload the u...

Page 6: ...Community find the packet of adhesive backed local language warning tags that was shipped with the unit Overlay the non English language part of the tags already on this unit with the tags from the p...

Page 7: ...n Corporation All rights reserved 41 3000V Issued 5 00 A3EN 04 3V A AAXP 12 6 See Figure A 1 2 Secure the unit to the mounting surface with the bolts you removed in step 1 4130009A Fig A 1 2 Securing...

Page 8: ...s 3500V or Series 3700V unit you will find two strainers 2 Series 3500V and 3700V units only See Figure A 1 3 Determine the correct strainer to use for your adhesive the small strainer or the large st...

Page 9: ...ton pumps If your unit has a gear pump which is motor driven you do not need to connect air to your unit To determine which kind of pump your unit has see Figure A 1 4 If your unit has a gear pump go...

Page 10: ...supply line to isolate the unit from the air supply for maintenance procedures 3 Connect a supply of clean dry air to the input air fitting or shutoff valve NOTE To achieve the rated adhesive output o...

Page 11: ...ectric Gun S To Install a Hand Operated Gun NOTE Air operated and electric guns are also referred to as automatic guns 4130692 Fig A 1 6 Air Operated Gun left Electric Gun center and Hand Operated Gun...

Page 12: ...ect a triggering device to the driver S Connect a hose to the gun Instructions for connecting the hose and gun cordsets are given later in this section Refer to Connecting Gun and Hose Cordsets To Ins...

Page 13: ...ion Procedures for Externally Circulating Systems at the end of this section 1 Follow the instructions in the gun manual to connect a hose to each gun but do not connect the gun cordsets at this time...

Page 14: ...s than six hoses you can use hose port number 2 for the first hose NOTE A To install six hoses your unit must have the ability to heat six hoses Check to see if your unit has six hose electrical recep...

Page 15: ...ration All rights reserved 41 3000V Issued 5 00 A3EN 04 3V A AAXP 12 5920010 P N 111 940 X 13 mm 0 50 in R 203 mm 8 00 in P N 271 486 8 mm 5 16 in P N 274 174 16 mm 5 8 in X P N 274 174 29 mm 1 1 8 in...

Page 16: ...d with the unit and apply an anti seize compound to the threads Thread the fitting into the hose port 4103398A Fig A 1 9 Threading the Hose Connector Fitting into the Hose Port 7 Tighten the fitting w...

Page 17: ...hether you are installing an automatic gun or a hand operated gun An automatic gun is either air operated or electrically operated A hand operated gun is manually operated see Figure A 1 6 2 Follow th...

Page 18: ...e you connected to the manifold 5 See Figure A 1 10 Connect this hose plug to electrical receptacle number 1 on the unit 6 If you have additional guns and hoses continue connecting gun and hose cordse...

Page 19: ...ect switch 2 See Figure A 1 11 Loosen the captive screws on the electrical enclosure lid lift the lid from the unit and prop it against the pump cover Take care not to disconnect the ground wire 3 Mak...

Page 20: ...ock See Figure A 1 12 to determine whether your pump has a triggering solenoid valve 1 If your pump does not have this valve skip to the next procedure Connecting Output Contacts Optional 4130879A 1 2...

Page 21: ...whichever is most convenient for your operation and install a strain relief 4 in the hole Refer to the following table for the appropriate size strain relief NOTE Your unit may have several knockout h...

Page 22: ...of a system fault condition This output is typically used to turn on a light or to sound an alarm System Ready Used to signal a device that will alert remotely located operators that the system is rea...

Page 23: ...ck TB2 3 Make sure your installation meets these requirements S Use 0 34 0 25 mm2 22 24 AWG stranded wire that is suitable for National Electrical Code NEC Class 1 remote control and signaling circuit...

Page 24: ...ready 5 6 NOTE A The output contacts are not polarity sensitive It does not matter which wire is inserted into a position 8 Connect the plug to TB2 See Figure A 1 13 for the location of TB2 9 Go to t...

Page 25: ...n relief to protect wires from being damaged by the edges of the knockout hole CAUTION Circuit boards can be easily damaged Avoid any contact with circuit boards when removing a knockout hole plug 2 I...

Page 26: ...ilure to install ferrites as shown can result in equipment damage personal injury or death Ferrites must not come into contact with an energized component 4 See Figure A 1 14 Route the input wires fro...

Page 27: ...e A 1 4 4130254 X6P 1 2 3 4 Fig A 1 15 Terminal Block X6P on the Pattern Control Driver Board 1 Position 1 2 Position 2 3 Position 3 4 Position 4 Table A 1 4 Connections for Trigger and Enable Disable...

Page 28: ...the type of trigger signal you wish to use Refer to Table A 1 5 4130271 JPR1 1 2 3 Fig A 1 16 Jumper 1 JPR1 on the Pattern Control Driver Board 1 Position 1 2 Position 2 3 Position 3 Table A 1 5 Conn...

Page 29: ...ppropriate connections Refer to Table A 1 6 4130255 1 2 X3P X4P 1 2 Fig A 1 17 Terminal Blocks X3P and X4P on the Pattern Control Driver Board 1 Position 1 2 Position 2 Table A 1 6 Connections for Sol...

Page 30: ...the Electrical Enclosure in this section 2 See Figure A 1 18 Locate the identification plate on your unit 4130690A 1 2 3 4 5 6 Fig A 1 18 Location of Identification Plate 3 See Figure A 1 19 Determine...

Page 31: ...240V 1 200 240 VAC 1 two wire service without a neutral 200 240 VAC 3 three wire service without a neutral 3 N PE AC 400 230V 2 230 VAC 1 two wire service including a neutral 400 230 VAC 3 four wire s...

Page 32: ...can be easily damaged Avoid any contact with circuit boards when removing a knockout hole plug 6 If you have not already done so remove and discard the plug from a knockout hole on either the back sid...

Page 33: ...1 when you open the operator panel Excess wiring can be pinched when you close the panel causing equipment damage personal injury or death 8 See Figure A 1 20 Route the electrical service line through...

Page 34: ...e different sizes of cable strap are provided one is attached to the unit just below the power board and the other two are included in the ship with kit 4130763 1 2 Fig A 1 21 Installing the Cable Str...

Page 35: ...s including a neutral 230 VAC 1 Illustration C A Two wires without a neutral 200 240 VAC 1 Illustration D B NOTE A If the VOLTS ac label on your unit is 3 N PE AC 400 230V voltage code 2 your unit is...

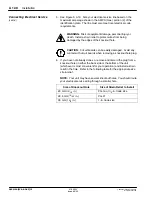
Page 36: ...e power CAUTION Units with 400 Vac 3 without neutral service are factory wired for three phase operation only and cannot be modified for single phase operation If you install a single phase voltage pl...

Page 37: ...isted in Table A 1 9 and on the label of the electrical enclosure lid Table A 1 9 Voltage Plug Part Numbers Type of Service Part Number of Single Phase Plug to Install 200 240 VAC single phase 227 567...

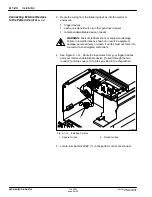
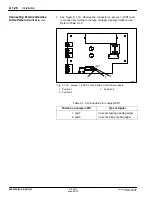
Page 38: ...f the electrical enclosure as shown in Figure A 1 26 4130550 2 1 Fig A 1 26 Location of Contactor Board 1 Contactor board 2 Wiring harness X1C X2C 4 If your unit has a contactor board go to step 5 If...

Page 39: ...is shown in Figure A 1 27 The part number of the wiring harness you must install is listed in Table A 1 10 and on the label of the electrical enclosure lid 4130428 Fig A 1 27 Contactor Board Wiring H...

Page 40: ...f the unit and secure it with the captive screws 4 Remove the lock out and turn on the power at the branch circuit disconnect switch Before running your unit follow the procedures in this part of the...

Page 41: ...int temperature is entered After a setpoint is entered the display will show the setpoint that was entered as the default when power is turned on S The Actual Temperature display shows the room temper...

Page 42: ...rmal operation STANDBY Temperature This feature sets the desired temperature to which a zone will be reduced when the system is in the standby mode CLOCK SET TIME This feature keeps the current day an...

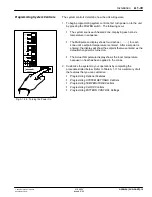
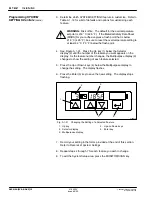
Page 43: ...ress the Move Up 1 and Move Down 2 keys until the SYSTEM SETTINGS light turns on When you select SYSTEM SETTINGS the following occur S The values in the Displays area change S The number in the Select...

Page 44: ...display 2 until the number of the feature you want appears on the display As the feature number changes the Multipurpose display 3 changes to show the setting of each feature selected 5 Press the Up o...

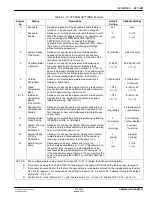
Page 45: ...degree to which a temperature may deviate for an individual zone before the system initiates a warning See Note C 17 30 _C _F 6 28 10 50 _C _F 20 Sequential or Simultaneous Startup Allows you to speci...

Page 46: ...res 32 Auto Energize Pump Temperature Setting Piston pump units only Allows you to determine when the pump automatically starts if you are using the auto energize pump feature Feature No 24 You can ha...

Page 47: ...able A 1 13 Types of Temperature Settings Setting Description Setpoint Temperature Desired temperature of a zone during normal operation Standby Temperature Temperature to which a zone will be reduced...

Page 48: ...ting Zone Numbers Zone Number Zone Type See Note A INTERNAL HOSE GUN 0 Set All See Note B 1 Tank Hose 1 Gun 1 2 Grid See Note C Hose 2 Gun 2 3 Hose 3 Gun 3 4 Hose 4 Gun 4 5 See Note D Hose 5 Gun 5 6 S...

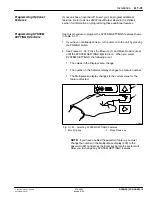
Page 49: ...r than the operating temperature S Before programming any temperature settings make sure that the overtemperature setpoint is at least 14 _C 25 _F higher than the highest operating setpoint used Refer...

Page 50: ...press the Enter key before the system will allow you to change any of the temperature setpoints 3 If you want to select the hose zone type or the gun zone type instead of the internal zone type press...

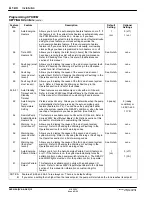
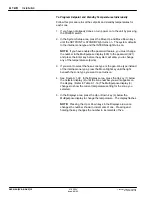
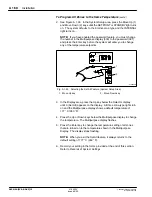
Page 51: ...ne that you wish to customize and repeat this procedure until you have set temperatures for all zones To Program All Zones to the Same Temperature Follow this procedure to set all zones to the same te...

Page 52: ...5A 1 2 Fig A 1 33 Selecting the Set All Feature System Setup Area 1 Move Up key 2 Move Down key 3 In the Display area press the Up key below the Selector display until 0 Set All appears on the display...

Page 53: ...turned on the unit will resume normal operations You do not need to reprogram any features controlled by the clock NOTE The clock does not automatically adjust for seasonal time shifts such as daylig...

Page 54: ...y of the week as shown in Table A 1 15 Table A 1 15 Selector Display Codes Shown When Clock Feature is Activated Day Code Day of Week Represented 1 Monday 2 Tuesday 3 Wednesday 4 Thursday 5 Friday 6 S...

Page 55: ...ust be set to come on between 01 00 and 24 00 hours If the clock is set from 00 01 to 00 59 it will not operate Correct Action Yes Press the Enter key to save the setting No Press the Up or Down key b...

Page 56: ...xiting standby and for turning heaters on and off After you have programmed the clock use the CLOCK key to turn the clock feature on and off The CLOCK light turns on when the clock feature is active N...

Page 57: ...the week as shown in Table A 1 16 Table A 1 16 Selector Display Codes Shown When Clock Feature is Activated Day Code Day of Week Represented 1 Monday 2 Tuesday 3 Wednesday 4 Thursday 5 Friday 6 Saturd...

Page 58: ...ars in the display 6 Press the Enter key to save the hour setting The hour shown in the Multipurpose display stops flashing and the minutes flash 7 Press the Up or Down keys until the minutes 3 for wh...

Page 59: ...Table A 1 16 and press the Up key below the Selector display until the day code of the day that you want to change appears in the Selector display 4 Press the Enter key to save the setting The Select...

Page 60: ...M INTERVAL 1 and at 6 30 P M INTERVAL 2 allowing 15 minutes for the system to reach application temperature S Turn the heaters on HEATERS ON Monday through Friday 30 minutes before the start of the fi...

Page 61: ...terns that are applied to a product by both outputs A product may have up to two patterns with each pattern applied by one or more guns Figure A 1 38 provides a graphic illustration of the pattern con...

Page 62: ...Sensor 4 Gun output 1 5 Guns output 2 6 Start point of first bead output 1 7 End point of first bead output 1 8 Start point of second bead output 1 9 End point of second bead output 1 10 Start point...

Page 63: ...set the line speed to 0 and go to step 4 You must also use units of time in the next procedure To Define a Pattern for Output 1 or Output 2 b If you plan to use units of distance to define your patter...

Page 64: ...tep 1 Example 150 ms or 75 mm 3 0 in 2 Estimate the amount of time the gun should fire to give you the desired length of the first bead Example 50 ms 2 Determine the length of the first bead to be app...

Page 65: ...ited to 1 amp per output or 2 amps total per unit Ensure that the guns connected to your unit do not exceed this rating 2 Press the Move Right key See Figure A 1 40 item 3 until the light for the bead...

Page 66: ...play to change the current setting The display flashes 5 Press the Enter key to save the new setting The Multipurpose display stops flashing 6 Repeat steps 2 5 until you have programmed all bead start...

Page 67: ...ght 2 turns on 3 Check the Multipurpose display The display flashes the number of the next available pattern set For example if you have already stored three pattern sets in system memory the Multipur...

Page 68: ...Move Right key to select the bead start or end point to change The current value for the point is shown in the Multipurpose display 4 Use the Up and Down keys to change the setting in the Multipurpos...

Page 69: ...Processing Instructions at the beginning of this manual 1 If you have not already done so program your unit Refer to System Programming Procedures in this section 2 Open the tank lid WARNING Use a me...

Page 70: ...trigger WARNING Hot Risk of burns Wear heat protective clothing safety goggles and heat protective gloves 2 Place a drain pan under each gun and remove all gun nozzles 3 If the unit is not already on...

Page 71: ...ng adhesive 6 Trigger the guns keeping them open so that no pressure builds up NOTE You may need to adjust the gun air pressure depending on the viscosity of the adhesive and the gun response 7 Flush...

Page 72: ...n pump units only adjust the pump air pressure regulator until the air pressure is at the desired operating setting Test adhesive patterns as necessary 13 Air operated guns only adjust the gun air pre...

Page 73: ...adjusting screw in place while using a wrench to loosen the locking nut as much as possible 4130779 Fig A 1 45 Adjusting the Pressure Control Valve 3 Turn the pressure adjusting screw clockwise until...

Page 74: ...00 450 F Hose 1 Hose 1 38 232 C 100 450 F 2 Hose 2 38 232 C 100 450 F 3 Hose 3 38 232 C 100 450 F 4 Hose 4 38 232 C 100 450 F 5 Hose 5 38 232 C 100 450 F 6 Hose 6 38 232 C 100 450 F Gun 1 Gun 1 38 232...

Page 75: ...32 C 100 450 F 5 Hose 5 38 232 C 100 450 F 6 Hose 6 38 232 C 100 450 F Gun 1 Gun 1 38 232 C 100 450 F 2 Gun 2 38 232 C 100 450 F 3 Gun 3 38 232 C 100 450 F 4 Gun 4 38 232 C 100 450 F 5 Gun 5 38 232 C...

Page 76: ...Note A On Off On Off 1 Monday On at 6 00 A M Off at 5 00 P M and 00 01 to 24 00 2 Tuesday On at 6 00 A M Off at 5 00 P M and 00 01 to 24 00 3 Wednesday On at 6 00 A M Off at 5 00 P M and 00 01 to 24...

Page 77: ...xit Enter Exit 1 Monday Enter at 12 00 P M Exit at 1 00 P M and 00 01 to 24 00 2 Tuesday Enter at 12 00 P M Exit at 1 00 P M and 00 01 to 24 00 3 Wednesday Enter at 12 00 P M Exit at 1 00 P M and 00 0...

Page 78: ...Bands 17 _C 30 F From 6 to 28 C From 10 to 50 F Sequential or Simultaneous Startup Sequential 1 Sequential 1 or Simultaneous 0 Display Heater Proportioning No display 0 No display 0 or Show display 1...

Page 79: ...on All rights reserved 41 3000V Issued 5 00 A3EN 04 3V A AAXP 12 Table A 1 26 Record of Air Pressure Settings System Component Air Pressure Setting Pump piston pump units only Gun 1 Gun 2 Gun 3 Gun 4...

Page 80: ...N 04 3V A AAXP 12 Table A 1 27 Record of PATTERN CONTROL Settings Pattern No Output Channel Bead Positions Line Speed Channel First Second Third Fourth 1 1 2 2 1 2 3 1 2 4 1 2 5 1 2 6 1 2 7 1 2 8 1 2...

Page 81: ...2000 Nordson Corporation All rights reserved 41 3000V Issued 5 00 A3EN 04 3V A AAXP 12 Pattern No Output Channel Bead Positions Line Speed 14 1 2 15 1 2 16 1 2 17 1 2 18 1 2 19 1 2 20 1 2 21 1 2 22 1...

Page 82: ...ault has occurred Fault Code 5 Control board is bad Fault Code 1 Zone is below setpoint Fault Code 6 Brownout has occurred temperature Fault Code 7 Pattern control board is faulty Fault Code 2 RTD is...

Page 83: ...Notes NOTE A Warning Code 0 No warning has occurred Warning Code 6 Not used Warning Code 1 Not used Warning Code 7 Pattern control driver Warning Code 2 RTD is open board is faulty Warning Code 3 RTD...

Page 84: ...Installation A 1 82 E 2000 Nordson Corporation All rights reserved 41 3000V Issued 5 00 A3EN 04 3V A AAXP 12...

Reviews: