Maintenance
5‐18
P/N 213828_11
2014 Nordson Corporation
VersaBlue_PPA
Safety Valve Plate
Installing Service Kit
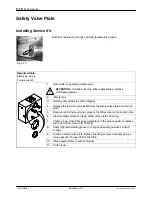
Each kit contains two O‐rings and high‐temperature grease.
Required tools:
Allan key, size 6
Torque wrench
1.
Heat melter to operating temperature.
ATTENTION:
Hot! Risk of burns. Wear appropriate protective
clothing/equipment.
2.
Empty tank.
3.
Detach pump (Refer to section
Repair
).
4.
Release the four fixing screws M8 from the safety valve plate and remove
plate.
5.
Remove old O‐rings and when present, the filter screen in the suction hole.
6.
Clean sealing surfaces on tank, safety valve plate and pump.
7.
If there is one, clean filter screen and place in the groove again, or replace
with a new filter screen (P/N 394072).
8.
Apply high temperature grease to O‐rings and sealing surfaces. Attach
O‐rings.
9.
Screw on safety valve plate. Tighten the fixing screws crosswise using a
torque wrench. Torque: 25 Nm / 220 lbin.
10.
Attach pump (Refer to section
Repair
).
11.
Fill the tank.
Summary of Contents for VersaBlue VA
Page 12: ...Table of Contents X P N 213828_11 2014 Nordson Corporation VersaBlue_PPA...
Page 28: ...Safety Instructions 1 14 P N 213828_11 2014 Nordson Corporation VersaBlue_PPA...
Page 40: ...Introduction 2 12 P N 213828_11 2014 Nordson Corporation VersaBlue_PPA...
Page 62: ...Installation 3 22 P N 213828_11 2014 Nordson Corporation VersaBlue_PPA...
Page 74: ...Operation 4 12 P N 213828_11 2014 Nordson Corporation VersaBlue_PPA...
Page 142: ...Operation 4 80 P N 213828_11 2014 Nordson Corporation VersaBlue_PPA...
Page 174: ...Maintenance 5 26 P N 213828_11 2014 Nordson Corporation VersaBlue_PPA...
Page 204: ...Troubleshooting 6 30 P N 213828_11 2014 Nordson Corporation VersaBlue_PPA...
Page 234: ...Repair 7 30 P N 213828_11 2014 Nordson Corporation VersaBlue_PPA...
Page 248: ...Password A 4 P N 213828_11 2014 Nordson Corporation VersaBlue_PPA...
Page 272: ...Glossary D 16 P N 213828_11 2014 Nordson Corporation VersaBlue_PPA...


