background image

11

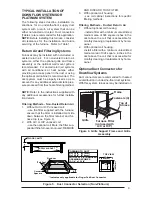
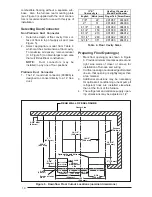
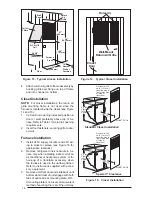
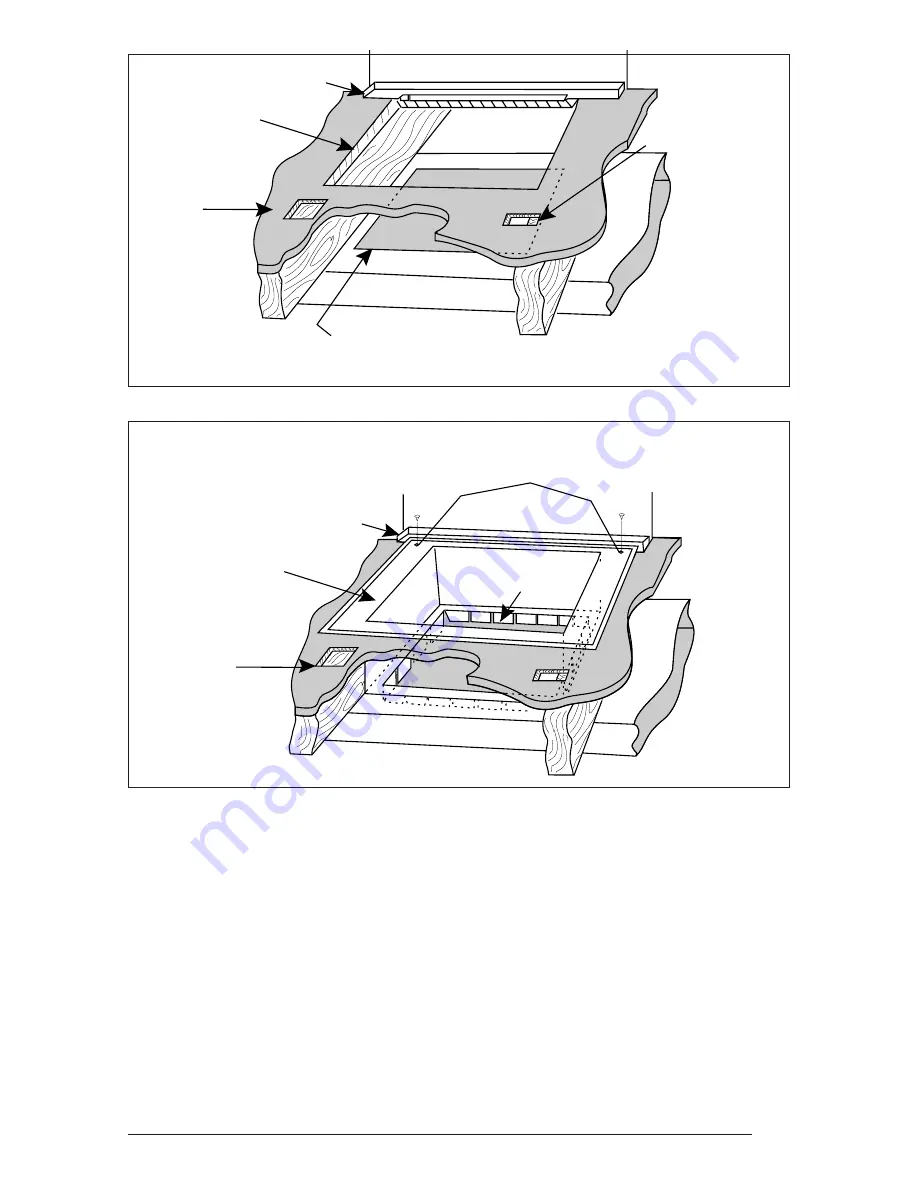
Rear Wall

Cut-out Area

Optional Supply
      Entrance

Mounting 
Plate

Floor 
Opening

Refrigerant 
Line 
Opening

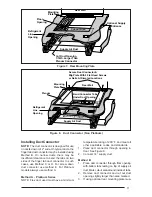
Supply Air Duct

Cut Duct Opening
1/16th. Larger Than 
Plenum Connector

Rear Wall

Secure Duct Connector &
Mtg Plate With 2 Flat Head Screws 
or Nails At Dimpled Locations 

Refrigerant 
Line 
Opening

Supply Air Duct

Mounting 
Plate

Plenum

Bend Connector Tabs
Under Duct Opening

Figure 7.  Rear Mounting Plate

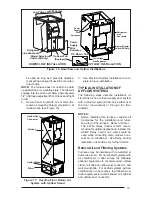
Figure 8.  Duct Connector (Non Platinum)

temperature rating of 200

°

 F and meet all

other applicable codes and standards.

1.

Place duct connector through opening in
floor. See Figure 9.

2.

Connect 14” supply duct.

Method B
1.

Place duct connector through floor opening
with bottom tabs resting on top of supply air
duct. Mark cutout area around inside of tabs.

2.

Remove duct connector and cut out duct
opening slightly larger than area marked.

3.

If using optional rear mounting plate (sup-

Installing Duct Connector

NOTE:  The duct connector is designed for use
on ducts down to 12" wide. On typical ducts, the
finger tab duct connector may be installed using
Method B. On narrow ducts, there may be
insufficient clearance to bend the tabs on two
sides of the finger tab duct connector. In such
cases, use Method C or D. For screw down
duct connector use method E. For Platinum
models always use method A.

Method A - Platinum Series
NOTE: Flex duct used must have a minimum

Summary of Contents for E2EB-010-HB

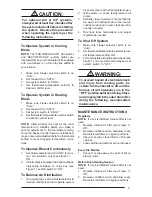
Page 1: ...ervice agency To avoid personal injury or property damage ask a service technician to inspect the furnace and to replace any part of the control system which has been under water SECTION 1 OWNER INFORMATION OPERATING INSTRUCTIONS Before Operating System Before operating your heating cooling system see Figure 1 make sure that Control panel covers are closed Blower and or relay control plugs are plu...

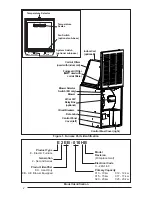
Page 2: ...rnace Parts Identification Model Identification 10 20 30 50 60 70 80 90 SYSTEM HEAT OFF COOL VENTILATE ON AUTO Temperature Selector Temperature Scales System Switch optional sub base Fan Switch optional sub base E 2 EB 010 HB Product Type E Electric Furnace Generation 2 Second Series Product Identifier EH Heat Only EB A C Blower Equipped Model Revision R replacement Electrical Code H 240 1 60 Prim...

Page 3: ...bution 1 On a typical day set thermostat selector to desired comfort level and operate system for several hours with all air registers open 2 With system on check temperature in all rooms 3 Partially close registers in rooms that are too warm in heating mode or too cool in cooling mode and in rooms that are infre quently occupied 4 Re check room temperature and adjust registers as needed To Shut O...

Page 4: ...YNE distributor Optional air conditioners and heat pumps are listed by Underwriters Laboratories UL or Environmental Testing Laboratories ETL and certified by ARI and the Canadian Standards Association CSA orWarnockHerseyorETLC These cooling systems include energy saving components to provide maximum cooling per formance at electrical energy usage levels es tablished by federal standards Refer to ...

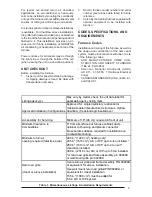
Page 5: ...ordance with one or more of the following codes HUD MANUFACTURED HOME CON STRUCTION AND SAFETY STANDARD Title 24 Part 3280 American National Standards ANSI A119 11 C1 NFPA 7 National Electrical Code CANADIANSTANDARDS C S A Z240 6 1 and Z240 9 1 Table 1 Miscellaneous Listings Installation Requirements Listing agency s May vary by model check the unit data label for applicable agency listing mark Ap...

Page 6: ...ation of 200 or less Noncombustible pans having 1 upturned flanges must be located beneath openings in a floor return duct system Wiring materials located in return duct sys tem must conform to NEC Article 300 22 c Gas piping must not run in or through return air duct system If return air opening is located below top of furnace a minimum clearance must be pro vided between opening and furnace see ...

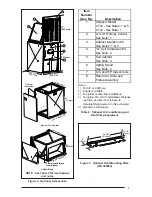
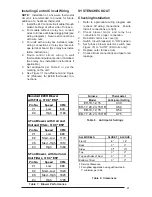
Page 7: ...ow Stand Filters one obtained from furnace 23 3 4 603 mm 20 508 mm 14 357 mm 20 508 mm Cabinet Insulation Upflow Coil Cabinet 23 3 4 603 mm 29 737 mm NOTE See Table 2 for descriptions and notes Figure 2 Optional Accessories 1 2 3 4 7 8 27 686 mm 29 737 mm 20 508 mm 23 3 4 603 mm Item Number See Fig Description 1 4 Speed Blower 4 Ton See Notes 1 5 5 Ton See Note 1 2 A C H P Relay Control See Note 1...

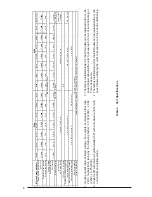
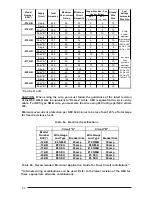
Page 8: ...ote 1 35 000 41 000 53 000 57 000 57 000 70 000 75 000 35 000 41 000 53 000 57 000 57 000 70 000 Watts Total kw Heating Elements and Blower 10 4 12 0 15 4 16 6 16 6 20 4 22 0 10 4 12 0 15 4 16 6 16 6 20 4 Supply Voltage Heating Elements No Total kw 2 10 0 2 11 6 2 15 0 3 16 2 3 16 2 4 20 0 4 21 6 2 10 0 2 11 6 2 15 0 3 16 2 3 16 2 4 20 0 Blower Wheel Size 10 5 Dia 8 Wide Motor Speed H P Rating Amp...

Page 9: ...chosen filtering method NOTE Refer to the instructions supplied with any additional accessories for further installa tion details Filtering Methods Non Ducted Return Air 1 Without A C or H P uncased coil use the filter supplied with the furnace ensure that the filter is installed mat side down between the filter retainer and fur nace top see Figure 4 2 With A C or H P uncased coil use the optional...

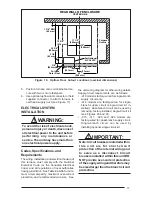
Page 10: ...e for installation of furnace and wiring 2 Cutflooropeningonoutsideedgeofmarked line so that opening is slightly larger than area marked 3 Additional provisions may be necessary for optional air conditioning or heat pump if refrigerant lines are installed elsewhere than at the front of the furnace 4 The refrigerant and entrance supply open ing dimensions may be adjusted 1 2 2 3 8 MIN 60 mm 6 1 4 2...

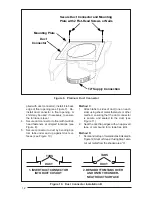
Page 11: ...Figure 9 2 Connect 14 supply duct Method B 1 Place duct connector through floor opening with bottom tabs resting on top of supply air duct Mark cutout area around inside of tabs 2 Remove duct connector and cut out duct opening slightly larger than area marked 3 If using optional rear mounting plate sup InstallingDuctConnector NOTE The duct connector is designed for use on ducts down to 12 wide On ...

Page 12: ...ure connector to duct by bending bot tom tabs under and up against duct sur faces see Figure 10 Figure 10 Duct Connector Installation B Method C 1 Attach tabs to sides of duct one on each side using sheet metal fasteners or other method ensuring that the duct connector is secure and sealed to the duct see Figure 11 2 Seal the duct flap edges with an approved tape or compound for a leak free joint ...

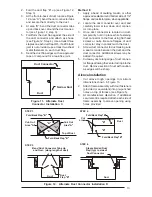
Page 13: ...s discretion if additional securement is required attach each side of frame assembly to alcove opening using holes provided 2 Fold the duct flap B up see Figure 12 Step 3 3 At the front to back of duct run see Figure 12 area A bend the duct connector tabs and secure them directly to the duct 4 At area B bend the duct connector tabs up and back over around the duct connec tor see Figure 12 step 3 5...

Page 14: ...ceInstallation 1 Install 240V supply circuit s and 24V wir ing to closet or alcove see Figure 16 for appropriate locations 2 Remove refrigerant line knockouts in fur nace only when installing indoor coil of an air conditioner or heat pump system or for hook up of a VentilAire accessory when the furnace is used in the upflow position Refer to instructions supplied with acces sory equipment 3 Remove...

Page 15: ...al System Installation to com plete furnace installation TYPICALINSTALLATIONOF UPFLOW SYSTEMS The following steps describe installation in structions for an overhead supply duct system with a return air system that can be either over the floor non ducted or through the floor ducted NOTES Before installing this furnace consider all clearances for the installation and future servicing of the furnace...

Page 16: ...ing if refrigerant lines are installed other than at the front of the furnace 2 If return air duct is made of combustible material locate a pan fabricated of non combustible material with 1 upturned flanges under furnace return air opening 3 Install 240V supply circuit s and 24V wir ing to closet see Figure 16 for appropriate locations 4 Position optional coil cabinet over floor cutout and secure ...

Page 17: ...8 mm 17 1 2 445 mm 14 356 mm 5 3 4 147 mm 3 1 8 80 mm 3 73 mm Furnace Outer Door For Optional A C Or H P REAR WALL OF ENCLOSURE CENTER LINE Furnace Outline 18 5 8 474 mm Figure 19 Upflow Floor Cutout Locations nominal dimensions the unit wiring diagram for other wiring details Supply circuit requirements are as follows 010 model is factory wired for single branch supply circuit only 012 models are...

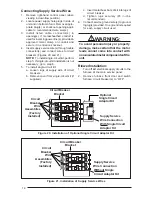
Page 18: ...ngle circuit kit installation is not necessary go to step 6 5 To install single circuit kit a Loosen lugs at supply side of circuit breakers b Remove cover from single circuit kit if supplied Figure 20 Installation of Optional Single Circuit Adaptor Kit Figure 21 Installation of Supply Service Wires c Insert metal buss bars of kit into lugs of circuit breaker d Tighten lugs securely 45 in lbs reco...

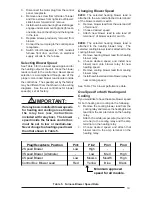
Page 19: ... Speed Data Changing Blower Speed E2EH The selected heating blower lead is attached to the wire lead attached to terminal 2 of the blower selector switch a Remove blower lead from the wire lead off of terminal 2 b Choose desired speed c Attach new blower lead to wire lead off terminal 2 of blower selector switch E2EB The selected heating blower lead is attached to the heating blower relay The sele...

Page 20: ... 48 0 60 60 4 6 10 Dual B 45 5 60 56 4 6 10 012 HB 015 HB 017 HB 020 HB 023 HB 015 HR 2 Wire system maximum wire lengths 24 Ga 55 22 Ga 90 20 Ga 140 18 Ga 225 4 or more Wire systems maximum wire lengths 24 Ga 25 22 Ga 45 20 Ga 70 18 Ga 110 Low Voltage Thermostat Wire Size Ground Wire Size Minimum Circuit Ampacity Maximum Over current Rating Total Amperes Supply Circuit Model Number E2E Can be H or...

Page 21: ... diagram and recheck all wiring connections Ensure that all connections are tight 2 Check blower motor and relay box connectors for proper connection 3 Reinstall control box cover s 4 Switch circuit breaker s to ON position 5 Set furnace blower selector switch see Figure 16 to AUTO EH Units only 6 Replace outer furnace door 7 Check all duct connections and tape for air leakage Table 7 Blower Perfo...

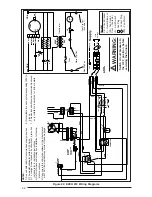
Page 22: ...to the OFF position before servicing the furnace 6 Not suitable for use on systems exceeding 120V to ground 7 This wire is used with some accessories See acces sory Installation Instructions for further details 240V Transformer Cont 1 24V Red Pig Tail White Pig Tail 2 4 Cont 1 CB A CB A IFS Top 10 0 6 E Cont 1 IFS Org 3 See Note 7 Grey Pig Tail Fuse LS 2 3 4 5 1 Grey Black Blue Yellow Red H L C IF...

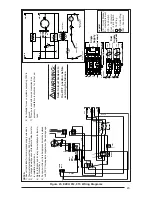
Page 23: ... for further de tails Legend CB Circuit Breaker E Heater Element IFS Fan Switch Cont Contactor LS Limit Switch Fan Plug Control Plug IFM Fan Motor CIRCUIT BREAKERS 60A ON OFF GRD Single Supply standard OR Circuit A Circuit B GRD GRD Ground Dual Supply optional 60A 60A ON ON OFF OFF Ground Line Voltage Ground Line Voltage 60A ON OFF TRANSFORMER 240V 24V 1 2 3 BLOWER SWITCH GREY YELLOW BLACK CONTACT...

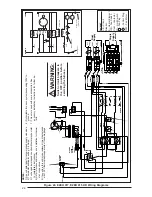
Page 24: ...e accessory Installation Instructions for further de tails Figure 24 E2EH 017 E2EH 015 HR Wiring Diagrams 60A ON OFF GRD Single Supply optional OR Circuit A Circuit B GRD GRD Ground Dual Supply 60A 60A ON ON OFF OFF Ground Line Voltage Ground Line Voltage 60A ON OFF CIRCUIT BREAKERS TRANSFORMER 240V 24V 1 2 3 BLOWER SWITCH BLACK GREY YELLOW BLACK CONTACTOR ORANGE BLACK RED 1 1 2 2 3 3 4 4 5 5 6 6 ...

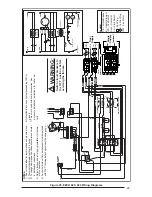
Page 25: ... E Heater Element IFS Fan Switch Cont Contactor LS Limit Switch Fan Plug Control Plug 60A ON OFF GRD Single Supply optional OR Circuit A Circuit B GRD GRD Ground Dual Supply 60A 60A ON ON OFF OFF Ground Line Voltage Ground Line Voltage 60A ON OFF CIRCUIT BREAKERS TRANSFORMER 240V 24V 1 2 3 BLOWER SWITCH BLACK GREY YELLOW BLACK CONTACTOR ORANGE BLACK RED 1 1 2 2 3 3 4 4 5 5 6 6 BROWN WHITE LIMIT BL...

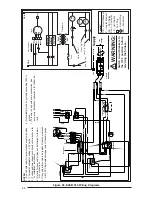
Page 26: ...stallation Instructions for further de tails Legend CB Circuit Breaker E Heater Element IFR Fan Relay Cont Contactor LS Limit Switch Fan Plug Control Plug IFM Fan Motor TRANSFORMER 240V 24V BLOWER RELAYS GREY YELLOW CONTACTOR 1 2 3 4 5 6 GREY WHITE LIMIT BLACK BLACK TOP ELEMENT 10 0 KW ORANGE RED RED RED BLACK BLACK 3 2 1 3 2 1 6 5 4 6 5 4 RED BLUE BLACK VIOLET GREY GREY RED WHITE YELLOW RED GREY ...

Page 27: ...FR2 240V Cont 1 CB A CB B CB B Transformer Top 11 6 15 0 E 24V Red Pig Tail White Pig Tail Green Pig Tail Grey Pig Tail 2 4 3 5 E Fuse CB A Red Jumper Wire See note 8 IFR1 IFR2 Grey Black Blue Yellow Red 6 Org 2 3 4 5 1 ML C IFM H MH L 4 Speed TRANSFORMER 240V 24V BLOWER RELAYS GREY YELLOW CONTACTOR 1 2 3 4 5 6 GREY WHITE LIMIT BLACK BLACK TOP ELEMENT 11 6 15 KW ORANGE RED RED RED BLACK BLACK 3 2 ...

Page 28: ...t Breaker E Heater Element IFR Fan Relay Cont Contactor LS Limit Switch Fan Plug Control Plug IFM Fan Motor IFR1 Cont 1 LS IFR2 240V Cont 1 CB A CB B CB B Transformer Top 11 6 15 0 E 24V Red Pig Tail White Pig Tail Green Pig Tail Grey Pig Tail 2 4 3 5 E Fuse CB A Red Jumper Wire See note 8 IFR1 IFR2 Grey Black Blue Yellow Red 6 Org 2 3 4 5 1 ML C IFM H MH L 4 Speed TRANSFORMER 240V 24V BLOWER RELA...

Page 29: ...nt Contactor LS Limit Switch Fan Plug Control Plug IFM Fan Motor 240V Cont 1 CB B CB B Transformer Bottom 5 4 Top 10 6 E Cont 1 Cont 2 24V Red Pig Tail White Pig Tail Green Pig Tail Grey Pig Tail 2 4 3 5 E Fuse IFR2 LS LS Cont 2 Cont 1 IFR1 CB A CB A Red Jumper Wire See note 8 IFR1 IFR2 Grey Black Blue Yellow Red 6 Org 2 3 4 5 1 ML C IFM H MH L 4 Speed TRANSFORMER 240V 24V BLOWER RELAYS GREY YELLO...

Page 30: ...6 GREY WHITE LIMIT BLACK BLACK BOTTOM ELEMENT 10 0 KW ORANGE RED RED RED BLACK BLACK 3 2 1 3 2 1 6 5 4 6 5 4 RED BLUE BLACK VIOLET GREY GREY RED WHITE YELLOW RED GREY WHITE WHITE GREEN 1 2 3 4 5 6 GREEN GREY BLACK GREEN BLUE ORANGE BLACK RED YELLOW BLACK GREY CONTACTOR LIMIT BLACK TOP ELEMENT 10 0 11 6 KW BLACK RED MH ML L H C BLACK RED See Note 7 BLACK Legend CB Circuit Breaker E Heater Element I...

Page 31: ...ump Thermostat Wire nuts E2EB FURNACE Control Plug 6 pin matrix 2 WireThermostat Wire nuts Figure 31 E2EB Thermostat Connection Typical AC R G W Y Yellow Black PLATINUM THERMOSTAT Yellow or Blue White Green Red Wire from furnace to Platinum unit Green White Red Yellow or Blue Red and white t stat wire connected by OEM Wire from thermostat to furnace R G W Y Grey White Red Green Grey or Green White...

Page 32: ...talled properly Yes No N A Is roof assembly installed properly Yes No N A Is roof assembly a minimum of 3 inches from any other vents Yes No N A General Is filter in place Yes No N A Is owner s packet included Yes No N A Checked storage area for damage to product and proper storage Yes No N A Is installation in accordance with installation instructions Yes No N A Comments Please Write In Appropria...

Reviews: