background image

Please read this information thoroughly and become familiar with the capabilities and 
use of your appliance before attempting to operate or maintain this unit. Keep this 
literature where you have easy access to it in the future. If a problem occurs, check the 
instructions and follow recommendations given. If these suggestions don’t eliminate 
the problem, call your servicing contractor.

The Installation Instructions are primarily intended to assist qualifi ed  individuals 
experienced in the proper installation of this appliance. Some local codes require licensed 
installation/service personnel for this type of equipment. Please read all instructions 
carefully before starting the installation.

DO NOT DESTROY. PLEASE READ CAREFULLY AND 

KEEP IN A SAFE PLACE FOR FUTURE REFERENCE.

IMPORTANT

SPLIT SYSTEM HEAT PUMP - R-22

USER’S MANUAL / INSTALLATION INSTRUCTIONS

JT5BD Series

13 SEER

Summary of Contents for JT5BD Series

Page 1: ... eliminate the problem call your servicing contractor The Installation Instructions are primarily intended to assist qualified individuals experiencedintheproperinstallationofthisappliance Somelocalcodesrequirelicensed installation service personnel for this type of equipment Please read all instructions carefully before starting the installation DO NOT DESTROY PLEASE READ CAREFULLY AND KEEP IN A ...

Page 2: ...Ton Units 18 Refrigerant Charging Tables Heating Mode 19 Table 11 JT5BD 018K 1 5 Ton Units 19 Table 12 JT5BD 024KA 2 Ton Units 19 Table 13 JT5BD 030KA 2 5 Ton Units 20 Table 14 JT5BD 036K 3 Ton Units 20 Table 15 JT5BD 042K 3 5 Ton Units 21 Table 16 JT5BD 048K 4 Ton Units 21 Table 17 JT5BD 060K 5 Ton Units 22 Electrical Information 23 Figure 12 JT5BD Wiring Diagram 23 Table 18 Electrical Specs Phys...

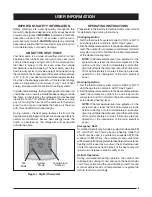
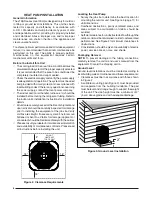
Page 3: ... system mode to COOL or AUTO and change the fan mode to AUTO See Figure 1 2 Setthetemperatureselectortothedesiredtemperature level Theoutdoorfan compressor andblowermotorwill all cycle on and off to maintain the indoor temperature at the desired cooling level NOTE If the temperature level is re adjusted or the system mode is reset the fan and compressor in the outdoor unit may not start immediatel...

Page 4: ...he aluminum fins Check and remove any obstructions such as twigs sticks etc TROUBLESHOOTING If the unit fails to operate check the following The thermostat is properly set See Cooling Operation for air conditioning or Heating Operation for furnace The unit disconnect fuses are in good condition and the electrical power to the unit is turned on Operating the Heat Pump for Automatic Cooling and Heat...

Page 5: ...ant in this unit Use of another refrigerant will damage the unit WARNING The information listed below must be followed during the installation service and operation of this unit Unqualified individuals should not attempt to interpret these instructions or install this equipment Failure to follow safety recommendations could result in possible damage to the equipment serious personal injury or deat...

Page 6: ...efully inspected for damage prior to installing the equipment at the job site Verify coil fins are straight If necessary comb fins to remove flattened or bent fins Claims for damage apparent or concealed shouldbefiledimmediatelywiththecarrier Pleaseconsultyourdealerformaintenanceinformation and availability of maintenance contracts Please read all instructions before installing the unit 18 18 18 1...

Page 7: ...applicable local codes and ordinances and with the current revision of the National Electric Code ANSI NFPA 70 For Canadian installations the electrical connections and grounding shall comply with the current Canadian Electrical Code CSA C22 1 and or local codes Pre Electrical Checklist Verify that the voltage frequency and phase of the supply source match the specifications on the unit rating pla...

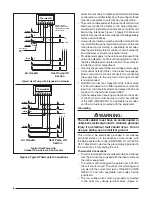
Page 8: ...connection to the power or control circuits must be wired in strict accordance of the NEC ANSI NFPA 70 applicable local codes and the instructions provided with the equipment Grounding WARNING The unit cabinet must have an uninterrupted or unbroken electrical ground to minimize personal injury if an electrical fault should occur Do not use gas piping as an electrical ground This unit must be elect...

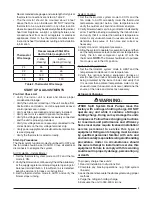
Page 9: ... s system mode to COOL and the fan mode to AUTO Gradually lower the thermostat temperature setpoint below room temperature and verify the outdoor unit and indoor blower energize 2 Verify blower wheel is spinning in direction indicated by arrow Feel the air being circulated by the indoor blower and verify that it is cooler than ambient temperature Listen for any unusual noises If unusual sounds occ...

Page 10: ...lit System Heat Pump Orifice Model Number JT5BD Restrictor Bore Size inches System Charge R2 oz Indoor Outdoor 018K 0 053 0 041 93 024KA 0 061 0 047 96 030KA 0 069 0 049 144 036K 0 078 0 057 155 042K 0 083 0 059 248 048K 0 090 0 065 248 060K 0 101 0 071 268 HEAT PUMP MAINTENANCE WARNING To prevent electrical shock personal injury or death disconnect all electrical power to the unit before performi...

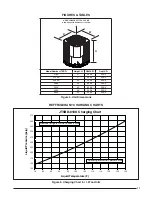
Page 11: ... 4 060K 43 30 3 4 30 3 4 D W H DO NOT OBSTRUCT TOP OF UNIT Allow adequate clearance for airflow REFFRIGERANT CHARGING CHARTS Figure 6 Charging Chart for 1 5 Ton Units 125 150 175 200 225 250 275 300 325 350 375 75 80 85 90 95 100 105 110 115 120 125 130 Liquid Temperature F Liquid Pressure psig Add refrigerant when below curve Remove refrigerant when above curve JT5BD 018K Charging Chart FIGURES T...

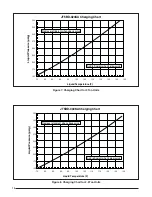
Page 12: ...mperature F Liquid Pressure psig Add refrigerant when below curve Remove refrigerant when above curve Figure 8 Charging Chart for 2 5 Ton Units JT5BD 030KA Charging Chart 150 175 200 225 250 275 300 325 350 75 80 85 90 95 100 105 110 115 120 125 130 Liquid Temperature F Liquid Pressure psig Add refrigerant when below curve Remove refrigerant when above curve ...

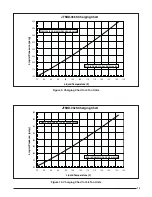
Page 13: ...perature F Liquid Pressure psig Add refrigerant when below curve Remove refrigerant when above curve Figure 10 Charging Chart for 3 5 Ton Units JT5BD 042K Charging Chart 150 175 200 225 250 275 300 325 350 75 80 85 90 95 100 105 110 115 120 125 130 135 Liquid Temperature F Liquid Pressure psig Add refrigerant when below curve Remove refrigerant when above curve ...

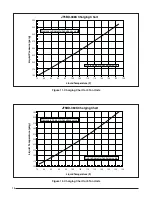
Page 14: ...g Add refrigerant when below curve Remove refrigerant when above curve JT5BD 048K Charging Chart Figure 12 Charging Chart for 5 Ton Units 150 170 190 210 230 250 270 290 310 330 350 75 80 85 90 95 100 105 110 115 120 125 130 135 Liquid Temperature F Liquid Temperature psig Add refrigerant when below curve Remove refrigerant when above curve JT5BD 060K Charging Chart ...

Page 15: ...p Liq Press Dis Temp Liq Press Dis Temp 73 140 135 75 143 140 155 137 77 145 146 157 143 170 140 79 147 150 160 148 172 145 185 142 81 151 153 162 152 175 150 187 147 200 144 83 166 155 177 154 189 151 202 149 215 147 85 181 157 192 155 204 153 217 151 230 149 87 196 159 207 157 219 155 232 153 244 151 89 199 163 211 161 222 159 234 157 246 154 91 214 165 226 163 237 161 248 158 93 229 167 241 165...

Page 16: ...ress Dis Temp Liq Press Dis Temp 71 148 144 73 150 149 164 147 75 152 155 166 152 179 149 77 155 158 168 157 181 154 195 152 79 159 161 171 161 183 159 197 156 210 154 81 174 164 187 163 199 161 212 158 226 156 83 190 166 202 165 214 163 228 161 241 159 85 206 168 218 167 230 165 243 163 257 161 87 209 172 221 171 233 169 245 167 259 165 89 225 174 237 173 249 171 261 169 91 240 177 252 175 264 17...

Page 17: ...ress Dis Temp Liq Press Dis Temp 69 132 130 71 134 136 149 135 73 136 141 151 140 166 140 75 137 149 153 145 168 145 183 145 77 140 152 154 152 170 150 185 149 200 149 79 158 155 172 155 188 154 203 153 218 153 81 176 158 190 158 205 158 220 157 235 157 83 193 162 207 162 222 162 237 161 252 161 85 197 166 211 166 225 166 239 165 254 165 87 214 170 229 170 243 170 256 169 89 232 174 246 174 260 17...

Page 18: ...167 84 222 178 235 176 248 174 260 171 86 238 180 252 178 265 176 88 255 182 268 180 90 271 185 92 Shaded boxes indicate flooded conditions Rated design values The suction pressure will vary from design value if indoor air flow entering dry bulb or entering wet bulb temperatures are lower than design 1 All pressures are listed in psig and all temperatures in F 2 Discharge temperatures greater than...

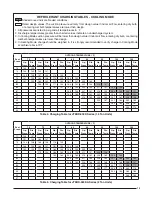
Page 19: ...ess Liquid Press Disch Temp Suc Press Liquid Press Disch Temp Suc Press Liquid Press Disch Temp Suc Press Liquid Press Disch Temp 12 120 107 21 135 119 29 150 131 37 165 142 46 169 158 56 184 177 66 200 196 13 127 105 22 141 117 30 155 129 38 169 140 47 176 155 57 191 172 67 207 189 14 134 103 23 147 115 31 160 127 39 173 138 48 183 152 58 198 168 68 214 183 15 141 101 24 153 113 32 165 125 40 176...

Page 20: ...s Liquid Press Disch Temp Suc Press Liquid Press Disch Temp Suc Press Liquid Press Disch Temp Suc Press Liquid Press Disch Temp 13 116 120 22 136 125 31 156 130 40 176 136 49 183 151 59 201 175 68 218 199 14 123 118 23 142 123 32 161 128 41 180 134 50 190 148 60 208 170 69 225 193 15 130 116 24 148 121 33 166 126 42 183 132 51 197 145 61 215 166 70 232 187 16 137 114 25 154 119 34 171 124 43 187 1...

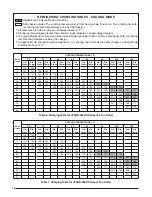
Page 21: ...ss Liquid Press Disch Temp Suc Press Liquid Press Disch Temp Suc Press Liquid Press Disch Temp Suc Press Liquid Press Disch Temp 23 129 118 27 140 124 31 151 130 35 162 136 44 173 149 58 206 168 72 239 187 24 136 116 28 146 122 32 156 128 36 166 134 45 180 146 59 213 163 73 246 181 25 143 114 29 152 120 33 161 126 37 169 132 46 187 143 60 220 159 74 253 175 26 150 112 30 158 118 34 165 124 38 173 ...

Page 22: ...159 139 31 182 143 39 206 147 48 230 158 58 257 175 68 283 193 16 142 133 24 165 137 32 187 141 40 209 145 49 237 155 59 264 171 69 290 187 17 149 131 25 171 135 33 192 139 41 213 143 50 244 152 60 271 166 70 297 181 18 156 129 26 176 133 34 196 137 42 217 141 51 251 149 61 278 162 71 304 175 Table 17 Charging Table for JT5BD 060K Series Heat Pump 5 Ton Units REFRIGERANT CHARGING TABLES HEATING MO...

Page 23: ...t avant de faire letretien 2 Employez uniquement des conducteurs en cuivre 3 Ne convient pas aux installations de plus de 150 volt a la terre Single Phase OPTIONAL HARD START KIT Start Capacitor 2 5 Start Relay 1 to T1 on contactor to H on capacitor to T2 on contactor Red Yellow Black Yellow Legend Field Wiring Factory Wiring Low Voltage High Voltage CC Contactor Coil CCH Crankcase Heater If Equip...

Page 24: ... 1 4 1 4 1 4 1 4 1 4 Fan Blade Dia Blades 24 3 SCFM 2370 2370 3000 3000 3000 4000 4000 Compressor Data RLA 8 3 10 8 13 4 15 3 19 2 19 8 25 3 LRA 40 3 56 68 87 112 105 146 Refrigerant suction line Length O Liquid Line All Lengths 3 8 O D 0 24 ft 3 4 3 4 3 4 3 4 7 8 7 8 7 8 25 39 ft 3 4 3 4 3 4 7 8 3 7 8 7 8 1 1 8 4 40 75 ft 3 4 3 4 7 8 3 7 8 3 7 8 1 1 8 4 1 1 8 4 R 22 Refrigerant charge in ounces O...

Reviews: