17
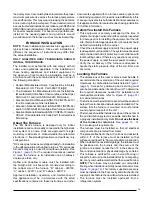
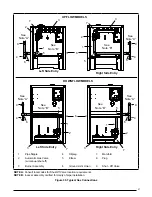
Figure 14
Bend tabs
up 90°
Mounting Plate
Duct
Connector
Connector
Tabs
Supply
Air Duct
Hole for
Gas Line
Wood Floor
Duct Connector
Supply
Air Duct
Bend tabs tightly
against supply air duct
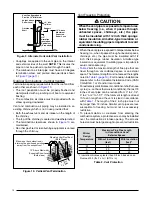
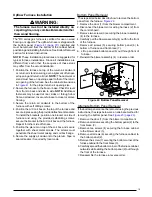
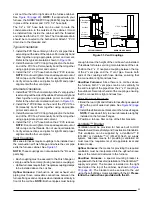
Figure 14. Duct Connector Installed
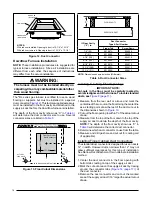
Figure 15
W
ood Floor
Left Plate
Right Plate
Front
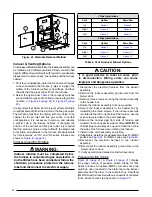
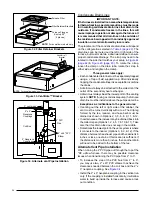
Figure 15. Duct Connector Side Plates
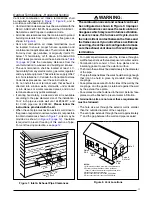
4. Install the duct connector back in the floor opening with
the bottom tabs extending into the supply air duct.
5. Install the mounting plate (
) under the back
side of the duct connector. Align the screw holes in both
components.
6. Secure the duct connector and the mounting plate to
the wood floor with appropriate size screws.
7. Secure the duct connector and the mounting plate to
the wood floor with appropriate size screws.
) on top of the duct connector,
one on each side (left and right) of the opening. Align
the screw holes in both components.
9. Secure both plates and duct connector to the wood
floor with appropriate size screws.
10. Bend the connector tabs on the bottom of the duct
connector upwards and as tight as possible against
the supply air duct.
11. Bend both tabs on the mounting plate (
) up
90°.
12. Seal all connections with industrial grade sealing tape
or liquid sealant. NOTE: Requirements for sealing
ductwork vary from region to region. Consult with local
codes for requirements specific to your area.
Narrow Duct Attachment - Option 1
Thes alternate attachment methods may be used to install
a furnace duct connector to narrow metal ductwork if
insufficient clearances prevent the bending of the duct
connector tabs at the side of the duct.
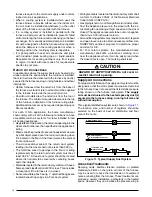
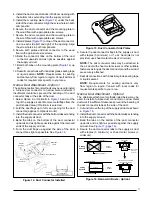
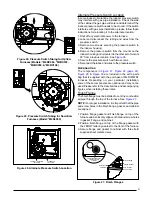
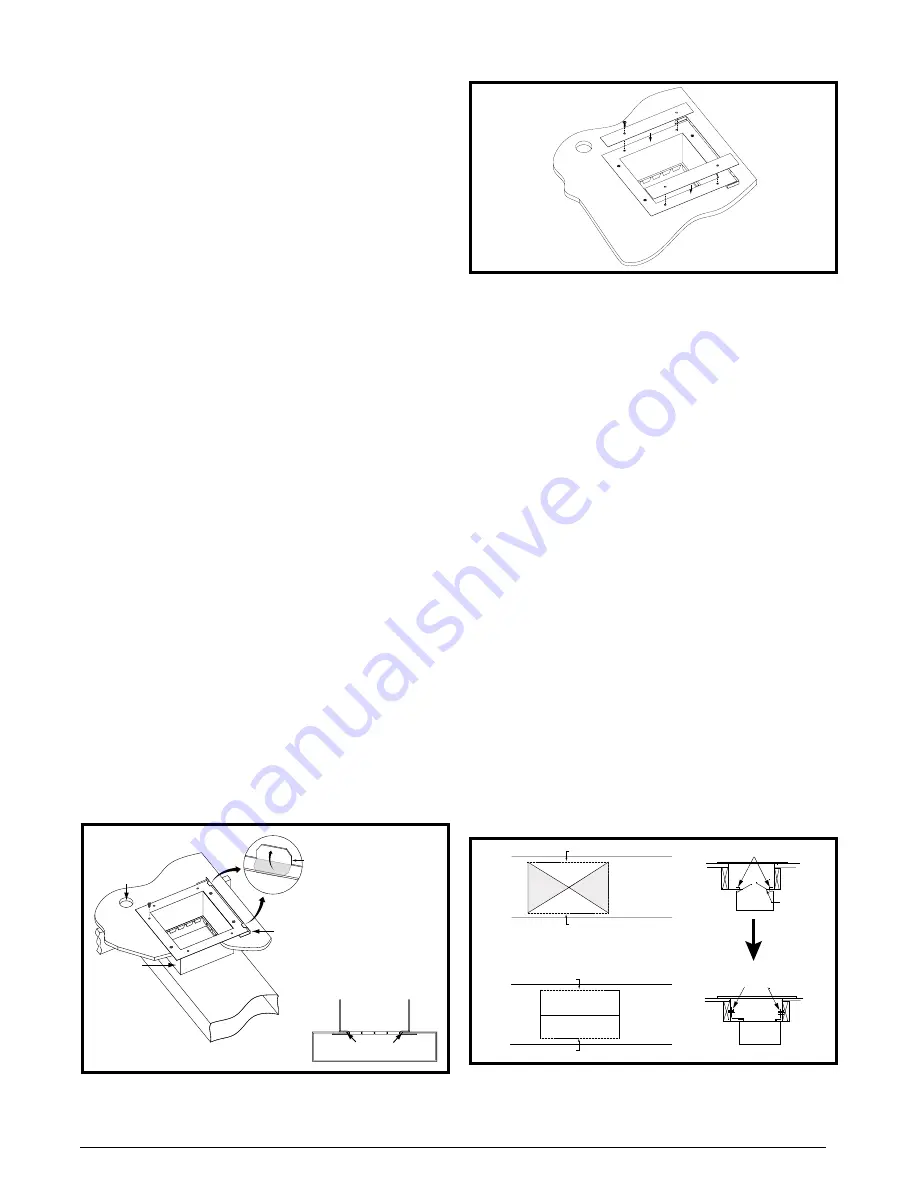
1. Select Option A or Option B in
and cut the
top of the supply air duct. Remove metal flaps from the
duct (shaded area) if Option A is selected.
2. Fold the duct flaps up to form an opening for the duct
connector (applies to Options A or B).
3. Install the duct connector with the bottom tabs extending
into the supply air duct.
4. Bend the tabs on the bottom of the duct connector
upwards and as tight as possible against the removed
ends of the supply air duct.
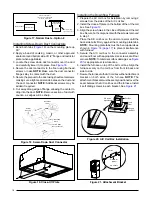
5. Form the duct flaps up against the side of the duct
connector as tight as possible. See
6. Secure the duct connector flaps to the supply air duct
with staples (3 minimum) or if a 2x block/joist is not
provided, use sheet metal screws (2 minimum).
NOTE: The duct connector tabs may be attached to
the air duct with sheet metal screws or other suitable
fasteners as long as the duct connector and the air duct
are securely attached.
7. Seal all connections with industrial grade sealing tape
or liquid sealant.
NOTE: Requirements for sealing ductwork vary
from region to region. Consult with local codes for
requirements specific to your area.
Narrow Duct Attachment - Option 2
The alternate attachment methods listed below may be
used to install a furnace duct connector to narrow metal
ductwork if insufficient clearances prevent the bending of
the duct connector tabs at the side of the duct.
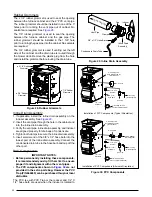
1. Cut and remove the top of the supply air duct as shown
.
2. Install the duct connector with the bottom tabs extending
into the supply air duct.
3. Bend the tabs on the bottom of the duct connector
upwards and as tight as possible against the supply
air duct. See
.
4. Secure the duct connector tabs to the supply air duct
with staples (3 minimum) or sheet metal screws (2
minimum).
Figure 16
Figure 16.
Narrow Air Ducts - Option 1
Cutting
Option A
Supply
Air Duct
Fold duct flap here
Remo
ve
this Flap
Cut Here
Cut Here
Cut Here
Cut Here
Cut Here
Cut Here
Cut Here
Cut Here
Cut Here
Fold Flap Here
Narrow
Duct
Narrow
Duct
Finger Tabs
Secure Flaps with Staples
or sheet metal screws
Fold duct flaps
into duct
connector
Remo
ve
this Flap
Fold Flap Here
Cutting
Option B
Fold duct flap here
Supply
Air Duct
Summary of Contents for M4RC-072D-35C
Page 47: ...47...

