14
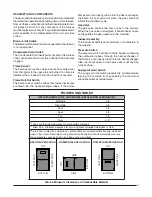
Before using Table 2, the number of pipes (1-pipe or 2-pipe)
connected to the furnace must be known. Find the proper
furnace style (upfl ow, horizontal, or downfl ow) and then
the side that the pipes will exit from the furnace. Finally
select the option that properly matches your installation
type from Figures 25-28 (pages 39-42).
Existing Installations
When an existing furnace is removed from a vent system
serving other appliances, the existing vent system may
not be sized properly to vent the remaining appliances
(For example: water heater). An improperly sized venting
system can result in the formation of condensate, leakage,
or spillage. The existing vent system should be checked
to make sure it is in compliance with NFGC and must be
brought into compliance before installing the furnace.
NOTE:
If replacing an existing furnace, it is possible you
will encounter an existing plastic venting system that is
subject to a Consumer Product Safety Commission recall.
The pipes involved in the recall are High Temperature
Plastic Vent (HTPV).
If your venting system contains
these pipes
DO NOT reuse this venting system!
This
recall does not apply to other plastic vent pipes, such
as white PVC or CPVC. Check for details on the CPSC
website or call their toll-free number (800) 758-3688.
FURNACE INSTALLATION
General Requirements
*SC series gas furnaces are shipped ready for installation
in the upfl ow or horizontal right or left positions. Only
the *SL series gas furnace may be used for downfl ow
operation.
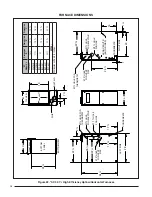
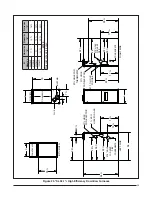
• The furnace must be leveled at installation and attached
to a properly installed duct system. See Table 3 (page
27) for the required clearances needed to move the
furnace to its installation point (hallways, doorways,
stairs, etc).
• The furnace must be installed so that all electrical
components are protected from water.
• The furnace must be installed upstream from a
refrigeration system.
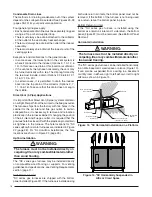
• The cabinet plug must always be used to close the hole
in the side of the furnace when rotating the inducer.
• Additional reference information for US and Canadian
installations can be found in the General Installation
section (page 5).
Vent and Inducer Assembly Options
*SC series gas furnaces offer a wide range of installation
options, including installation in the upfl ow or horizontal
positions with either right, left, or upfl ow return air. The
*SL series gas furnaces may only be installed as a down
fl ow application.
To increase installation fl exibility, the inducer assembly can
be rotated up to 3 different positions. Each variation has
slightly different requirements with regard to condensate
disposal and, in some cases, the need to seal the furnace
cabinet.
IMPORTANT NOTE: The Inducer Assembly
must never be positioned to vent downwards on
horizontal installs.
Inducer Assembly Rotation
WARNING:
Inducer rotation must be completed before
the furnace is connected to gas and electric. If
both utilities have been connected, follow the
shutdown procedures printed on the furnace
label and disconnect the electrical supply.
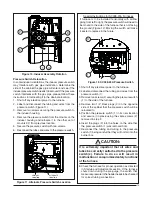
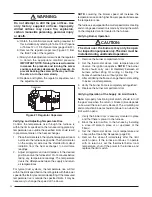
1. Disconnect the electrical harness (1) from the inducer
assembly (2) as shown in Figure 10 (page 15).
2. Remove the inducer assembly ground wire (3) from
the blower deck (4) or door.
3. Remove three screws (5) securing the inducer
assembly (2) to the header box (6).
4. Rotate the inducer assembly (2) to its new position.
5. Secure the inducer assembly (2) to the header box
(6) by reinstalling the three screws (5). If the inducer
assembly is rotated to the left or right side of the
furnace, use the extra screw provided in the parts
package.
6. Remove the cabinet plug (7) from side of furnace and
reinstall in hole on opposite side of cabinet.
7. Install in-line drain assembly and tubing.
8. If applicable, install the condensate drain lines as
shown in (Figures 25-28).
9. Reconnect the electrical harness (1) to the inducer
assembly (2).
10. Reconnect the inducer assembly ground wire (3) to
the blower deck (4) or door.
11. Verify operation as detailed on the furnace label.
Table 2. Vent and Inducer Blower Options
Conventional (1 Pipe)
Vent
Upfl ow
Horizontal
Right
Horizontal
Left
Downfl ow
Up
Option 1
Option 7
Option 10
Option 15
Right
Option 2
Option 8
N/A
Option 16
Left
Option 3
N/A
Option 9
Option 17
Direct Vent (2-pipe)
Vent
Upfl ow
Horizontal
Right
Horizontal
Left
Downfl ow
Up
Option 4
Option 12*
Option 14*
Option 18
Right
Option 5*
Option 11
N/A
Option 19*
Left
Option 6*
N/A
Option 13
Option 20*
* Requires a 2 inch PVC endcap.


