background image

StarTalk Mini Installation Guide

_

I

_

-.

-c

Summary of Contents for StarTalk Mini

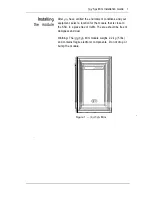
Page 1: ...StarTalk Mini Installation Guide _ I _ c ...

Page 2: ...t 4 Special parts check list 5 Installation check list 6 installing the module 7 Mounting steps 8 Connecting the module to the KSU 10 and connecting the power supply 11 Preparing to initialize 12 Initializing 13 Connecting a printer to the Mini module 16 Printer check list 16 communication parameters 17 Connecting an RS 232 terminal 17 Determining Feature Codes 18 ...

Page 3: ......

Page 4: ...SA specification 0 8 8 which are designed to provide reason able protection against such interference when operated in a commercial environment Operation of this equipment in a residential area is likely cause interference in which case users will be required at their own expense to take whatever measures necessary to correct the interference This apparatus does not exceed the Class A limits for r...

Page 5: ...ized dealers Address of repair facilities USA Northern Telecom Inc Nashville Repair Distribution Center 640 Drive Nashville TN 37210 A t t n Tel 615 883 9220 Canada Northern Telecom Canada Ltd Telecom Service Division 12345 Albert Hudon Blvd Montreal North Quebec Attn Customer Service Dept 0914 Tel 514 324 2020 ...

Page 6: ...start u U Read this guide Make sure the compatibility conditions are met A Compatibility check list is provided on page 2 of this guide Make sure all the equipment in the package is accounted for A Package check list is provided later in this guide Make sure the environment and electrical conditions are met An Environment and an Electrical check list are provided later in this guide Make sure you ...

Page 7: ...software version 5 2 or greater DR3 software DR4 software DR5 software s o f t w a r e software To determine the software type and version of the KSU refer to Determining the KSU software type and version Package Make sure the package contains check list the Mini module a power supply an RJ 11 teladapt connection cord a shrink wrapped package of documentation ...

Page 8: ...al motors and other equipment that could produce electromagnetic radio frequency and electrostatic interferences a wall area approximately 1 m square approximately 3 sq within 305 m approximately 1000 ft of the KSU within 2 m approximately 6 ft of a three wire grounded electrical outlet a minimum of 16 cm approximately 6 in from a corner wall or other component a minimum of 46 cm approximately 18 ...

Page 9: ...05 to 132 volts for the V product voltage 220 VAC or 240 VAC nominal 180 to 263 volts frequency Hz nominal 47 to 63 Hz current 0 5 Amps maximum 3rd wire ground Note The Mini module does not require a dedi cated circuit DO NOT the module to an outlet on a circuit that is likely to be overloaded or used by large office equipment or power tools ...

Page 10: ...ews module one modular telephone jack twisted pair station wire plywood backboard 2 cm thick surge protector recommended terminal or RS 232 printer and RS 232 printer cable optional Guide Note equipment is not supplied with the Mini module You might need this guide for instructions on installing a station port in the event there are no free station ports available at the distribution block ...

Page 11: ... means you must list Install the module mount the unit to the wall connect the station port mount the power supply l connect the power supply Initialize Connect a terminal or printer if required optional Determine the Feature Codes Set the Date and Time Name the port ...

Page 12: ... the module equipment select a location for the module that is close to the KSU in a place free of traffic The area should be free of dampness and dust Warning The Mini module weighs 2 2 kg 5 Ibs and contains fragile electronic components Do not drop or bump the module Figure 1 Mini ...

Page 13: ...to the KSU 2 Install a wood screw in the top screw hole but do not tighten it completely 3 Make sure the module is level Install and tighten a wood screw in the bottom screw hole 4 Tighten the top screw to secure the module You are now ready to connect the module to the KSU Mounting screw holes LED Teladapt jack 25 Pin connector Power connector Figure 2 Stat Talk Mini connectors ...

Page 14: ...Mini Installation Guide 9 Compact KSU Distribution block Figure 3 Mini Mini module Power supply RJ 11 teladapt jack teladapt cord installation overview ...

Page 15: ...KSU software type and version To wire the module 1 Locate the distribution block 2 Make sure there is one available station port at the distribution block 3 Mount the RJ I 1 teladapt jack next to the distribution block 4 Using twisted pair station wire connect the teladapt jack to a free station port on the distribution block 5 Test the port using a working telephone Connect one end of the RJ 11 t...

Page 16: ...ptacle located on the right side of the module 3 Plug the three prong plug into a grounded electrical outlet The red power Light Emitting Diode LED on the module should light up If the LED does not light up 4 Verify there is power at the AC end of the power 5 If there is power at the AC outlet verify there is power at the DC end of the power supply 6 If there is power a the DC end of the power sup...

Page 17: ...e DN Important If you are using with software you must set the DN type of the DN to be Only before you initialize For instructions on setting the DN type refer to the Installer Guide Determine if the system is using the bilingual language capability Know the primary and alternate languages to be used Know if the Group List option is enabled Know the leading digit for Group Lists The Group List lea...

Page 18: ...efault code is The display shows 2 E n t e r C O N F I G 3 P r e s s The display shows Note To change mailbox number length press and enter the new DN length The mailbox DN length MUST be the same as the DN length The mailbox number range is between two and seven digits 4 Press The display shows ...

Page 19: ...up Lists you must re initialize to re enable Group Lists The display shows Note If 9 is not the Leading Digit for Group Lists indicated on the Mini Programming Record press and enter the Group List number Important The Group List Leading Digit can be any number from 0 to 9 The Special Mailbox numbers automatically begin with so if you select a Group List Leading Digit of the Special Mailbox number...

Page 20: ...Mini Installation Guide 15 Press to enable the Leading Digit When the initial configuration is completed the and then returns to the date and time ...

Page 21: ...ess a serial to parallel interface is used printer speeds must support 300 baud hardware and software compatibility Note supports and all reports are terminated by line feed carriage return cable type must be straight through You must open the door of the unit before you can connect the printer To connect a printer 1 Plug the male end of the cable into the port 2 Plug the female end of the RS 232 ...

Page 22: ...the instruction manual that came with the terminal Connecting an You must open the door of the unit before you can connect W 232 terminal the terminal To connect the RS 232 terminal to 1 Pin 2 on one end is connected to pin 2 on the other end pin 3 on one end is connected to pin 3 on the other end and pin 7 on one end is connected to pin 7 on the other end The end of the cable attached to must be ...

Page 23: ...e display shows Note represents a number between 00 and 99 2 Record the Feature Code for the Leave Message Feature on the Mini Programming Record and Figures and Tables Table 4 3 Press The display shows the Feature Code for the Open Mailbox Feature Record this code on the Mini Programming Record and Figures and Tables Table 4 4 Continue pressing to show all of the Feature Codes Record each Feature...

Page 24: ...Mini Installation Guide 19 Determining the TO determine the DN DN 1 Enter the Directory Number Code Note The default code is The display shows Note represents the directory number To end this session ...

Page 25: ...indicates to which greetings to To set the date and time Enter the Date and Time Feature Code Note The default code is The display shows 2 Note This number depends on the mailbox number length being used For example if the mailbox number length is six you would enter 1000020000 The mailbox number and default password combina tion for each mailbox number length are shown on Figures and Tables Table...

Page 26: ...must be entered as 920604 6 Press The display shows 7 Press The display shows 8 Enter the time in hours and minutes Note This is a four digit field Any single hour or minute must have a zero preceding the number For example must be entered as 0709 The display shows 9 Press The display shows Note To return to the date display press To end this session press ...

Page 27: ...rogram param eters correctly to ensure operates properly Assign ing the DN type and setting and thresholds are the two most important parameters To check other and Centrext feature compatibility refer to the Mini Set Up and Operation Guide Appendix A Important When you are using with and Centrext software you must ensure you designate the DN as only For instructions about determining the DN refer ...

Page 28: ...eck all the wiring for the Mini module Make sure the power supply is connected and plugged in Mini module has had the necessary time to complete the three to five minute self testing procedure is connected to a working station port power source to the Mini module is not damaged 3 After checking all the wiring reconnect the power Wait three to five minutes and enter the System Administration Featur...

Page 29: ...tware The fourth character to the right of the colon indicates the language combination of the KSU software The last three characters indicate the version of software being used If the fifth character to the right of the colon is not an E the KSU software is compatible If the character is an E continue to verify the version number uses letters of the alphabet to designate version numbers The lette...

Page 30: ...on Feature Code version Note The default code is The display shows 2 Enter Note This number depends on the mailbox number length being used The mailbox number and default password combination for each mailbox number length are shown on Figures and Tables Table 3 3 Press The display shows 4 Press The display shows I To end the session press ...

Page 31: ... other end and pin 7 on one end is connected to pin 7 on the other end The end of the cable attached to must be male Note If the connector is not a 25 pin RS 232 connector refer to the operating manual of the terminal you are connect ing for instructions Figure 4 Mini Module Transmit Data I Receive Data I G r o u n d Table 1 Pin Definition Pin Pin 2 Pin 3 Pin 7 RS 232 Terminal Receive Data Transmi...

Page 32: ...Mini Installation Guide 27 Figure 5 Attaching the RS 232 cable Pin 1 2 3 4 5 Connection no connection GND GND Table 2 Pin out of from the power supply to Mini Figure the power supply ...

Page 33: ...ault Feature Codes for are 980 through 986 inclusive When these Feature Codes are used by other applications or products i e PCI RAD SMDR assigns Feature Codes between 900 and 999 to These codes might not be assigned in sequential order Record the assigned Feature Codes on Table 4 Feature Code name Number Leave Message Feature 9 __ __ Open Mailbox Feature 9 __ __ Operator Status F e a t u r e 9 Sy...

Page 34: ...StarTalk Mini Reference Guide _ I _ c ...

Page 35: ...e Company Directory About the mailboxes The Special Mailboxes Personal Mailboxes Information Mailboxes Mailbox rules Using the Using with a two line display Using with a single line display Using with an Analog Terminal Adapter Entering characters into the command line About the voice prompts Interrupting a voice prompt Exiting from Programming a memory button l l l 2 l 3 1 4 2 1 2 l 2 l 2 2 2 3 2...

Page 36: ...ox options Listening to your messages Options while a message is playing Options at the end of a message Copy option Reply options Record a message Mailbox Administration Changing a Company Directory name Greeting options Record option Selecting a greeting Changing your mailbox password Off premise Message Notification Setting Up Off premise Message Notification parameters Assigning Message Notifi...

Page 37: ...ephone Leave Message options Opening your mailbox after leaving a message Transferring a caller to a mailbox The different types of messages Group Message About the Group List Broadcast Messages 5 1 5 l 6 Telephone etiquette 6 1 Introduction 6 l Telephone etiquette 7 Troubleshooting Introduction Timeout Messages are cut off Mailbox full too often Wrong prompt language 7 l 7 l Glossary Glossary Ind...

Page 38: ...4 Table of contents Mini Reference Guide ...

Page 39: ...g features and their operation Learning about provides an overview of how works This section defines the terms that are used in explaining the features Information Mailboxes provides a description of the Information Mailboxes and how to use them Your Personal Mailbox provides an outline of the steps you perform to set up a Personal Mailbox and also provides a description of all the options accessi...

Page 40: ...of everything contained in this guide and where the information is located The Index is in alphabetical order If you cannot find a term try looking for your item according to its task Other For more information about see your System Coordinator or refer to documents the Mini User Card Mini Reference Guide ...

Page 41: ...When you see an underlined word you can press the button directly below the option the display to proceed Buttons This guide uses button representations Any button that appears in the text or instruction steps indicates the button that selects an option Example P r e s s When you see a button it represents the button you must press to proceed Angled brackets Some information is descriptive informa...

Page 42: ...s guide Before you attempt to use ensure that you are familiar with how the requisites one and two line display telephones operate We recommend that you look through your telephone user card before proceeding Mini Reference Guide ...

Page 43: ...em offering a receptionist service that routes calls and provides voice message taking works capability When enabled answers incoming calls and routes the calls to extensions and mailboxes within the system has three main components Automated Attendant Mailboxes Voice Messaging Custom Call Routing CCR The first component is the Automated Attendant The Automated Attendant works like a receptionist ...

Page 44: ...send messages The third component of is Custom Call Routing CCR CCR is a single digit access application providing callers with a series of voice prompts and call transfer options Using CCR a user can listen to the Home Menu and make a selection listen to a pre recorded Information Message leave a message in a mailbox transfer to an extension Who can use can be used by any outside caller and by ma...

Page 45: ...ring the installation The default Feature Codes for are 980 through 986 inclusive When these Feature Codes are used by other applications or products i e PCI Hourglass assigns Feature Codes between 900 and 999 to These codes might not be assigned in sequential order For more information about Feature Codes see your System Coordinator Table 2 1 shows the default Feature Codes and also provides a sp...

Page 46: ...ween 00 and 99 2 the Feature Code for the Leave Message feature in Table 2 1 3 Press The display shows the Feature Code for the Open Mailbox feature Record the Feature Code for the Open Mailbox feature in Table 2 1 4 Continue pressing to show all of the Feature Codes and record these codes in Table 2 1 When you reach the last Feature Code the display shows To end this session press or T Mini Refer...

Page 47: ...er DN Feature Code Is used to determine directory number This number is used to forward a telephone to and to use with an Analog Terminal Adapter To use the DN feature press Transfer Feature Code Is used to transfer calls to a mailbox While the call is active enter the Transfer Feature Code then enter the mailbox number where you want to direct the call Do not put the call on hold The caller is no...

Page 48: ... company receptionist or designated operator open a Personal Mailbox as a mailbox owner not a voice prompt The Automated Attendant provides callers with commands to use each of these options A caller must press the button associated with the option they want to activate For example to use the Company Directory press When the default Automated Attendant menu prompt is turned OFF the System Coordina...

Page 49: ...e changed at any time Any two line display user can access the Company Directory by selecting I when the display shows the Directory option The Company Directory can also be opened by pressing when the Automated Attendant announces the option is available When you have opened the Company Directory you can enter the last name of a mailbox owner or you can press to view all the names When you view t...

Page 50: ...or more information about the System Coordinator Mailbox numbers see your System Coordinator General Delivery Mailbox This mailbox is used to collect messages from callers who use a rotary dial telephone for individuals in your company who do not have Personal Mailboxes and for mailbox owners whose mailboxes are full Your company s receptionist or System Coordinator will route messages left in the...

Page 51: ...ension To request an Guest Mailbox see your System Coordinator Information Mailboxes provide greetings that relay important company or Mailboxes department messages information Mailboxes do not have an operating extension To request an Information Mailbox see your System Coordinator Mail box Only a few rules apply to the mailboxes Remembering these rules make using your mailbox a simple everyday t...

Page 52: ...For example if you are looking for the last name Taylor you would press When you are looking for a mailbox owner using the Company Directory you can find the name by entering the first four letters of the last name If cannot find the name the first time you can press or To view all the names in the Directory press Then press or until you find the mailbox owner you are looking for Note If you are t...

Page 53: ...oes not appear on the display you must select the option using the numbers on the The two line display is shown in Figure 2 2 Display command line button options buttons 2 2 two line display The and M7208 telephones with a single line display can be used for any session If you are using a telephone with a single line display the display shows only the command All options are given immediately by t...

Page 54: ...hone does not have a feature button you can access features To access features such as Leave Message or Open Mailbox call and follow the voice prompts The DN determined by using Feature 985 on a telephone If you have an Enhanced you can also enter to open your mailbox or and follow the voice prompts Note When a caller uses from a rotary dial telephone transfers the caller to your receptionist or d...

Page 55: ...ntered The maximum number of characters you can line enter is 16 For example There are four situations when the command line prompt will disappear This happens when the display shows the command line prompt For instance when the display shows Once you begin to enter the last name the command line prompt disappears For example if you were entering the name S Martin you press the button for M the di...

Page 56: ...he display buttons or buttons Either button will invoke the selected option When has bilingual language capability enabled a user can change the language of the Automated Attendant prompts for the duration of the call The user can press on the while listening to the top level Auto mated Attendant voice prompt or before recording a message using the Leave Message Feature Interrupting Voice prompts ...

Page 57: ... Transfer Feature 986 To program a memory button The display shows Note What appears on the display is determined by the software version installed on your Mini system Regardless of the version in use follow the same steps to program a memory button 2 Select a programmable button 4 Enter the Feature Code number For example 980 The display shows 5 Label the button with the Feature Code description ...

Page 58: ...2 16 Section 2 Learning about Mini Reference Guide ...

Page 59: ...et up and maintained by the System Coordina tor Callers must use the CCR Tree to access a CCR Information Mailbox For more information about Information Mailboxes see your System Coordinator Information Mailboxes provide messages and announcements to callers Information Mailboxes can be used to Mailboxes announce sales provide product lists announce special events For example On Your Toes Studio a...

Page 60: ...s see your System Coordinator If you are using a Mini system with bilingual capability the Information Mailbox greeting must be recorded in both languages Before you record your Information Mailbox Greeting you must determine what the greeting is to include When preparing your greeting be sure to include important times and dates Write the greeting out and practice reading it aloud When you are co...

Page 61: ...splay shows 2 Press The display shows 3 Enter the information Mailbox number and password Note For your Information Mailbox number and password combination see your System Coordinator 4 Press or The display shows 5 Press At the tone record the prirnary Information Mailbox Greeting Note For information about Pause and Continue while recording a greeting refer to Section 5 Leaving a message from a t...

Page 62: ...te To listen to your greeting before accepting it press To record your greeting again press 7 Press to accept the recording Note To record an alternate lnforrnation Mailbox Greeting press and follow the instructions that appear on the display To end this session press Mini Reference Guide ...

Page 63: ...tion changing a Company Directory name greeting options changing your mailbox password Off premise Message Notification disabling Off premise Message Notification changing the destination number Personalizing your mailbox involves initializing your mailbox to receive ing your sages recording and selecting greetings that will make your mailbox uniquely mailbox yours Personalizing your mailbox consi...

Page 64: ...eros recording your name in the Company Directory This establishes your voice name in a directory that is used by other users and outside callers who search through the Company Directory Note If you do not want your name to appear in the Company Direc tory see your System Coordinator To initialize your Personal Mailbox display shows Note If you are using a telephone that has not been assigned to y...

Page 65: ...assword press or The display shows 7 At the tone record your name Note When you record your name remember to speak clearly and at a pace that is easy to understand It is a good idea to include your mailbox number in your Company Directory recording For example Marina mailbox number 41 To end your recording press or The display shows Note To replay your before accepting it press or To re record you...

Page 66: ...reeting and Recording your alternate greeting later in this section Your mailbox is now ready to receive messages You can change both your password and your Company Directory name at any time To change your password refer to Changing your mailbox password later in this section To change your Company Directory recording refer to Changing a Company Directory name later in this section Mini Reference...

Page 67: ... you are to answer the call personally You can include in your alternate mailbox greeting how long you plan to be away from your desk or office and whether or not you are away on a business trip vacation or sick leave You should also assure callers their messages will receive your prompt attention When recording your personal greetings remember to speak clearly with a pleasant voice at a pace that...

Page 68: ... want to leave callers special information For this reason provides greetings you with an alternate greeting This greeting is called the alternate mailbox greeting For example ii This is Paul Wayne am of office until Thursday December 17 Although am out of the office I do check my mailbox daily Please leave me a message at the tone and I will your call as soon as possible Thank you Because the alt...

Page 69: ... mailbox and performed the initialization steps If you are recording a greeting from a telephone extension that has not been assigned to your Personal Mailbox press The display shows the prompt When this prompt appears enter your mailbox number and password combination 3 Press OK or The display shows 4 Press or The display shows 5 Press GREET or The display shows 6 Press or The display shows Mini ...

Page 70: ...1 You now have the options to RETRY re record the greeting PLAY the greeting back or OK accept the greeting When you are satisfied with the greeting press or to return to the prompt Your primary personal greeting is now recorded After you have recorded your primary and alternate greetings you must choose the greeting to be played If you do not choose a greeting the primary greeting automatically p...

Page 71: ...ermined when you first opened your mailbox and performed the initialization steps If you are recording a greeting from a telephone extension that has not been assigned to your Personal Mailbox press The display shows the prompt When this prompt appears enter your mailbox number and password combination The display shows 4 Press or The display shows 5 Press or q Mini Reference Guide ...

Page 72: ...eting 10 Press or to end your recording The display shows 11 After recording your greeting you can RETRY re record the greeting PLAY the greeting back or OK accept the greeting When you are satisfied with the greeting press or to return to the Ha i 1 i prompt You have now finished recording your alternate mailbox greeting For instruc tions about selecting your alternate greeting refer to Selecting...

Page 73: ... time To select a primary or alternate greeting 2 Enter your password The display shows Note Your unique password was determined when you first opened your mailbox and performed the initialization steps If you are recording a greeting from a telephone extension that has not been assigned to your Personal Mailbox press The display shows the prompt When this prompt appears enter your mailbox number ...

Page 74: ...nges to show and then Note If you have selected a greeting that is not yet recorded you are transferred back to the Greeting options to record the greeting Your Personal Mailbox Greeting is now selected and plays each time a caller chooses to leave a message in your mailbox If you choose the alternate greeting remember to change back to the primary greeting at the appropriate time Mini Reference G...

Page 75: ...phone display shows After opening your mailbox automatically plays Broadcast Messages The display informs you of the number of messages in your mailbox Urgent messages are played next Then new mes sages are played in the order received from first message oldest to last most recent Saved messages are played last Listening to your saved messages Use this option to listen to the saved messages in you...

Page 76: ...op the message you have the option to play the previous message continue playing the current message or skip to the next message You can stop and continue a message as many times as required End of Message This option allows you to skip all the way to the end of the message being played To reach the end of the display Forward This option advances the message nine seconds and continues playing from...

Page 77: ... is automatically saved Since your mailbox has limited message storage space you should delete any messages you no longer need Reply This option allows you to reply to the message Your reply to the sender can be either a message to the sender s mailbox or a telephone call automatically sends your message to the sender s mailbox or dials the sender s extension This option is not shown on the displa...

Page 78: ...udes the date and time the message was sent and if the message was internal the directory name of the sender The option is not shown on the display Save Message This option saves the message being played This option is not shown on the display Erase This option deletes the message that just played If you do not delete a message it stays in your mailbox indefinitely Since your mailbox has limited m...

Page 79: ...re record play or accept the introduction and send it with the message to a mailbox When you select SEND you can choose a Delivery option to mark a message CERTIFIED URGENT or PRIVATE You can also enter the mailbox number of the person you want to send the copy to If you do not know the mailbox number you can find the mailbox owner in the Company Directory If you change your mind about forwarding ...

Page 80: ...ephone Pause Continue Selecting PAUSE temporarily stops the recording session When you are ready to continue recording select CONTINUE You can pause and continue as many as five times If you are using a single line display tel ephone press OK This option ends the recording session When you have finished recording your reply you can Play This option plays your recorded reply As it is playing you ca...

Page 81: ...age you can Play This option plays your recorded message As it is playing you can select options to retry the recording play it again or send it Retry This option erases your recorded message and starts the recording session again Accept This option accepts your message You must enter the mailbox number of the person s you want to send the message to or use the Company Directory option Delivery op...

Page 82: ...you want played Password This option allows you to change your mailbox password Off premise Message Notification This option allows to notify you at another extension a remote telephone number or pager when a message is left in your mailbox Changing a This option allows you to change your name in the Company Directory To use this option you must open your mailbox using Open Mailbox Directory To re...

Page 83: ...single line display telephone OK Select this option to tell you have finished record ing your name When you have completed recording your name you can Play This option plays your recorded name As it is playing you can select options to retry the recording play it again or accept it Retry This option erases your recorded name and starts the recording session again OK This option tells you are satis...

Page 84: ...Selecting this option tells to begin a recording session No This option returns you to the Greetings menu This option is not available on a single line display telephone I Quit This option returns you to the Mailbox Administration menu options Star This option erases your recorded name and replays the Mailbox Administration menu options When you have finished recording your greeting you can Play T...

Page 85: ...ck to the Greeting options to record your greeting Star This option returns you to the Greeting options menu I Quit This option returns you to the Mailbox Administration r menu Changing Your password was created when you first initialized your mailbox Your mailbox password can be changed at any time Keep your password in a safe place and avoid giving it to your co workers When determining what you...

Page 86: ... password When you have finished entering your new password you are given three o p t i o n s Yes Selecting this option tells you are satisfied with the new password The new password is installed and you are returned to the Mailbox Administration menu No This option erases the password you just entered and password entry over again This option is not available on a single line display telephone Qu...

Page 87: ...r not you are using a telephone or pager determining a notification time range and selecting which type of messages you receive When you have set the Off premise Message Notification parameters message notification is enabled automatically Note A notification time range establishes how long message notification is in effect To set up Off premise Message Notification parameters you must first open ...

Page 88: ... and you want to access an outside line you must enter the command to recognize dial tone For example l enter to access an outside line l enter to recognize dial tone l enter q to enter more digits l enter the destination number press to access special digits and any required pauses l follow prompts Note Pauses must be entered to activate pager notification Each pause entered is four seconds long ...

Page 89: ...remise Message Notification start time The display changes to show Note This is a four digit field Any single digit must be preceded by a zero Enter or or o r Press or to accept the time The display shows Enter Off premise Message Notification stop time The display changes to show Note This is a four digit field Any single digit must be preceded by a zero Mini Reference Guide ...

Page 90: ...e type is NEW This means you are notified whenever you receive a New message Changing the message type changes NEW to URGENT This means you are only notified when you receive an Urgent message 20 The display shows This completes setting up Off premise Message Notification Off premise Message Notification is enabled automatically Mini Reference Guide ...

Page 91: ...ication receive a message during the time you specified To assign Off premise Message Notification you must first open your mailbox using the Open Mailbox Feature Code After you have opened your mailbox 1 Press or 2 Press The display shows 3 Press SELECT or The display shows Note Pressing T allows you to verify the and stop time parameters 4 Press or 5 Press T or to return to the Mailbox Administr...

Page 92: ...hone or pager destination number can be To change the destination number you must first open your mailbox using the Open Mailbox Feature Code After you have opened your Mailbox 1 Press I or 2 Press The display shows 3 Press I The display shows 4 Press LI or or I The display shows Note If you press Pool or these appear on the display instead of Line Mini Reference Guide ...

Page 93: ...he number and enter a new number press To insert a pause press or and press or The pause entered is automatically four seconds long To recognize dial tone press To enter more digits press a Press OK to end the new number 9 Press to accept the new number The destination number is now changed To end this session press Mini Reference Guide ...

Page 94: ...4 32 Section 4 Your Personal Mailbox Mini Reference Guide ...

Page 95: ...erent types of messages that you are able to send and the types of messages you might receive in your own Personal Mailbox the Leave Message feature is assigned a special three digit code similar to the Open Mailbox Feature Code The Leave Message Feature Code is 980 feature To use the Leave Message Feature Code press q The Leave Message display shows Note If you are using a single line display tel...

Page 96: ...corded and accepted your mailbox message to access Message Delivery options press or To assign one of the Delivery options press the appropriate Delivery option button provides you with four Message Delivery options which are Certified Urgent Private or Normal This option sends you notification that your message been received and read This option marks the message and plays it before playing other...

Page 97: ... contained in the Group For more information about Group Lists refer to The different types of messages later in this section the To use the Company Directory option you must use the Leave Message feature To access the Company Directory Directory Press or The display shows Note To view all the names in the Company Directory press and or 2 Using the enter the first four letters of the mailbox owner...

Page 98: ... it press record you message again press 7 Press to access Delivery options 8 Select a Delivery option 9 P r e s s o r To If you are using a display telephone the mailbox owner s name appears on the command line After you have accepted the mailbox owner you are greeted with the mailbox owner s personal greeting Note When a mailbox owner does not have a personal greeting recorded and selected the n...

Page 99: ...ed the mailbox you are greeted with one of the mailbox owner s personal greetings The display shows the mailbox owner s name and changes to show 2 At the tone record your message Note Remember to speak directly into the handset speak clearly and at a pace that is easy to understand The display changes to show To temporarily stop your message press or To continue recording your message press or If ...

Page 100: ...all the details you wanted You can also check to see if any background noise made your message inaudible While you are playing your recorded message you can retry the recording play it again or send the message to the mailbox you selected To retry your message press or This allows you to re record your message To assign a Delivery option press To send your message without assigning a Delivery opti...

Page 101: ...a caller wants to leave a message in a mailbox you can easily transfer the caller from your telephone You can transfer a to any mailbox registered and initialized with To transfer a call to a mailbox from your telephone 1 Press Note Do not press hold 2 Enter the mailbox number or use the Company Directory Note Do not use the Internal Feature 3 Press or replace the handset There are two types of me...

Page 102: ...message to the mailboxes included in the List your mailbox does not receive your message If you would like a Group List for your specific needs ask your System Coordi nator to create a Group List for you When you give the System Coordinator the information you should include 1 All the mailbox owners names 2 A list of the mailbox numbers 3 The Group List name Note You cannot send a Group List messa...

Page 103: ...the nearest telephone Clean up your mailbox There is a limited amount of message storage space both in your mailbox and within Do not save messages unless you need to listen to them again When you are finished with a message erase the message to free up storage space for yourself and other mailbox owners Remember to erase new and saved messages as soon as you are finished listening to them Keep a ...

Page 104: ... the office specify when you expect to return If you will be checking your mailbox even though you are out of the office make that clear If callers can reach you at another telephone number ensure your message includes the telephone number and the length of the temporary arrangement If you are going to be out of the office remember to forward your telephone to Take care when recording your greetin...

Page 105: ...e to all the mailboxes included in the Group List Encourage use Old habits are sometimes hard to break and some people have difficulty accepting or even trying new technologies Use your Personal Mailbox and other features and encourage your co workers and frequent callers to use them too Report problems promptly Should you encounter problems using report the trouble to the System Coordinator as so...

Page 106: ...6 4 Section 6 Telephone etiquette Mini Reference Guide ...

Page 107: ...minimum voice level If a response is not Attendant received the caller is automatically transferred to the receptionist or designated seems to operator If the operator is not available the call is transferred to the General transfer some Delivery Mailbox callers to the General It might be possible that the extension being called does not have a mailbox Delivery assigned Inform your System Coordina...

Page 108: ...The mailbox is not initialized A mailbox cannot receive messages until it has been initialized by the mailbox owner Initialize your mailbox Refer to the Mini User Card or refer to Section 4 Initializing your mailbox I have forgotten A forgotten password cannot be recovered Your old password must be reset to my mailbox the default password 0000 After the System Coordinator has reset your password p...

Page 109: ...mailbox up to 10 minutes you can ask the System Coordinator to assign a Class of Service to your mailbox which allows a longer maximum message length If you find that you need more message time in your mailbox you can ask your System Coordinator to assign a Class of Service to your mailbox that allows a longer total message time for your mailbox If the wrong language appears on the display of your...

Page 110: ...7 4 Section 7 Troubleshooting Mini Reference Guide ...

Page 111: ... an operator is available to answer calls Automated Attendant The answering service that answers incoming calls with a Company Greeting plays a list of options to a caller and performs call routing functions in response to a caller s selections Broadcast Message A message that can only be sent by the System Coordinator This type of message is played in all initialized Personal Mailboxes and plays ...

Page 112: ...display When pressed these buttons select the specified option Display options The choices available to a user that appear on the two line display Options appearing on the display can be selected using the display or buttons Enter more digits While assigning the destination telephone number for Off premise Message Notification entering a Pause recognizes dial tone then entering allows the user to ...

Page 113: ...ained in the List receive the same message Guest Mailbox A mailbox that is assigned to a user who does not have an extension Information Mailbox A mailbox that provides a caller with a message describing goods or services available from your company Initialize mailbox Preparing a mailbox to receive messages which includes changing a mailbox default password and recording a Company Directory name L...

Page 114: ...Mailbox Overrides are optional parameters in addition to the Class of Service values The Mailbox Overrides are Include in Company Directory and Message Message Waiting Notification A display prompt that informs a mailbox owner when a message has been left in a mailbox This feature is a Mailbox Override Off premise Message Notification The feature that forwards calls to an internal company telephon...

Page 115: ...one After accepting the Off premise Message Notification destination telephone number entering adds a D to the digit string The system uses this to recognize dial tone when an access code is required Resetting passwords A System Coordinator task that changes a mailbox password from its current setting back to the default setting 0000 four zeros Special Mailboxes The two mailboxes that are used by ...

Page 116: ...Glossarv 6 Voice prompts The prerecorded voice instructions that are played when accessing the different features and options Mini Reference Guide ...

Page 117: ...g recording name 4 2 Components 2 l Continue message option 4 l 4 Conventions l 3 Copy message option 4 l 7 D Destination number changing 4 30 2 l 0 Directory name 4 20 changing Disabling Off premise Message Notification 4 29 Display 2 11 Documents other l 2 E End of Message message options 4 16 Entering characters into the command line 2 l 3 Envelope message option 4 l 5 Erase message option 4 l ...

Page 118: ...s 5 7 N Names entering 2 l 0 Next message option 4 l 5 0 Off premise Message Notification 4 25 assigning 4 29 changing the destination number 4 30 setting up 4 25 Open Mailbox Feature Code 2 5 Operating how works 2 l Options at the end of a message 4 16 Company Directory 5 l copy 4 l 7 greeting 4 22 4 23 mailbox 4 l 3 Record 4 19 4 22 Reply 4 l 8 while a message is playing 4 14 while entering a ne...

Page 119: ...ilbox 3 3 Primary 4 7 Record message 4 l 9 Replay message option 4 14 4 l 6 Reply message option 4 l 8 Rules mailbox 2 9 S Select a greeting 4 l 1 4 23 Selecting the Company Directory option 5 l Single line display 2 l 1 Special Mailboxes 2 8 Directory Number Feature Code 2 5 Symbols 1 3 System Coordinator Mailbox 2 8 T Timeout 7 3 Transferring caller 5 7 Troubleshooting 7 l Two line display 2 11 ...

Page 120: ...Index 4 Mini Reference Guide ...

Page 121: ...StarTalk Mini Setup and Operation Guide _ I _ c ...

Page 122: ...he Company Directory About the mailboxes The Special Mailboxes Personal Mailboxes Information Mailboxes Mailbox rules Logging on Using the Using with a two line display Using with a single line display Using with an Analog Terminal Adapter Entering characters into the command line About the voice prompts Interrupting a voice prompt About the Reports Exiting from Your role as System Coordinator 2 l...

Page 123: ...ture Codes Verifying the Feature Codes Determining the software version Programming a memory button language capability 4 Preparing to set up Custom Call Routing CCR 4 l Introduction 1 How CCR works 4 l The CCR Tree 4 2 A Point 4 2 Home Menu 4 2 Home Menu voice prompt 4 2 Information Message 4 3 Leave Message Point 4 3 Transfer Point 4 3 Destination type 4 4 The Workspace 4 4 How you assemble the ...

Page 124: ...ty 5 1 5 l 5 l 5 2 5 4 5 4 5 5 5 5 5 7 5 9 5 1 1 11 5 1 3 15 16 5 1 7 5 1 8 6 Setting up mailboxes Introduction 6 1 Registering Personal Mailboxes Information Mailboxes Class of Service Mailbox Overrides Before you register the mailboxes Adding Personal Mailboxes How a Guest Mailbox can be used Adding Guest Mailboxes Using Information Mailboxes Adding information Mailboxes Special Mailboxes Initia...

Page 125: ...lding a Tree Recording the Home Menu voice prompt Adding an Information Message Assigning the Destination type Adding a Transfer Point Adding a Leave Message Point Assigning the Destination type Saving a CCR Tree Enabling a CCR Tree Testing a CCR Tree 9 Administering Custom Call Routing CCR Introduction Disabling a Tree Accessing the Workspace Deleting a Tree Erasing a Path Adding a Point Changing...

Page 126: ...of Service Changing a mailbox owner s name Changing Mailbox Overrides Resetting a mailbox password Deleting a mailbox 11 Sending a message to more than one mailbox Introduction Broadcast Messages to send a Broadcast Message Sending a Broadcast Message Group Messages Preparing a Group List Adding a Group List Changing a Group List name and Company Directory recording Changing the members of a Group...

Page 127: ...stem trouble 1 3 1 Operating trouble 1 3 3 CCR trouble 1 3 6 Appendix A feature compatibility only DN A l A 6 Appendix Configuration data definition Appendix C Resetting Appendix D configuration tips Appendix E error messages Appendix F samples and tips B l C l D l E l F l G l o s s a r y Glossary 1 Index Index 1 1 1 2 2 1 2 6 1 2 7 1 2 9 Mini Set Up and Operation Guide ...

Page 128: ...ection 3 Preparing to set up This section outlines the information you need for a successful set up and also provides information on how to check the tion of your company s Business Communication System HOW this The System Coordinator s Set Up and Operation Guide is organized guide is according to sections that cover organized ow to use this guide provides a brief overview identifying the organiza...

Page 129: ...pt and Business Status It also shows you how to change the receptionist or designated operator extension Setting up Custom Call Routing CCR provides the necessary steps and information to set up This section also explains how to record the messages set up the Tree and enable CCR Administering Custom Call Routing CCR provides the necessary information and steps to change CCR This section explains h...

Page 130: ...ips Appendix E provides a list of error messages that might appear when is being used Appendix F provides a sample set up and also describes some common application tips Glossary covers the terms and definitions used in this guide Index provides a list of everything contained in this guide and where the information is located The Index is in alphabetical order If you cannot find a term try looking...

Page 131: ...e Press When you see an underlined word you can press the button directly below the option on the display Buttons This guide uses button representations Any button that appears in the text or instruction steps indicates the button that selects an option Example Press When you see a button it represents the button you must press proceed Angled brackets Some information is descriptive information th...

Page 132: ...ples of the different main menus appearing on the display with optional software enabled refer to Appendix Configuration Default menus Before you attempt to set up ensure you are familiar with how the requisites one and two line display telephones operate We recommend you read your telephone user cards before proceeding Other For more information about Mini refer to the documents Mini User Card l ...

Page 133: ...1 6 Section 1 How to use this guide Mini Set Up and Operation Guide ...

Page 134: ...m Call Routing CCR using the the display voice prompts exiting from your role as System Coordinator set up and operation task summaries works with a Business Communication System offering a receptionist service that routes calls and provides voice message taking capability When enabled answers incoming calls and routes the calls to extensions and mailboxes within the system has three main componen...

Page 135: ...m Coordinator and then initialized by the mailbox owner Any caller can leave a message in a mailbox after the mailbox is initialized Mailbox owners can open their mailboxes and customize them using all the available options of Some common mailbox options are record and select primary and alternate greetings password selection record a name in the Company Directory set up and maintain Off premise M...

Page 136: ...to the General Delivery Mailbox When the General Delivery Mailbox is disabled the caller is returned to the Automated Attendant When using from a telephone a user must first enter a Feature Code Feature Codes are used to access the different set up and operation functions of To use a function a Feature Code must first be entered There are six Feature that work with The default Feature Codes that w...

Page 137: ...available This Feature Code is also used to establish whether a business is open or closed and to designate the operator s extension This Feature Code is protected by a password To use the Operator Status Feature press System Administration Feature Code Is used by the System Coordinator and the installer up This Feature Code is also used by the System Coordinator to add mailboxes and select an alt...

Page 138: ...e Automated Attendant is enabled the Automated Attendant menu prompt provides a list of options so that a caller can reach any extension or mailbox in your company leave a message in a mailbox select an alternate language not a prerecorded voice prompt look for an extension or mailbox in the Company Directory reach your company receptionist or designated operator open a Personal Mailbox as a mailb...

Page 139: ...hether or not a mailbox appears in the Company Directory is established by the System Coordinator when the mailbox is registered with This Company Directory override can be changed at any time About the A mailbox is a storage place for messages on the Mini system mailboxes Mini can store a maximum of 24 mailboxes There are three groups of mailboxes including Special Mailboxes Personal Mailboxes l ...

Page 140: ...n To request an Information Mailbox see your system Coordinator Mail box Only a few rules apply to the mailboxes These rules should be given to any user who is going to have a mailbox The mailbox rules are A password is always needed to open a mailbox 2 A mailbox can be opened from any telephone from the display prompt At this prompt enter the mailbox number and password combination When a mailbox...

Page 141: ...ailbox number for your System Coordinator Mailbox The next four digits represent the default password The password and mailbox combination varies depending on the mailbox number length Mailbox number lengths range from two to seven digits When the mailbox number length is two digits the System Coordinator mailbox is 12 When the mailbox number length is seven digits the System Coordinator mailbox i...

Page 142: ...e 2 1 When you are entering a name using the Company Directory option you need only to press the number button associated with the letters of the name once You do not need to enter a comma For example if you are looking for the last name Taylor you would press When you are looking for a mailbox owner using the Company Directory you can find the name by entering the first four letters of the last n...

Page 143: ...oice prompt and the corresponding button does not appear on the display you must select the option using the numbers on the The two line display is shown in Figure 2 2 Display command line Display buttons button options Figure 2 2 two line display The display on and M7208 telephones is a single line display that can be used for any session Any configuration task such as setting the date and time r...

Page 144: ... is determined by using Feature 985 on a telephone If you have an Enhanced you can also press to open your mailbox or to leave a message and follow the voice prompts When a caller uses from a rotary dial telephone transfers the caller to your company receptionist or designated operator If a receptionist or designated operator is not available to answer the call the caller is transferred to General...

Page 145: ...can enter is 16 For example There are three situations when the command line prompt will disappear This happens when the display shows the command line prompt For instance when the display shows When you begin to enter the last name the command line prompt disappears For example if you were entering the name S Martin you press the button for M the display drops the command and changes to show Afte...

Page 146: ... prompt plays the available options it only provides the number buttons that invoke the options When the voice prompt announces a display option with a corresponding button you can use the display button or the number on the Either button will invoke the selected option Voice prompts can be interrupted by selecting an option on the display or A voice prompt can be stopped by pressing A user cannot...

Page 147: ...e available in minutes on the module Mailbox Activity Report 5 lists daily and average mailbox activity statistics for an individual mailbox or all mailboxes Tree Report lists the points on the tree assignments made to the points and any areas that need administering You must have an RS 232 printer connected to to produce Reports For more information about Reports refer to Section 12 Reports When ...

Page 148: ...Assigning a line to a Greeting Table Changing language capability Setting up the mailboxes Initializing the Special Mailboxes Setting up CCR Operation tasks Assigning Company Greetings Setting the Operator Status Adding new mailboxes Changing Mailbox options Reassigning the Class of Service Changing the mailbox extension Resetting a mailbox password Deleting a mailbox Registering a Guest Mailbox S...

Page 149: ...2 16 Section 2 Learning about Mini Set Up and Operation Guide ...

Page 150: ...cord is Mini provided to you by your installer your customer sales representative The Programming Record is useful for organizing the set up It Record contains information about hardware verification line data verification initialization verification Feature Codes Business Hours Optional equipment Custom Call Routing CCR It also provides a Greeting Table Summary Greeting and Line Summary Mailbox L...

Page 151: ...ailbox number The mailbox number length must be the same as the DN length This is designated by your installer The default DN length is two digits Bilingual This identifies whether or not the module has bilingual language capability Two types of modules with bilingual capability are avail able one type uses English and French the other uses English and Spanish This section of the Programming Recor...

Page 152: ...er in this section This section of the Programming Record shows the default Business Hours Business Hours can be assigned by your installer according to the Business Hours used in your company A space is provided to record the Business Hours for the Morning Afternoon Evening and Non business Hours This section of the Programming Record has information about the optional equipment attached to your ...

Page 153: ...mmary also provides a space where you can record the Customized Automated Attendant Main menu prompt and the Information Mailbox Message About the The Mailbox List provides a convenient place to record personal mailbox Mailbox List information This can serve as a paper record for future reference about mailbox numbers associated with extensions a mailbox owner s name a Class of Service and Mailbox...

Page 154: ...shed during the initialization performed by your installer important For to work the intercom number length must be the same as the mailbox number length If the intercom number length is different from the mailbox number length you must change the mailbox number length Refer to Appendix C Resetting Resetting is only reset if you have to change the mailbox number length the Group List capability or...

Page 155: ...Hourglass or SMDR If these codes are being used by another applica tion automatically assigns codes between 900 and 999 These codes might not appear in sequential order To determine Feature Code availability 2 To view the next Feature code press The display shows the next Feature Code display prompt and number 3 Continue pressing to view all the Feature Codes Feature Codes shown here are the defau...

Page 156: ... Section 3 Preparing to set up 3 F e a t u r e 9 Feature 9 _ _ Note For more information about Feature Codes refer to Section 2 Feature Code descriptions Mini Set Up and Operation Guide ...

Page 157: ...To verify the Feature Code display prompts 1 From a or M7324 display telephone press each Feature code The display shows the Feature Code s display menu Mini Set Up and Operation Guide ...

Page 158: ...termine the software version of your module version 1 Press Feature The display shows 2 Enter the System and password combination 3 Press The display shows 4 Press q The display shows To end the session press Note In the event troubleshooting is required you must reference the software version Mini Set Up and Operation Guide ...

Page 159: ...d Feature Codes are button Leave Message Open Mailbox Operator Status l System Administration Determine Intercom Number Transfer To program a memory button Feature 980 Feature 981 Feature 982 Feature 983 Feature 985 Feature 986 i Press On Compact DR2 and systems the display shows On Compact DR5 Modular DR3 DR4 DR5 and Centrext systems the display shows 2 Select a programmable button Mini Set Up an...

Page 160: ... DR5 and Centrext systems the display shows 5 Label the button with the Feature Code description using the paper labels provided with your telephone Repeat steps 1 through 5 for each Feature Code you want to program Note We recommend you program a memory with DN To verify DN refer to Verifying the Feature Codes earlier in this section Mini Set Up and Operation Guide ...

Page 161: ...u record For more information about recording greetings with a language option refer to Section 5 Recording the Company Greetings Important If for any reason you disable language option a user cannot select the option from the Automated Attendant voice menu When you use bilingual language capability mailbox Classes of Service determine which language is used by the mailbox For instance Class of Se...

Page 162: ... language preference display available Feature Code 983 language preference display not available Automated Attendant language selection option 9 available Automated Attendant language selection option 9 not available Figure 3 1 Language Feature Summary When bilingual language capability is disabled you can use one of the two languages your module is equipped with as the primary language Models ar...

Page 163: ...3 14 Section 3 Preparing to set up Mini Set Up and Operation Guide ...

Page 164: ...ype the Workspace how to a Tree call Paths and Path numbers CCR is a customized call routing application that allows incoming callers to route their own calls along call Paths you Create A Path on a CCR Tree is accessed by selecting a number option that you assign to a voice menu The CCR voice menus act just like Automated Attendant The only difference is that you determine the options available a...

Page 165: ... an option by pressing a number on any tone dial telephone For example To p ace an order press I To add name to our mailing press To reach our Sales department press To speak our Customer Service Representative press To speak with our receptionist press The Home Menu can also be an Information Message After a caller listens to the home Information Message the call is disconnected For example Come ...

Page 166: ...ss hours price lists shipping times or even the weather Leave The Leave Message Point provides a caller with single digit access to a mailbox to leave a message The Leave Message Point is assigned a digit number that appears in a menu When this number is pressed the caller is automatically transferred to a mailbox to leave a message For example You have reached fhe Ideal Office Machines Order Desk...

Page 167: ... The Each time you build or make changes to the CCR Tree you use the Workspace The Workspace is a work area that you use to assemble the CCR Workspace When the CCR Tree is built and you have recorded all the menus and mes sages you must save the Tree After the tree is saved it is removed from the Workspace Each time you want to make a change you select the Tree identification number and it is auto...

Page 168: ... you record plays immediately after the Com pany Greeting A call Path is a branch of the CCR Tree It consists of an Information Mes sage a Leave Message Point or a Transfer Point Each Point is identified by a Path number A Path number is the single digit that callers enter to route themselves along the call Path of the CCR Tree The CCR Tree call path can have a maximum of eight Paths The Home Menu...

Page 169: ...e Message Points Note Destination types appear in bold type HOME represents returning the call to the Home Menu DISC represents disconnecting the call Company Greeting Path Home Menu Path Path Path Path Transfer to an Leave Message Transfer to an Transfer to an Extension HOME Extension Extension Figure 4 1 Sample CCR Tree Paths including Points and Destination types Mini Set Up and Operation Guide...

Page 170: ...ailing list press To reach our Sales department press To speak with our Customer Service press To speak our reception ist press Path Path Transfer to an Transfer to an Extension Extension Path Leave Message To be included on the Machines mailing list leave your name and Path Leave Message To be included on the Machines mailing list leave your name and complete address lone Path Path Path Path Tran...

Page 171: ... this section Where Before you begin assembling the CCR Tree ensure you have a copy of the begin Mini Programming Record Constructing the CCR Tree involves three steps Step The first step in building the CCR Tree involves assigning options to the Menu The options you assign can be a transfer to a mailbox or extension or an Information Message The Home Menu is Path 0 For example Path To place an or...

Page 172: ...es preparing the voice menus and messages you want to record The Programming Record provides a space to record the message voice prompts for the Home Menu and a place to record the option messages The Home Menu voice prompt you record should include all the options available in the Menu For example Path To place an order press To add your name our mailing list press To reach our Sales department T...

Page 173: ...4 10 Section 4 Preparing to set up Custom Call Routing CCR Mini Set Up and Operation Guide ...

Page 174: ...s language availability Before you can begin to use you must determine how your Business Communication system is set up Refer to Section 3 Preparing to set up Important To set up in your company you require a M7310 or M7324 two line display telephone You cannot set up from a or M7208 single line display telephone Before you begin the set up ensure you have 1 Read Section 3 Preparing to set up 2 Re...

Page 175: ...sociated with a season can store the Date and Time for several weeks when the power is interrupted To set Date and Time The display shows 2 Enter the System Coordinator Mailbox and password combination 3 Press The display shows 4 Press The display shows 5 Enter the year month and day Note This is a six digit field Any single digit month or day must be preceded by a zero For example February 7 1992...

Page 176: ...s Note This is a four digit field Any single digit hour or minute must have a zero preceding the number For example must be entered as 0203 The display shows 9 Press or The display shows Note To return to the date display press To end the session press Mini Set Up and Operation Guide ...

Page 177: ...erator status HOW the You can record four Company Greetings for the table There is a total of four Greeting reetings stored on the Greeting Table at any one time A number from 1 to 10 Table is must be assigned to any greeting that is used in the Greeting Table organized e recommend using greetings 1 through 8 as your daily business greetings and greetings 9 and 10 as special greetings For example ...

Page 178: ...fternoon Evening and Non business Hours You must number each greeting 1 to 4 For example 1 Morning Greeting Good Morning You have reached Touchstone Marketing 2 Afternoon Greeting Good You have reached Touchstone Marketing 3 Evening Greeting Good Evening You have reached Touchstone Marketing 4 Non business Hours Greeting You have reached Touchstone Marketing Our business hours are Monday to Friday...

Page 179: ...French please press The greeting enclosed inside the brackets would be recorded in French important Since the Automated Attendant does not announce an alternate language option your greeting must instruct a caller to press to use the alternate language Although can store 10 greetings in total the sections Preparing your greetings and Recording the Company Greetings only show you how to prepare the...

Page 180: ...tor Mailbox and password combination 3 Press The display shows 4 Press The display shows 5 Press The display shows Note Pressing changes the display to show For more information refer to Section Changing the Automated Attendant status 6 Press The display shows 7 Enter the greeting number to be recorded Note This number can be any number from 1 to 10 You do not have to record your Company Greetings...

Page 181: ... greeting is unclear or there is background noise you can re record the greeting To record the greeting again press 12 To accept the greeting press To end this session press You are returned to the display Repeat steps 5 through 11 for greetings 2 3 and 4 and any other numbered greeting you want to record Note Greetings 1 through 4 are assigned by default to the Greeting Table This means that gree...

Page 182: ...reetings that you will need Language preference The language preference you select determines which language the Automated Attendant uses There are two language types primary and alternate To assign greetings and language preference to the Greeting Table 1 2 3 4 5 6 7 P r e s s The display shows Enter System Press The display shows Press The display shows P r e s s The display shows Coordinator Ma...

Page 183: ...isplay 10 Press The display shows Note You can set the language preference for the Greeting Table This setting determines which language the Automated Attendant uses when answering incoming calls This can be changed at any time If the bilingual option is set to NO this display is not shown To change the language preference press The display changes to show 1 t To return to the display and continue...

Page 184: ... added to the Configuration and line answer is set to YES Note For more information about line answering refer to Section 7 Assigning Line Answering Adding To add a line and assign it to the Greeting Table lines P r e s s 2 Enter System Coordinator Mailbox and password combination 3 Press OK The display shows 4 Press The display shows Press L I display shows i I 6 Enter the line number Note For in...

Page 185: ...to change answer from to Note Press RI to move to the Li 1 Ri display Repeat steps 5 through 8 to continue entering lines and assigning the lines to the Greeting Table 9 Press q The display shows To end this session press Mini Set Up and Operation Guide ...

Page 186: ...iately To assign or change the number of rings before answers answers 2 3 4 5 6 7 Press Enter System Coordinator Mailbox and password combination Press OK The display shows Press The display shows Press L I The display shows Line Enter line number Note For information about the incoming line numbers used in your company refer to your Mini Programming Record Press The display shows Mini Set Up and ...

Page 187: ...are the Automated Attendant must be set to answer after a minimum of two rings After two rings calling line infomation appears on the display Press The display shows Press to view Line 2 Note Pressing returns the display to the 2 display Repeat steps 9 through 12 to continue entering the number of rings before answers lines 13 P r e s s To end this session press Mini Set Up and Operation Guide ...

Page 188: ...assword combination Press The display shows Press The display shows Press L I The display shows Enter line number Note For information about the incoming line numbers used in your company refer to your Mini Programming Record Press The display shows Press to change answer from PI to Press The display shows Use the and buttons to view and change the configura tion of all the incoming lines in your ...

Page 189: ...e System Coordinator Mailbox and password combination 3 Press The display shows 4 Press The display shows Note Press to change the to an 5 Press When the Voice Mail option is enabled callers who try to reach an extension that is busy or does not answer will be transferred to the extehsion s mailbox When the Voice Mail option is disabled callers hear the Automated voice prompt At any time callers c...

Page 190: ...ox and password combination 3 Press The display shows 4 P r e s s The display shows Note Press to change the to an 5 Press When enabled callers who reach the General Delivery Mailbox can leave a message When disabled callers will hear the Automated Attendant voice prompt At any time callers can press zero 0 to reach the operator Note If the operator is not available the Automated Attendant voice p...

Page 191: ...hen a is shown pressing changes the to an 6 Press The display shows 7 Press to select the alternate language In this example English is used as primary language and is abbreviated as The alternate language can be either French or Spanish Note Pressing returns the display to the i display prompt To end the session press When the bilingual option is set to NO there is no alternate language capabilit...

Page 192: ... User Mailboxes can be assigned to each user who has an operating extension User Mailboxes store the messages for users who are unable to answer their telephone When you establish User Mailbox numbers you should assign the same number as the user s extension Guest Mailboxes Guest Mailboxes are assigned to users who do not have an operating extension These mailboxes act just like the User Mailboxes...

Page 193: ...stomized for the Mini A Class of Service outlines the special features of a mailbox There are 8 Classes of Service that specify Language prompts is enabled with English and French or English and Spanish When this feature is designated as Y Classes of Service 1 3 5 and 7 reflect the primary language and Classes of Service 2 4 6 and 8 reflect the alternate language Maximum mailbox message time This ...

Page 194: ...cipient of a new or urgent message The retry interval ranges from five to 30 minutes r This establishes the number of attempts will make to notify the recipient of a new or urgent message The number of attempts value ranges from three to nine Mailbox Mailbox Overrides allow you to change the default for optional parameters The default for both optional parameters is YES This be changed at any time...

Page 195: ...ts 1 P 15 3 30 Y 1 Y Y 5 3 Figure 6 1 Class of Service Summary 0 indefinite retention P primary language A alternate language 2 A 15 3 30 Y Y Y 5 3 3 P 15 7 0 Y 1 Y Y 10 5 4 A 15 7 0 Y 1 Y Y 10 5 5 P 5 3 7 Y 1 Y N 15 7 6 A 5 3 7 Y 1 Y N 15 7 7 P 20 2 15 Y 10 Y Y 30 9 8 A 20 2 15 Y 10 Y Y 30 9 Note Class of Service numbers 2 4 6 and 8 are alternate language Classes of Service This means when you as...

Page 196: ...y option and Message Waiting Notification are not included in a class of Service When you are adding a mailbox you can override these options The Company Directory option defaults to YES When the Company Directory option is NO a mailbox owner s name is not included in the Company Directory nor can a mailbox owner be selected from the Company Directory This means the mailbox is not included in the ...

Page 197: ...ing Service Yes or No Yes or No 20 20 01 No Yes 21 21 01 Yes Yes 22 22 03 No Yes 23 23 02 Franco M No Yes 2 4 2 4 01 Yes Yes 2 6 4 0 2 6 01 Yes Yes 0 1 Guest A Yes No 3 0 0 8 Sales Information Yes Figure 6 2 Sample Mailbox Number List Note When adding Information Mailboxes you should assign a Class of Service that has the maximum message length To accommodate an average Information Mailbox recorde...

Page 198: ...al prepared Mailboxes To add a mailbox The display shows 2 Enter the System Coordinator Mailbox and password combination 3 Press The display shows 4 The display shows 5 Press The display shows 6 Enter mailbox number The display shows 7 Enter extension number The display shows Mini Set Up and Operation Guide ...

Page 199: ...the last name from the first initial To enter a comma press 10 Press The display shows 11 Press This is a Directory Override Pressing means the mailbox owner s name is always played in the Company Directory Pressing means a mailbox owner s name does not appear in the Company Directory The display shows 12 Press This establishes whether or not a message notification appears on the display Pressing ...

Page 200: ...o services Guest Mailboxes can also be used for making customer reservations and even reserving a tee off time for a game of golf How you decide to use a Guest Mailbox is as limitless as your imagination Setting up a Guest Mailbox for any of the above suggestions is easy The following section shows you how to add a Guest Mailbox The example shown provides you with a suggestion of how to set up a G...

Page 201: ...ith ordering capability After you have determined what the announcement will say you must record a company greeting to inform callers this mailbox is available For example Good This is On Your Toes Dance School To reach dance studio press 46 To register for our fall classes press 28 To reach our company operator press 0 Note The extension number 46 in this example is an operating extension If this...

Page 202: ...ng Mailboxes services without an extension To add a Guest Mailbox The display shows 2 Enter the System Coordinator Mailbox and password combination 3 Press The display shows 4 Press The display shows 5 Press The display shows 6 Enter Guest Mailbox number The display shows Mini Set Up and Operation Guide ...

Page 203: ... button To select the next letter on a button press the button again To advance one space press To backspace press A comma must be entered after the last name To enter a comma press Press The display shows Press This is a Directory Override Pressing means the mailbox owner s name is always played in the Company Directory Pressing a mailbox owner s name is not played in the Company Directory The di...

Page 204: ...using the following methods Advertise the Automated Attendant main number and record a Company Greeting informing the caller of all the Information Mailbox services You can also provide a list of your company s Information Mailboxes in brochures and yellow pages advertising Recording all the Information Mailboxes in the Company Greeting is only applicable with a small number of mailboxes for examp...

Page 205: ... can add an Information Mailbox you must determine an appropriate Class of Service The Class of Service must have adequate message length available to accommodate an information greeting A Class of Service of 7 or 8 is appropriate for most Information Mailboxes These Classes of Service defaults allow 10 minutes for a recorded greeting To add an Information Mailbox P r e s s The display shows Enter...

Page 206: ...the display in the order that they appear on the button To select the next letter on a button press the button again To advance one space press To backspace press Press The display shows Press This is a Directory Override Pressing means the Information Mailbox is always played in the Company Directory Pressing means the Information Mailbox name is not played in the Company Directory You must repea...

Page 207: ...n 10 Changing a mailbox Class of Service General Delivery The General Delivery Mailbox is used to store messages from callers when the operator is not available when Personal Mailboxes are full or from callers using a rotary dial telephone The General Delivery Mailbox has a default greeting but you can replace this greeting with one you record Refer to Recording a Special Mailbox Greeting later in...

Page 208: ...s sent to you in the System Coordinator Mailbox The Special Mailboxes must be initialized before they can be used by your co workers Refer to Section 6 Initializing the Special Mailboxes Note The mailbox numbers used here for the Special Mailboxes are the default mailbox numbers based on a two digit length The mailbox number length is determined in the set up Mailbox numbers can range from two to ...

Page 209: ...he steps for initializing Special Mailboxes and Personal Mailboxes are the same A mailbox is only initialized once After a mailbox is initialized the mailbox owner can change the password and re record the Company Directory name using the Mailbox Administration options in the mailbox For more information refer to the Mini Reference Guide Mailbox options About the Each mailbox registered with is pr...

Page 210: ...ords must be between four and eight digits in length and cannot start with zero 0 Ensure that you write down and keep the password for each Special Mailbox in a safe The General Delivery Mailbox password should be provided to your receptionist or designated operator To initialize the Special Information or Personal Mailboxes Press The display shows Note Unless you have assigned an extension to the...

Page 211: ...understand Press to end the recording The display shows To accept the recording press Note If the recording is not acceptable press You are returned to the display where you can re record the Company Directory name When you have completed recording the Company Directory name you returned to mailbox s administration display prompt You are now ready to record the mailbox greeting You must repeat ste...

Page 212: ... sound of fhe tone p ease leave name of the person you are calling and your message Your message be returned as soon as possible Before you record the Special Mailbox Greetings prepare a greeting for each mailbox Include the Special Mailbox name in your greeting Remember to speak clearly at a pace that is easy to understand To record a Special Mailbox Greeting 1 2 3 4 The display shows Note Unless...

Page 213: ...boxes 5 The display shows The display shows The display shows I Note The primary greeting is represented by I The alternate greeting is represented by The display changes to show 9 The display shows At the tone record your greeting ...

Page 214: ... and re record the greeting For each Special Mailbox Greeting follow steps 1 through 12 To end this session press Note After the primary and alternate greetings are recorded you must select a greeting to play Refer to the next section Selecting a Special Mailbox Greeting If you do not select a greeting to play the primary greeting plays automatically Mini Set Up and Operation Guide ...

Page 215: ...greeting remember to change back to the primary greeting at the appropriate time To choose a primary or alternate greeting Press The display shows Note Unless you have assigned an extension to the Special Mailboxes the display prompt always appears If the prompt appears press 2 Enter the Special Mailbox number and password 3 Press The display shows 4 I The display shows 5 Press The display shows 6...

Page 216: ...d this session press The Special Mailbox Greetings are now selected and will play each time a caller reaches a Special Mailbox If you have selected an alternate mailbox greeting for a Special Mailbox remember to select the primary greeting when the situation changes Note The procedure for selecting a Personal Mailbox Greeting is the same as for selecting a Special Mailbox Greeting Mini Set Up and ...

Page 217: ... operator s operator should be assigned the General Delivery Mailbox number To change extension 1 Press The display shows L Enter the System Coordinator Mailbox and password combination 2 3 Press OK The display shows 4 5 6 Enter the General Delivery Mailbox number 7 The display shows Press The display shows The display shows Press The display shows Mini Set Up and Operation Guide ...

Page 218: ...tor s extension number The display changes to show Note The extension number shown in step 9 is only an example The extension number that you enter can be any operating extension number on your Business Communication System To end this session press Mini Set Up and Operation Guide ...

Page 219: ...6 28 Section 6 Setting up mailboxes Mini Set Up and Operation Guide ...

Page 220: ...endant Sign ON OFF Feature determines whether an operator is Sign available Each day the receptionist or designated operator must sign ON OFF on in the morning and sign off in the evening When your company receptionist or designated is available the attendant status must be set to YES When your company receptionist or designated operator for lunch coffee breaks or leaves in the afternoon the atten...

Page 221: ... 2 Enter Note This is the default operator password To change the operator password refer to Changing the operator password later in this section 3 Press The display shows 4 Press Note Pressing changes the to a When your company receptionist or designated operator is available the operator status should be set to When an operator is not available the operator status should be set to To end this se...

Page 222: ... To change the operator password 2 Enter Note This is the default operator password 3 Press 4 The display shows 5 Enter the new operator password Note A valid password is between four and eight digits The operator password cannot begin with a zero 0 6 To end this session press Mini Set Up and Operation Guide ...

Page 223: ... The password must be the operator reset to the default password OPERATOR password To reset the operator password 2 P r e s s 2 Enter RESETOPERPSWD Press OK The display shows 5 Press The operator password will reset to OPERATOR This session ends automatically Mini Set Up and Operation Guide ...

Page 224: ...e Afternoon Greeting automatically plays after 12 00 p m When your business closes you must set the Business Status to NO When the Business Status is set to NO the Non business Hours Greeting is played Table 7 1 summarizes the default greeting times For more information about greeting times refer to Setting your Hours later in this section a m to n o o n to to 12 00 midnight Plays when Business St...

Page 225: ...eptionist or designated operator to change the Business Status in the morning when your company opens and again in the evening when your company closes for the day To set the Business Status 1 2 P r e s s Enter the operator password Note The default password is q q q q q 3 OPERATOR Press The display shows 4 Press The display shows Note This changes the t l to a To end this session press Mini Set U...

Page 226: ...vening and Non business To set the Business Hours 1 P r e s s 2 Enter operator password Note The default password is OPERATOR 3 Press The display shows 4 Press until the display shows 5 Press 6 Enter Morning start time The display shows Note This is a four digit field Any single digit hour must be preceded by a zero 0 Press The display shows 7 8 Press The display shows Mini Set Up and Operation Gu...

Page 227: ...me The display shows 11 Press The display shows 12 Press The display shows 13 Press 14 Enter Evening start time The display shows 1 5 Press The display shows Note The Evening start time must be p m 16 Press This session ends automatically Mini Set Up and Operation Guide ...

Page 228: ...sabled will not answer incoming calls all incoming calls must be answered and routed by your company receptionist Note For information about line configuration refer to Section 5 Configuringthelines To assign Line Answering 2 Enter operator password Note The default password is q 3 OPERATOR Press The display shows 4 Press The display shows 5 Press The display shows Note Pressing changes the to an ...

Page 229: ... the receptionist or designated operator extension extension Note Requesting to speak to your company receptionist or designated operator is available when the Automated Attendant voice prompt announces the option and the Attendant availability is set to YES To change the operator default extension 1 P r e s s 2 Enter the operator password Note The default password is q q q OPERATOR 3 Press The di...

Page 230: ...this session press The display automatically returns to the Date and Time Any user requesting an operator is transferred to the new extension Important Whenever the operator s extension number is changed you must change the extension number of the General Delivery Mailbox to the new extension number of the operator Mini Set Up and Operation Guide ...

Page 231: ...Attendant prompt is set to NO the caller is not provided with any more options after leaving a message Instead after hearing the voice prompt Message delivered the caller hears the voice prompt Exiting the system Goodbye and the session ends You might want to disable the Automated Attendant prompt to prevent callers from establishing lengthy sessions You might also want to set the Automated Attend...

Page 232: ...tatus 7 13 6 Press The display shows 7 Press Note Changing the to an prevents the caller from returning to the Automated Attendant menu prompt after leaving a message To end this session press Mini Set Up and Operation Guide ...

Page 233: ...tion unique to your company Your Customized Automated Attendant menu prompt uses greetings 9 and 10 If greetings 9 and are recorded as Company Greetings erases the greetings and allows you to record your Customized Automated Attendant menu prompts Greeting 9 becomes the alternate greeting and greeting 10 becomes the primary greeting These new greetings must provide the caller with a list of option...

Page 234: ...he alternate prompt press Press I The display shows Note To record the alternate prompt press and follow the instructions that appear on the display Press At the tone record your prompt When recording your prompt be sure to include instructions such as press to reach an operator press to choose the alternate language and press to access the Company Directory Remember to speak slowly and clearly at...

Page 235: ...the prompt Important Recording the Customized Automated Attendant menu prompt overrides a previously recorded version of greeting 9 as the greeting or greeting 10 as the primary greeting Changing the Automated Attendant menu prompt status to enables you to record and assign greetings 9 and 10 through the Greeting Table To end this session press Mini Set Up and Operation Guide ...

Page 236: ... CCR Tree Before you can begin to build the CCR Tree you must determine how to design your Tree Refer to Section 4 Preparing to set up Custom Call Routing CCR and the Mini Programming Record Important To set up CCR in your company you require a M7310 or M7324 two line display telephone You cannot set up CCR from a or M7208 single line display telephone Before Before you begin the CCR set up ensure...

Page 237: ...ved before it can be enabled Important When you start building a CCR Tree you can save the Tree at any time If you end the CCR session at any point before you save the Tree the Tree is automatically saved as Tree 5 A Tree must be saved when all steps are completed All steps must be completed before a Tree can be put into service For more information about Tree 5 refer to Section 9 Accessing the Wo...

Page 238: ...play shows 2 Enter the System Coordinator Mailbox and password combination 3 Press The display shows 4 Press The display shows 5 Press The display shows 6 Press I The display shows 7 8 E n t e r Press The display shows 9 Press I LO The display shows Note When appears pressing changes the display to show I Mini Set Up and Operation Guide ...

Page 239: ...cord an alternate language Home Menu voice prompt press and follow the instructions that appear on the display To save the Tree press For information about saving a Tree refer to Saving a CCR Tree later in this section This completes recording the primary and alternate language Home Menu voice prompts You are now ready to add either an Information Message a Leave Message Point or a Transfer Point ...

Page 240: ... from this display 1 Enter the Path number 2 Press The display shows Note The shown in step 2 represents the Path number 3 Press I The display shows 4 Press The display shows At the tone record your primary language Information Message To temporarily stop your message press or To continue recording your message press or To re record your message press 5 Press OK to end the recording The display sh...

Page 241: ...on Message in the alternate language press and follow the instructions that appear on the display This completes recording the primary and alternate language Information Messages You are now ready to assign the Destination type For more information about designing a Tree refer to Section 4 Preparing to set up Custom Call Routing CCR Mini Set Up and Operation Guide ...

Page 242: ...on type 8 Press to return the caller to the Home Menu Note Pressing SC disconnects the call The display shows Note To save the Tree press For information about saving a Tree refer to Saving a CCR Tree later in this section This completes assigning the Destination You are now ready to add either an Information Message a Leave Message Point or a Transfer Point For more information about designing a ...

Page 243: ...step 2 represents the Path number Press The display shows 4 Press The display shows 5 Enter the extension number Note The display returns to the prompt Press to save the Tree For information about saving a Tree refer to Saving a CCR Tree later in this section This completes adding a Transfer Point You are now ready to add either an Information Message a Leave Message Point or a Transfer Point For ...

Page 244: ...er to a CCR Tree To add a Leave Message Point begin from this display 1 2 3 4 Enter path number P r e s s The display shows Press The display shows Press The display shows Note To access the Company Directory press DIE To erase your entry and re enter press 5 Enter the mailbox number The display shows This completes assigning the mailbox number You are now ready to assign the Destination For more ...

Page 245: ...re the Home Menu or to disconnect the call To assign the Destination type 6 Press to return the caller to the Home Menu Note Pressing DISC disconnects the call The display shows Note To save the Tree press This completes assigning the Destination type You are now ready to save the Custom Call Routing Tree For more information about saving a Tree refer to Saving a CCR Tree later in this section Min...

Page 246: ... Tree before it can be enabled CCR Tree To save a CCR Tree begin from this display Et ID 1 Press The display shows 2 Press The display shows 3 Press The display shows This completes saving the CCR Tree You are now ready to enable the CCR Tree Mini Set Up and Operation Guide ...

Page 247: ... the Tree to the Greeting Table Note For more information about the Greeting Table refer to Section 5 in this guide To assign a Tree to a Greeting Table The display shows 2 3 Enter the System Coordinator mailbox and password combination Press The display shows 4 Press The display shows Press The display shows 6 Press until the display shows Mini Set Up and Operation Guide ...

Page 248: ...to ensure it is working properly Verify the Tree by calling the company number and routing yourself along each Tree Path Options to verify also include the Home Menu routes the call as designed each transfer routes the caller to the intended extension or mailbox each message provides the correct information messages are courteous and easy to understand This completes the steps required to put the ...

Page 249: ...8 14 Section 8 Setting up Custom Call Routing CCR Mini Set Up and Operation Guide ...

Page 250: ...e transfer extension changing a Leave Message Point changing the Destination type Note After you have recorded voice prompts and messages Do not replace the handset If you want to use the Handsfree feature remember to press the Handsfree button before replacing the handset After the Tree is saved it must be assigned to the Greeting Table before it is in service Before you change a CCR Tree you mus...

Page 251: ...abling a Tree puts the Tree out of service Note To redesign a Tree refer to Section 4 Preparing to set up Custom Call Routing CCR and the Mini Programming Record To disable a Tree The display shows 2 Enter the System Coordinator password and mailbox combination 3 Press The display shows 4 Press The display shows 5 P r e s s Mini Set Up and Operation Guide ...

Page 252: ...Section 9 Administerinq Custom Call Routing CCR 6 Press until the display shows 7 Press The display changes to show 8 Press OK The display shows To end this session press Mini Set Up and Operation Guide ...

Page 253: ... You can access the Workspace continue to make changes Workspace and save the Tree as Tree number To access the Workspace 1 Press _ _ The display shows 2 3 4 5 6 Enter the System Coordinator password and mailbox combination Press OK The display shows Press The display shows Press The display shows Press I The display shows Mini Sel Up and Operation Guide ...

Page 254: ...display shows 9 P r e s s The display shows 10 Enter the Path number you want to change 11 Press Note Continue making the changes you require according to the steps provided in this section or follow the options that appear on the display Be sure to save the Tree as Tree number 1 Mini Set Up and Operation Guide ...

Page 255: ...leting it to ensure that service is not a Tree To delete a Tree 1 P r e s s The display shows 2 Enter System Coordinator password and mailbox combination 3 P r e s s The display shows 4 P r e s s The display shows 5 Press The display shows 6 Press I display shows Mini Set Up and Operation Guide ...

Page 256: ...Tree number you want to delete Note The Tree number is or 5 The display changes to show Press The display shows 9 P r e s s The display changes to show Press The display shows The display changes to show To end this session press Mini Set Up and Operation Guide ...

Page 257: ...en erased a Path cannot be recovered To erase a Path 1 2 3 4 5 6 7 The display shows Enter System Press The display shows Press The display shows Press The display shows Press I The display shows Coordinator password and mailbox combination Enter the tree number Note The Tree number can be 1 or 5 The display changes to show Mini Set Up and Operation Guide ...

Page 258: ...Routing CCR 8 Press The display shows 9 Press The display shows 10 Enter Path number you want to delete 11 Press The display shows Note The shown in step 11 represents the path number 12 The display shows Mini Set Up and Operation Guide ...

Page 259: ...nges to show 14 Press E The display shows 15 Press The display shows 16 Press The display shows Note When Tree 1 is enabled Tree 5 cannot be saved to replace Tree The new tree is saved as Tree 5 in the workspace The display changes to show To end this session press Mini Set Up and Operation Guide ...

Page 260: ...ansfer Point Leave Message Point To add a Point The display shows 2 Enter the System Coordinator password and mailbox combination 3 Press OK The display shows 4 Press The display shows 5 Press The display 6 Press The display shows 7 Enter the Tree number Note The Tree number can be 1 or 5 Mini Set Up and Operation Guide ...

Page 261: ... shows Note The shown in step 11 represents the Path number To add an Information Message press To add a Transfer Point or a Leave Message Point press and follow the instructions that appear on the display Note For more information about Points refer to Section 8 Setting up Custom Call Routing CCR To end this session press Star Talk Mini Set Up and Operation Guide ...

Page 262: ...ormation Message To change an Information Message Press The display shows 2 3 Enter the System Press The display shows 4 Press The display shows 5 Press The display shows 6 Press I The display shows Coordinator password and mailbox combination 7 Enter Tree number Note The Tree number can be 1 or 5 8 Press The display shows Mini Set Up and Operation Guide ...

Page 263: ...p represents the Path number 12 P r e s s The display shows The display shows At the tone record your primary language Information Message 14 Press to end your recording The display shows 15 Press to accept your recording Note To record an alternate language Information Message press and follow the instructions that appear on the display Mini Set Up and Operation Guide ...

Page 264: ...g changes the display to show SC Pressing returns the caller to the Home Menu Pressing DISC disconnects the call Press OK The display shows Press The display shows P r e s s The display shows Press The display shows I i The display changes to show To end this session press Mini Set Up and Operation Guide ...

Page 265: ...1 Press The display shows how a call is transferred to an extension 2 Enter the System Coordinator password and mailbox combination 3 Press OK The display shows 4 P r e s s The display shows 5 Press The display shows 6 Press I The display shows 7 Enter the Tree number Note The Tree number can be 1 or 5 Mini Set Up and Operation Guide ...

Page 266: ...9 Press The display shows 10 Enter the Path number you want to change 11 Press The display shows 12 Press The display shows Note The shown in step 12 represents the current extension 13 Press The display shows 14 Enter the new extension number Mini Set Up and Operation Guide ...

Page 267: ...tering Custom Call Routing CCR 15 Press The display shows 16 Press The display shows 17 Press The display shows 18 Press The display shows The display changes to show To end this session press Mini Set Up and Operation Guide ...

Page 268: ...ct the call Important Ensure the mailbox is initialized before assigning the mailbox number to a CCR Tree To change the mailbox number 1 Press The display shows 2 Enter System Coordinator password and mailbox combination 3 Press The display shows 4 Press The display shows 5 Press The display shows 6 Press I The display shows 7 Enter Tree number Note The Tree number can be 1 or 5 Mini Set Up and Op...

Page 269: ... number you want to change 1 Press The display shows 12 Press The display shows Note The shown in step 12 represents the current mailbox number 13 Press 14 Enter the new mailbox number Note Pressing changes the display to show Pressing returns the caller to the Home Menu Pressing disconnects the Mini Set Up and Operation Guide ...

Page 270: ...g Custom Call Routing CCR 9 21 15 Press The display shows 16 Press The display shows 17 Press The display shows 18 Press The display shows The display changes to show To end this session press Mini Set Up and Operation Guide ...

Page 271: ...n Home Menu Point or to disconnect the call Note Only Information Messages and Leave Message Points require a Destination type To change the Destination type The shows 2 Enter System Coordinator password and mailbox combination 3 Press The display shows 4 Press The display shows 5 Press The display shows 6 Press I The display shows 7 Enter Tree number Note The Tree number can be 1 or 5 Mini Set Up...

Page 272: ...e 11 Press The display shows Note The display shows I if you are changing an Information Message Point or if you are changing a Leave Message Point 12 Press 13 Press until the display shows 14 Press The display shows 15 Press to return the caller to the Home Menu Point Note Pressing DISC disconnects the call Mini Set Up and Operation Guide ...

Page 273: ...tering Custom Call Routing CCR Press The display shows 17 Press E The display shows P r e s s The display shows 19 Press The display shows The display changes to show To end this session press Mini Set Up and Operation Guide ...

Page 274: ... you lose the System Coordinator s password it can be reset Refer to Troubleshooting A mailbox owner lost the mailbox password The Special Mailbox administration involves listening to messages attending to each Special message and then deleting the message from the mailbox It is very important Mailboxes that messages left in the Special Mailboxes are attended to daily When a message is left in the...

Page 275: ...an be increased to a maximum of 9 When the volume reaches 9 the next time you press the volume returns to 3 for all external calls and 0 for all internal calls Note Volume control does not apply to system prompts Messages play at the adjusted volume while the prompts play at the preset volume When leaving a message in a mailbox provides you with four Delivery options Certified Urgent Private and N...

Page 276: ...pt 2 Enter the Special Mailbox number and password combination Press The display shows 4 5 Press The first message in the mailbox is played the display shows Note If the message was left by an outside caller or an individual in your company who did not have an extension or mailbox the option display s h o w s After a message has played you can Press to listen to the next message Press to reply to ...

Page 277: ...ller who has a mailbox initialized with the display line options always show the feature To send a copy of a message to a mailbox owner you must open the mailbox and listen to the message After the message has played 1 Press The display shows Note If the display does not show the option press 2 Press At the sound of the tone record the message introduction Note To copy the message without an intro...

Page 278: ...he Delivery options press 6 Press The display shows To mark a message Certified press To mark a message Urgent press To mark a message Private press I To send the message press To cancel Delivery options or return to the options menu press 7 P r e s s The display shows The display changes to show Note Press to forward a copy of message to another mailbox To end this session press Mini Set Up and O...

Page 279: ...d mailbox and an operating extension Once you press you are transferred to the message sender s extension Once you have called the message sender your session with has ended To continue listening to messages left in the Special Mailboxes you must open the Special Mailbox using the Open Mailbox Feature Code Refer to Opening the Special Mailboxes earlier in this section Replying to When you are list...

Page 280: ...ows Note To listen to your message before sending it press To record your message again press RETRY 5 Press to accept your recording The display shows 6 Press The display shows To mark a message Certified press To mark a message Urgent press To mark a message Private press To send the message press To cancel Delivery options or return to the options menu press After the message is marked with a De...

Page 281: ...ccurs you should reset the password to New mailboxes can be added to whenever they are required Before you add a new mailbox ensure that you have all the necessary mailbox information You should complete a Mailbox List outlining the new mailbox number extension number mailbox owner s name Last name and first initial Class of Service Company Directory and Message Waiting Overrides Note Refer to you...

Page 282: ... Enter the mailbox owner last name and first initial5 Important This is a maximum 16 character field To enter a name you must press the number on the associated with the letter you want The letters appear in the order that they appear on the button To select the next letter on a button press the button again To advance one space press To backspace press A comma should be entered to separate the la...

Page 283: ...ns a Message for you notification is shown on the display after a message has been left in your mailbox Pressing means no message will be shown If this is a mailbox without an extension press The display returns to Repeat steps 5 through 12 for each mailbox To end this session press After a mailbox is registered with you can change the mailbox options extension Class of Service mailbox owner s nam...

Page 284: ... 3 4 5 6 7 The display shows Enter the System Coordinator Mailbox and password combination Press The display shows The display shows Press The display shows Enter the mailbox The display shows Press The display shows number Note The extension number shown is only an example Mini Set Up and Operation Guide ...

Page 285: ...10 12 Section 10 Administering the mailboxes 8 Press The display shows 9 Enter extension number The display changes to show To end this session press Mini Set Up and Operation Guide ...

Page 286: ... mailbox Class of Service 2 Enter the System Coordinator Mailbox and password combination 3 Press The display shows 4 The display shows 5 Press The display shows 6 Enter the mailbox number The display shows 7 Press The display shows 8 Press The display shows Mini Set Up and Operation Guide ...

Page 287: ...m 1 to To end this session press Changing a To change a mailbox owner s name mailbox owner s name 1 2 Enter the System Coordinator Mailbox and password combination 3 The display shows 4 display shows 5 P r e s s The display shows 6 Enter the mailbox number The display shows Mini Set Up and Operation Guide ...

Page 288: ... The display shows 9 Press The display shows 10 Press The display shows 11 Enter the mailbox owner s last name and first initial 12 Press The display shows Note The display numbers shown in these steps are only examples To end this session press Mini Set Up and Operation Guide ...

Page 289: ...ng Notification Mailbox Overrides 2 Enter System Coordinator Mailbox and password combination 3 Press The display shows 4 The display shows 5 The display shows 6 Enter the mailbox number The display shows 7 Press The display shows 8 Press The display shows 9 Press The display shows Mini Set Up and Operation Guide ...

Page 290: ...on the display the mailbox owner s name is not included in the Company Directory 11 Press The display shows Note To change the Message Waiting Notification press When a is shown on the display a Message for you notification appears on the display when a message is left in a mailbox When an is shown the Message for you 12 Press OK The display shows notification does not appear To end the session pr...

Page 291: ...ssword Important A mailbox cannot receive messages until the default password is changed To reset a mailbox password 1 2 Press Enter the System Coordinator Mailbox and password combination Note If the System Coordinator password has been lost refer to Troubleshooting A mailbox owner lost the mailbox 3 password P r e s s The display shows 4 P r e s s The display shows 5 P r e s s The display shows ...

Page 292: ...box are also deleted To delete a mailbox Press 2 Enter the System Coordinator Mailbox and password combination 3 Press The display shows 4 The display shows 5 Press The display shows 6 Enter mailbox number to be deleted The display shows 7 Press The display shows After the mailbox has been deleted the display returns to the i 1 display prompt To end the session press Mini Set Up and Operation Guid...

Page 293: ...1 0 20 Section 10 Administering the mailboxes Mini Set Up and Operation Guide ...

Page 294: ...d by you and played on all mailboxes initialized Messages with A mailbox owner does not have to select a Broadcast Message to play The message is played automatically when mailbox owners open their mailboxes A Broadcast Message is played only once for each mailbox owner and cannot be interrupted A mailbox must be initialized to receive a Broadcast Message When to A Broadcast Message ensures the sa...

Page 295: ...ssages left in your mailbox 5 After five seconds the voice prompt announces the other options 6 P r e s s The display shows 7 At the sound of the tone record your message Note When you record your Broadcast Message remember to speak clearly at a pace that is easy to understand Do not forget to include all the important points of your message Press to end your recording Note To listen to your messa...

Page 296: ...Group List name A Group List is set up using the Configuration Feature Code 983 You can have a total of two Group Lists Each Group List can contain a maximum of 24 mailboxes Before you begin to add Group Lists you must prepare a Group Mailbox member list This list should contain leading digit assigned during installation Group List name maximum 16 characters long mailbox numbers included in the gr...

Page 297: ...up List cannot include another Group List number For a mailbox to be added to a Group List the mailbox must be initialized If a mailbox is not initialized when you are adding it to a Group List you must end your session and have the mailbox initialized When you return to add that mailbox to the Group List you must select from the Group List display Refer to Changing a Group List later in this sect...

Page 298: ... 3 Press The display shows 4 Press The display shows 5 Press I ST The display shows 6 Press The display shows Note automatically assigns a Group List number The display shown in step 6 shows the Group List number In this display 901 is used only as an example 7 Press The display shows 8 At the sound of the tone record the Group List name Mini Set Up and Operation Guide ...

Page 299: ... Press The display shows Enter the mailbox number included in the Group List Note If you do not know a mailbox number press This allows you to select a name and mailbox number from the Company Directory After a mailbox number the display shows name of the mailbox owner Press The display returns to To add additional mailboxes to the Group List repeat steps 13 through 15 Note Mailboxes must be initi...

Page 300: ... section To change a Group List name and Company Directory recording recording 1 Press 2 Enter the System Coordinator Mailbox and password combination 3 Press The display shows 4 Press The display shows 5 Press I ST The display shows 6 Press The display shows i t i 7 Enter the Group List number you want to change The display shows Note The display shown in step 6 shows the Group List name In this ...

Page 301: ...hange the Group List name you must make a new recording of the Group List name 12 Press 13 At the sound of the tone record the new Group List name 14 Press to end your recording The display shows Note To listen to your recording press To record the name again press 15 Press The display shows To end this session press Mini Set Up and Operation Guide ...

Page 302: ...t To create a new Group List refer to Adding a Group List earlier in this section To change the members of an existing Group List 2 Enter the System Coordinator Mailbox and password combination 3 Press The display shows 4 Press The display shows 5 Press I ST The display shows 6 Press The display shows 7 Enter the Group List number you want to change The display shows 8 Press until the display show...

Page 303: ...n add them to a Group List After adding a mailbox number to the Group List the display shows Note To add more mailbox numbers to the Group List repeat steps 9 and 10 To delete a mailbox number from the Group List press The display shows Enter mailbox number to be deleted from the Group List After deleting a mailbox number from the Group List the display shows Note To delete more mailbox numbers fr...

Page 304: ...ist you need the Group List number To view a Group List 2 Enter the System Coordinator Mailbox and password combination 3 Press The display shows 4 Press The display shows 5 Press ET The display shows 6 Press The display shows 7 Enter the Group List number you want to view The display shows Press until the display shows Mini Set Up and Operation Guide ...

Page 305: ...time When you delete the Group List you Group List remove the Group List name and delete the Group List member mailbox numbers The Group List number is automatically re assigned by the next time you add a Group List Note Deleting a Group List does not delete any of the mailboxes from that were included in the List To delete a Group List Enter the System Coordinator Mailbox and password combination...

Page 306: ... more than one mailbox 11 Press I ST The display shows L i i 6 Press The display shows 7 Enter the Group List number you want deleted The display shows 8 Press The display shows To end the session press Mini Set Up and Operation Guide ...

Page 307: ...paring a Group List earlier in this section To send a Group Message from your telephone 1 Press The display shows 2 Enter the Group List number 3 The display shows the Group List name 4 Press 5 At the sound of the tone record your message Note When you record your message do not forget to include all the message particulars Remember to speak directly into the handset speak clearly and at a pace th...

Page 308: ...Report Numeric Subscriber Mailbox Report System Group List Report Message Usage Report Mailbox Activity Report CCR Tree Report This section describes the Reports and explains how to generate them Note To print the Reports you must have a printer connected to the RS 232 port on the Mini module Mini Set Up and Operation Guide ...

Page 309: ...a greeting recorded for their mailbox Figure 12 1 shows a sample Directory Report DIRECTORY REPORT Date Subscriber M B Ext Name Greeting Recorded Recorded BLACK K 24 24 Y Y 23 23 Y Y 33 33 Y Y GENERAL 10 10 N N GUEST ONE 20 N Y 21 21 Y Y SYSTEM MANAGER MB 12 12 Y Y 22 22 Y Y Figure 12 1 Directory Report Note The Directory Report appears in alphabetical order Numeric Subscriber Mailbox Report 2 Thi...

Page 310: ...Message Usage Report 4 This report shows the total minutes of message storage time available Figure 12 4 shows a sample Message Usage Report MESSAGE USAGE REPORT Date Minutes Current storage available 41 Figure 12 4 Message Usage Report When this report shows less than 20 minutes of message storage time avail able you should send a Broadcast Message telling users to delete any unnec essary message...

Page 311: ...ormation about the messages left in a mailbox This report covers mailbox usage over a period of seven days This is a two page report Figure 12 5 shows a sample page 1 of the Mailbox Activity Report Mailbox Activity Report Date July 8 92 Mailbox 10 MB access date May 15 Tues Mon Sun Sat Fri Thur Wedn No of recorded messages 0 0 0 0 0 0 0 Total length of messages 0 0 0 0 0 0 0 0 0 0 0 0 0 0 Average ...

Page 312: ... No Alternate Greeting Recorded No Figure 12 6 Mailbox Activity Report 12 6 shows a sample page 2 of the Mailbox Activity Report Note Each line total indicates a cumulative average of the mailbox activity You can print this report for individual mailboxes or all mailboxes registered with When you are printing the Mailbox Activity Report for all the mail boxes ensure the printer has enough paper Be...

Page 313: ...assignments made to the Points and any areas that need administering Figure 12 7 shows a sample Tree Report TREE REPORT Date Tree 1 Last Modified Status Enabled Path Description 0 Menu 1 Blind Xfer 2 Leave 3 Blind Xfer 4 Blind Xfer Parameter Pri Prompt Ext 24 Mbox 30 Ext 23 Ext 35 Dest ______ Home Caution Prompt Not Mbox Not Figure 12 7 Sample Tree Report Mini Set Up and Operation Guide ...

Page 314: ...eport to 5 The display shows 2 Enter system coordinator Mailbox and password combination 3 Press The display shows 4 P r e s s The display shows I Note Only the report number is shown on the display The report numbers appear in the number sequence from 1 to 5 To see the next report number on the display press For more information about printing the CCR Tree Report refer to Printing the Tree Report...

Page 315: ... to show Enter mailbox number or press Report 5 begins to print automatically When the report is finished printing the display changes to show Note To stop the printer press To reset the Mailbox Activity report press I The display shows 7 Press RESET To end this session press Mini Set Up and Operation Guide ...

Page 316: ...o print your reports ensure the printer is turned on and there is enough paper in the printer To print a CCR Report 2 3 4 5 6 7 Press The display shows Enter system coordinator mailbox and password combination The display shows Press The display shows Press The display shows Press I The display shows Enter the Tree number Note The Tree number can be 1 or 5 Mini Set Up and Operation Guide ...

Page 317: ...ction 12 Reports 8 P r e s s The display shows 9 Press I The display shows When the Report is finished printing the display changes to show When you are finished printing press T Mini Set Up and Operation Guide ...

Page 318: ...that all the channels are busy Try calling back Your call will be answered when a channel is available 3 Verify that greetings 1 to 4 have been recorded These greetings default to the Greeting Tables and must be recorded for the Automated Attendant to operate Refer to Section 5 Setting up If you find that the channels are frequently busy this might be a good indication that there is too much activ...

Page 319: ...that all mailboxes have unique extension numbers print the Directory Report Report 2 For instructions on printing reports refer to Section 12 Printing Reports There are three possible causes for this problem 1 The Business open is set to NO Change the Business open to YES Refer to Section 7 Setting the Business Status 2 internal calendar clock is not set to the correct time Reset the date and time...

Page 320: ...alized messages A mailbox cannot receive messages until it has been initialized by the mailbox owner Instruct owners to initialize their mailboxes Refer users to the Mini User Card or provide instructions from Section 6 in this guide 2 A mailbox is full If a mailbox is full instruct the mailbox owner to delete all or some of the messages in the mailbox 3 The Message Storage Pack is full notifies y...

Page 321: ... does not appear in the Company Directory You should check to ensure the Company Directory Override is set to YES Refer to Section 10 Adminis tering the mailboxes All ringing CO lines will be answered by if the station is forwarded to using Call Forward All Calls or Call Forward No Answer For a complete description of feature compatibility refer to Appendix A Ensure the mailbox is not already regi...

Page 322: ...can press the button The DTMF tone sent to indicates that you are finished entering your password Some voice patterns are the same as DTMF tones This can cause to function incorrectly For example if in the middle of a message you said something that sounded the same as the DTMF tone created by pressing the In button the recording session would end Correcting Talk Off requires adjustments to your s...

Page 323: ...rs 2 The maximum number of Paths have been added Interruptions If you press by mistake there is a power outage or there is no screen while building activity all data is automatically saved to Tree 5 Tree 5 is designated as the or changing Workspace for building or changing a Tree Until the Tree number is the Tree signed all data remains in Tree 5 The Tree cannot The Tree be saved while it is in us...

Page 324: ... not been deleted No Paths are The no paths available error message appears when all Paths are assigned available There is a maximum of eight Paths on the Tree The Leave Message Point mailbox is full Deleting a mailbox A mailbox will not accept messages when the mailbox is full If a mailbox is full instruct the mailbox owner to delete all or some of the messages in the mailbox Note If more message...

Page 325: ...13 8 Section 13 Troubleshooting Mini Set Up and Operation Guide ...

Page 326: ... External calls are sent to the called set s mailbox Non ringing answer keys do not affect external calls For internal calls when an answer key appears on set and there is no CFAC or CFNA the caller receives the mailbox of the called set When the set that has the key is CFAC to the caller is sent to the mailbox of the CFAC set For example If set A has a Ringing Answer Key for set B and set A is CF...

Page 327: ...ine appearance on a set is CFNA to the DN specified after the programmed number of rings Call Forward No Answer is not applicable in an Automated Attendant application If DRT is being used for answering ensure that the number of rings for CFNA on any of the sets is equal to or higher than the number of rings for DRT CFNA takes precedence over DRT and Transfer Callback if it has a lower number of r...

Page 328: ...nection This results in fewer phantom messages in the General Delivery Mailbox and prevents ports from being occupied The Disconnect Supervision feature is only available on Modular and trunk modules with the DS suffix on their labels and DR3 DR4 or DR5 software Stops all tones and ringing to a set When a call is transferred to a set with DND invoked the call appears as a flashing indicator on an ...

Page 329: ...ated Attendant using Feature Code 983 When a line programmed for the Automated Attendant appears on a set that line rings when transfers the call When a line programmed to be answered by the Automated Attendant does not appear on a set a call transferred to an intercom line appearing on the set Any message notification left an internal caller can be replied to using the message reply options canno...

Page 330: ... line is not programmed to ring CFNA is not invoked Ends a session Ringing lines programmed to sets are recognized by Features such as CFNA and CFAC to are not recognized by non ringing lines programmed to sets Refer to the CFNA CFAC and Answer Keys Refer to Do Not Disturb The Service Modes feature allows the System to be programmed to forward all incoming calls to during specific time periods suc...

Page 331: ...fer is evoked even to another telephone in the system with its own prime line software transfers through the Central Office To ensure transfers to are routed through the system all must be set to only Note For more information about and refer to the Installer Guide or Centrext Installer Guide Mini Set Up and Operation Guide ...

Page 332: ...000000 10 System Coordinator s Mailbox 1000002 12 Attendant Extension number any valid extension none CO Line Greeting assignment Line number Table Greeting Table number Number of rings 1 1 o 12 0 Greeting used Morning Afternoon Evening Non business Primary language 10 10 P primary A alternate l When the Group List leading digit is assigned as the Special Mailboxes default to 20 and 22 Mini Set Up...

Page 333: ... 1020000 10020000 100020000 1000020000 10000020000 1 none none none none none none 901 902 Data element Values Range Default Maximum number of mailboxes Class of Service Class of Service number Prompt language Max mailbox message time Max message length Max greeting length Message retention time Group Lists Group List number Maximum number of members ______ l 8 1 Pri 2 5 20 min 2 7 min l 10 min 7 ...

Page 334: ...mum number of Paths 8 Group List leading digit Group List range 0 001 and 002 1 101 and 102 2 201 and 202 3 301 and 302 4 401 and 402 5 501 and 502 6 601 and 602 7 701 and 702 8 801 and 802 9 901 and 902 Default Feature Codes for Leave Message Feature 980 Open Mailbox Feature 981 Operator Status Feature 982 Configuration Feature 983 Date Time Feature 984 Directory Number Feature 985 Transfer Featu...

Page 335: ...3 7 1 Y N 1 5 7 6 A 5 3 7 1 N 1 5 7 7 P 2 0 2 1 5 Y 10 Y 3 0 9 8 A 20 2 1 5 Y 1 0 Y Y 3 0 9 0 INDEFINITE RETENTION P PRIMARY A ALTERNATE Note When bilingual capability is disabled all Classes of Service default to the primary language Refer to your Mini Installa tion Guide U The Main menu appearing on the and M7324 telephone display varies tion default according to the optional software applicatio...

Page 336: ...ne lines enter Greeting Table information record Company Greetings add mailboxes initialize the Special Mailboxes Sections 5 and 6 in this guide cover the procedures for configuring lines entering Greeting Table information recording Company Greetings adding mailboxes and initializing the Special Mailboxes Important Resetting erases all the Company Greetings Greeting Table and mailbox information ...

Page 337: ...up you must enter the default password 0000 3 Press The display shows 4 P r e s s The display shows 5 Enter q q REINSTALL Important This password should not be made available to a user 6 Press The display shows 7 After you press begins to reset When is finished the You are now ready to initialize Refer to Initializing later in this appendix Mini Set Up and Operation Guide ...

Page 338: ...lize Press The display shows 2 Enter E l 3 Press The display shows Note To change the mailbox number length press and enter the new DN length The mailbox DN length MUST be the same as the DN length The mailbox number range is between two and seven digits 4 Press The display shows i 1 i 1 7 5 Select the bilingual capability The display shows Note means either or will appear English is abbreviated F...

Page 339: ...er a 9 leading digit from 0 to Press The display shows Press The display shows Initialization takes five to seven minutes When has completed the initialization the display shows and i After initial is completed the display returns to the date and time You are now ready to enter your Greeting Table and mailbox information Refer to your Mini Programming Record and Section 5 Setting up Mini Set Up an...

Page 340: ...ecretary s telephone has a ringing line appearance of the marketing director s telephone and the secretary s telephone is call forwarded to then all incoming calls are immediately transferred into the secretary s Personal Mailbox This is also true if the secretary s telephone is CFNA to and if the number of specified rings on the secretary s telephone is less than the specified rings on the market...

Page 341: ... and Call Forward No Answer features do not affect calls on a telephone s non ringing answer button Delayed Automated Attendant can answer any call on specified incoming answering telephone lines after a specified number of rings answers incoming by Automated Attendant The telephone service representative programs to be the prime telephone for one or more designated incoming telephone lines Norsta...

Page 342: ...r s extension are transferred directly into the user s Personal Mailbox To Call Forward to a mailbox 1 Press Note This is the Feature Code for determining directory number DN The directory number appears on the telephone 3 Enter directory number To cancel Call Forward Note No other telephone on the system can have a ringing line appearance of the user s lines or a ringing answer button of the forw...

Page 343: ...D 4 Appendix configuration tips Mini Set Up and Operation Guide ...

Page 344: ...o the same Group List twice Appears when trying to delete a Special Mailbox The System Coordinator and General Delivery mailboxes cannot be deleted Appears when a Group List number is entered as a mailbox member of another Group List A Group List number cannot be added to a Group List Appears when assigning more than one extension to a mailbox Appears when assigning the destination extension from ...

Page 345: ... entering a DN length of 8 or 9 The valid DN length is from 2 to 7 digits The mailbox number length must match the DN digit length Appears when an incorrect date is entered using Feature Code 984 The date must be entered as yymmdd Appears when an incorrect extension is entered Check the DN length or use the Company Directory Appears when an incorrect Group List number was entered while changing or...

Page 346: ...rect line pool number or an incorrect number of channels while configuring Outdialing Also appears when entering more than the maximum number of digits allowed for a telephone number The maximum number of digits allowed for a telephone number is 24 Appears when an incorrect mailbox password is entered Appears when entering an incorrect number to represent a Path The Path number must be 0 to 8 Appe...

Page 347: ...etermined by the Class of Service The mailbox owner should delete any unnecessarily stored messages in the mailbox Appears when adding a leave message point to a mailbox that is not assigned Appears when a message is sent to a mailbox that is not initialized Mini Set Up and Operation Guide ...

Page 348: ...a mailbox owner s name and the charac ters exceed the allowable limit of 16 The maximum field length includes the comma Appears when the Company Directory is empty Either mailboxes have not been initialized by the owners or there are no mailboxes registered with Appears when the maximum number of Group Lists have been assigned The maximum number of Group Lists is two Appears when a mailbox owner i...

Page 349: ...box registered and initialized with These types of messages cannot use the Reply option Appears when trying to transfer a call before establishing an active call Appears when all of the Paths on a Tree are assigned The maximum number of Paths per Tree is 8 Appears while the first message in a mailbox is playing and the command is entered to play the previous message Appears when a user is not allo...

Page 350: ...their mailboxes Appears when a password entered exceeded eight digits A password must be between four and eight digits in length Appears when a recorded message reaches its maximum number of segments This is caused by repeatedly using pause and while recording a message Appears when a recorded message is too long Message or greeting length for a mailbox is determined by the Class of Service Appear...

Page 351: ...greeting or message speak directly into the handset of your telephone Appears when the maximum number of users are accessing Appears when a working extension is not specified for the mailbox Appears when a mailbox has not been assigned to the requested extension These calls are transferred into the General Delivery Mailbox Mini Set Up and Operation Guide ...

Page 352: ...ommunica tion system The installer programmed both and The installer programmed to be the Call Forward No Answer telephone for each extension This means that any call not answered by a user is then transferred to the user s mailbox Each mailbox owner has buttons programmed for Leave Message and Open Mailbox Feature Codes This allows easy access to these frequently used features Each employee has b...

Page 353: ...utomated Attendant The DRT to Prime is set to YES and the DRT Delay is set to four Note Delayed Ring Transfer is a system wide call handling feature All lines on the programmed DRT to Prime are forwarded after four rings In the Configuration this is accomplished by setting the Prime set of the line to the DN uses the Greeting Table to answer all calls after four rings Depending on the time of day ...

Page 354: ...ore the Greeting Table greetings are used This completes the set up for the central receptionist For complete set up instructions refer to Section 5 Setting up The Costume Room The Costume Room has one telephone with a mailbox Calls are directed to the Costume Room attendant by the receptionist registrar or the Automated Attendant When the attendant is not available the caller is forwarded to the ...

Page 355: ...CR and work together in call handling The central receptionist Bridge Stone s central receptionist handles all calls from Bridge Stone s published telephone number except when she is busy and unable to answer the telephone When the receptionist is unable to answer the telephone within four rings Automated Attendant answers the call She has also been appointed designated operator Whenever a caller ...

Page 356: ...e to leave a message The Greeting Table automatically answers calls using greetings 1 through 4 Greetings 1 through 4 play until the System Coordinator assigns different numbered greetings When the Greeting Table was configured the primary language was set as English Important Lines used must be assigned to the Greeting Table before the Greeting Table greetings are used Following the company greet...

Page 357: ... by suggesting that the caller leave a voice message in the manager s Personal Mailbox When the caller wants to leave a message the secretary transfers the caller using TRANSFER with Leave Message Feature Code or the Transfer Feature Code When is set up in this manner Norstar s Call Forward No Answer for the manager s set is not used The secretary answers the manager s calls and uses Norstar s TRA...

Page 358: ...ulars of the product and also instruct callers to leave their name and telephone numbers for ordering or to receive personal attention by a company employee Each mailbox set up for announcements would be added to as a Guest Mailbox These mailboxes do not have an operating extension Setting up a mailbox for customer announcements You can set up a unique mailbox to be used for announcements to clien...

Page 359: ...ture 986 To turn OFF the Automated Attendant refer to Section 5 Viewing and changing line configuration To disable the General Delivery Mailbox refer to Section 5 Assigning the General Delivery Mailbox You can turn OFF the Voice Mail option at any time When the Voice Mail option is turned OFF mailboxes cannot be accessed When a caller Voice Mail tries to access an extension that is busy or does no...

Page 360: ......

Page 361: ... lines of a business are answered by and which Greeting Table is assigned Conventions The way certain information has been described For example using underlined text to represent second line display prompt information Custom Call Routing Tree Call paths that allow users to select options to direct their own calls Default The parameters that are preset within the Mini module Designated operator An...

Page 362: ...ecial Mailboxes used to collect messages for individuals in a company who have not been assigned Personal Mailboxes Greetings There are three types of greetings Company Greetings and Personal Mailbox Greetings and Information Mailbox Greetings Company Greetings are played by the Automated Attendant to incoming callers Personal Mailbox Greetings are played to callers who want to leave a message in ...

Page 363: ...ailable from your company Initialize mailbox Preparing a mailbox to receive messages which includes changing a mailbox default password and recording a Company Directory name Initializing Preparing the settings that are used in mailbox number length and language preference This also includes setting the date and time Intercom number length The number of digits in a extension and a mailbox number T...

Page 364: ...errides The two Mailbox Overrides are optional parameters in addition to the Class of Service values The Mailbox Overrides are Include in Company Directory and Message Waiting Notification Menu Point A point along a CCR Tree call path where voice prompts provide a caller with a list of options Message Delivery options Message sending options that are stamped onto a message There four Message Deliv...

Page 365: ...e sequence of digits that callers enter to route themselves along the call path Personal Mailboxes Mailboxes that are assigned to users as a place to store messages Point A point is an option along the call path of a CCR Tree A point can be the Home Menu a menu an Information Message a mailbox or an extension Primary greeting The main greeting played in a Personal Mailbox to callers wanting to lea...

Page 366: ...tten down System Coordinator The person responsible for configuring updating and maintaining the Mini voice module System Coordinator Mailbox One of the two Special Mailboxes used by the System Coordinator for sending Broadcast Messages This is the System Coordinator s Personal Mailbox Tone dial telephone A push button telephone that emits DTMF tones Transfer Point A message that provides a single...

Page 367: ...Glossary 8 Mini Set Up and Operation Guide ...

Page 368: ...lding a Tree 8 2 Business Hours 3 3 setting 7 7 Business Status 7 5 setting 7 6 Button options 2 l 0 C Call Forward All Calls see Appendix D Calling message sender 1 O 6 see Appendix A Class of Service 6 2 changing 1 O l 3 Summary Table 6 4 Clock see Date and Time Command line display 2 l 0 entering information 2 l 2 Company Directory 2 6 Group List name 1 l 7 override 1 O l 6 selecting from 2 9 r...

Page 369: ...termining 3 6 frequently used 3 l 0 verifying 3 8 Feature compatibility see Appendix A G General Delivery Mailbox 2 6 messages 1 O 6 Greeting Summary 3 4 Greetings Afternoon 5 4 7 7 see Business Hours assigning to the table 5 9 Company 5 7 duration 5 6 Evening 5 4 7 7 see Business fours length 6 3 Morning 5 4 7 7 see Business Hours personal 6 2 preparing recording 5 7 selecting 6 24 Special Mailbo...

Page 370: ...anging 5 l 5 viewing 5 l 5 Line data verification 3 2 Line number summary 3 4 Link 2 l 1 M 5 l M7324 2 10 5 l Mailbox about 2 6 adding 6 7 changing 1 O l 0 deleting 10 l 9 greeting 6 21 initializing 6 l 8 List 3 4 6 5 message time 6 2 number length 3 2 3 5 opening 1 O 3 operator 6 26 options 1 O l 0 overrides 6 3 6 5 owner name 1 O l 4 passwords 6 l 8 report 12 4 resetting 1 O l 8 rules 2 7 select...

Page 371: ... 4 setting 7 2 Optional equipment 3 3 Options selecting 0 Organization guide l l Overrides 6 3 P Passwords 6 l 8 operator 7 3 resetting 1 O l 8 System Coordinator Password 13 4 Path erasing 9 8 Path not available 13 7 Path numbers 4 5 Personal Greeting 6 2 selecting 6 24 Personal Mailboxes 2 7 1 O 8 adding new initializing 6 l 8 Point 4 2 adding 9 l 1 leave message 4 3 Transfer 4 3 Prerequisites l...

Page 372: ...6 l 7 System Coordinator Password reset 13 4 System Group List Report 12 3 System trouble 13 l T Time and Date setting 5 2 Transfer Extension 4 3 8 8 changing 9 l 6 Transfer Point 4 3 4 4 9 l 1 adding 8 8 changing 9 l 6 Tree 4 2 building 8 1 8 2 changing 13 6 deleting 9 6 designing 4 8 disabling 9 2 example of 4 6 4 7 see also Appendix A numbers 8 2 9 4 Report 12 6 saving 8 l 1 Index 5 U User Mail...

Reviews: