CONTROL INSTALLATION
·
Mount any wall humidistat (control or high limit)
over standard electrical box at height similar to
typical thermostat. Any wall humidistat should be
in location representative of overall space being
humidified and not in path of blower pack or air
supply grille. Do not mount on an outside wall
where temperature fluctuations can affect control
response.
·
Mount duct humidistat in location representative
of overall air humidity, usually in return duct. Do
not mount it directly in front of steam distributor or
in turbulent or mixing zone. Mount humidistat
where air's humidity and temperature are uniform
and representative of spaces being humidified.
·
Mount duct high limit humidistat downstream of
steam distributors far enough that, under normal
humidity and air flow conditions, steam will have
been fully absorbed (typically at least 10 feet). It
must be located to sense high humidity only
when uniform and representative air is
over-humidified or approaching saturation.
·
Mount duct air-proving switch so that it is able to
sense air flow or lack of it. Wire it to make when
air flow is sensed and break when air flow fails.
·
Check operation of all on/off controls before
starting humidifier.
·
Calibration of controls (on/off or modulation) in
the field may be necessary due to shipping and
handling. Verify humidistat accuracy before
commissioning system.
PLUMBING
NOTE:
All water supply and drain line
connections should be installed in accordance with
local plumbing codes.
FILL WATER SUPPLY LINE
·
Each unit is supplied with an adapter for the fill
valve (½”NPT ). Fill rate 10 l/min all unit sizes.
Size of piping is a minimum ½” copper,
recommend ¾” up to within 4 feet of unit.
·
Standard fill valves are sized for water pressure
ranging from 30 to 80 psig (ideally 55 to 60 psig).
For other pressures, consult factory. This
pressure should be measured at the humidifier if
the water pressure is suspect.
·
It is recommended to have a faucet installed
close to the humidifier to allow quick filling of the
system on initial start up. This can also be very
useful for mandatory cleaning of the unit.
·
ALWAYS supply and install a shut off valve and
union in the water supply line dedicated to the
humidifier to facilitate servicing.
·
If water hammer occurs, install a shock arrester
on the fill water line just before the inlet to the fill
valve. Water hammer will damage the fill valve.
·
A 1” air gap is designed into the fill system of the
GS humidifier. Some local plumbing codes may
still require the installation of a double check
valve on the fill line to the humidifier to prevent
contamination of the supply water system. Verify
with local codes and install if necessary.
DRAIN LINE
·
The humidifier is equipped with a ¾”O.D.
Unthread ed drain outlet connection on the side
of the humidifier. A vacuum break valve is
installed internal to the unit on the drain line. The
drain water line must be piped to a drain funnel to
provide an air gap before connection to the
building drainage system.
- 15 -
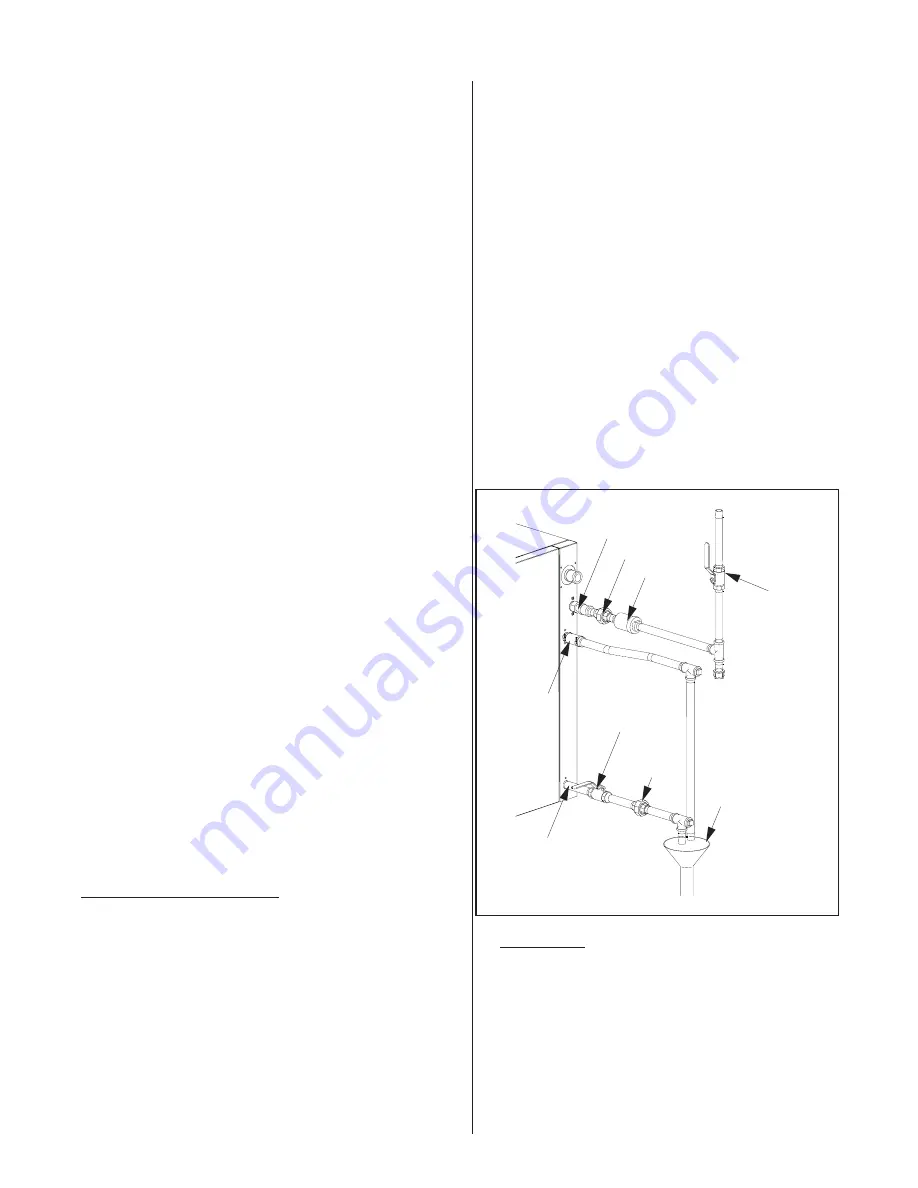
1/2” NPT Water Supply
(by Nortec)
Union
(by others)
Check Valve
(by others,
if required)
Manual Shut-off
(by others)
Funnel with
Air Gap (by others)
Union
(by others)
Manual
Shut-off
(by others)
3/4” O.D.
Drain
(Hose clamp by Nortec)
1/2” NPT Female
Auxiliary Drain
Figure # 11
Plumbing Connections
Summary of Contents for GS 100
Page 76: ......


