Nortel Switched Firewall 2.3.3 User’s Guide and Command Reference
Upgrading and reinstalling the software
241
213455-L, October 2005
4.
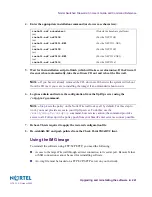
Enter the appropriate installation command (use lower case characters):
5.
Wait for the installation script to finish (which will take several minutes). If the Firewall
does not reboot automatically, take the software CD out and reboot the Firewall.
N
OTE
–
If you haven’t already removed the CD, do it now. Otherwise the system will reboot
from the CD (as if you were re-installing the image) if an unintended reboot occurs.
6.
Login as admin and restore the configuration from the ftp/tftp server using the
/cfg/gtcfg
command.
N
OTE
–
Step 4
sets the policy on the Nortel Firewall to
deny all
by default. For this step to
work, you must provide access to your tftp/ftp server. To do this, use the
/maint/diag/fw/unldplcy
command, but exercise caution; the command provides
access to all. Follow up with a policy push from your SmartCenter server as soon as possible.
7.
Reboot. This is required to apply the restored configuration file.
8.
Re-establish SIC and push policies from the Check Point SMART Client.
Using the IMG image
To reinstall the software using FTP/SCP/SFTP, you need the following:
Access to the target Firewall through a direct connection to its serial port. Remote Telnet
or SSH connections cannot be used for reinstalling software.
An .img file must be loaded on a FTP/SCP/SFTP server on your network.
install-nsf autodetect
(Detects the hardware platform)
(or)
install-nsf nsf5106
(For the NSF 5106)
(or)
install-nsf nsf5111-NE1
(For the NSF 5111-NE1)
(or)
install-nsf nsf5109
(For the NSF 5109)
(or)
install-nsf nsf5114-NE1
(For the NSF 5114-NE1)
(or)
install-nsf nsf5114
(For the NSF 5114)


