Nortel Switched Firewall 2.3.3 User’s Guide and Command Reference
254
The Command Line Interface
213455-L, October 2005
N
OTE
–
Telnet is not a secure protocol. All data (including the password) between a Telnet
client and the Nortel Switched Firewall is unencrypted and unauthenticated. If secure remote
access is required, consider using Secure Shell (SSH) (see
Using Secure Shell on page 255
).
Enabling Telnet access
Before Telnet access is possible, some configuration must first be performed using the serial
port.
1.
Log in as the administrator using the local serial port.
2.
Check that the Firewall is configured with proper IP addresses.
The Firewall host requires its own unique IP address, as well as one Management IP (MIP)
address. These IP addresses are configured during the initial setup (see
Chapter 2, Initial
setup,” on page 29
).
3.
Enable Telnet.
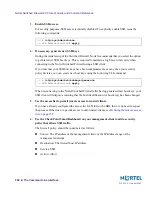
For security purposes, Telnet is initially disabled. To enable Telnet sessions on the Firewall,
issue the following commands:
4.
Use the access list to permit remote access to trusted clients.
If you have already configured the access list for SSH or the BBI, there is no need to repeat the
process for remote Telnet sessions. Otherwise, to permit remote access for Telnet sessions, see
Defining the remote access list on page 252
.
5.
Use the Check Point SmartDashboard on your management client to add a security
policy that allows Telnet traffic.
The firewall policy should be constructed as follows:
Source: The IP address of the Check Point SMART Client, or the IP address range of the
management network
Destination: The host IP address of the firewall (
not
the MIP address)
Service: Telnet
Action: Allow
>> #
/cfg/sys/adm/telnet/ena
>> Telnet Administration#
apply

