Chapter 17 Authentication server
321
Nortel Business Secure Router 252 Configuration — Basics
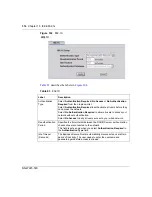
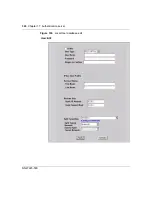
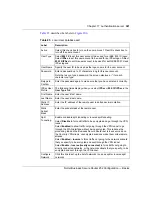
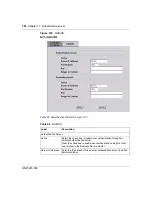
describes the labels in
.
Table 85
Local User database edit
Label
Description
Active
Select this check box to turn on the user account. Clear this check box to
turn off the user account.
User Type
Select
802.1X
to set this user account to be used for a IEEE 802.1X logon.
Select
IPSec
to set this user account to be used for an IPSec logon. Select
802.1X
/
IPSec
to set this user account to be used for both IEEE 802.1X and
IPSec logons.
User Name
Specify the user ID to be used as the logon name for the user account.
Password
Enter a password up to 31 characters long for this user account.
Note that as you type a password, the screen displays a (*) for each
character you type.
Retype to
Confirm
Enter the password again to make sure that you have entered it correctly.
IPSec User
Profile
The following fields display when you select
IPSec
or
802.1X
/
IPSec
in the
User Type
field.
First Name
Enter the user’s first name.
Last Name
Enter the user’s last name.
Static IP
Address
Enter the IP address of the remote user in dotted decimal notation.
Static
Subnet
Mask
Enter the subnet mask of the remote user.
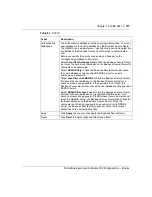
Split
Tunneling
Enable or disable split tunneling or inverse split tunneling.
Select
Disable
to force all traffic to be encrypted and go through the VPN
tunnel.
Select
Enabled
to allow traffic not going through the VPN tunnel to go
through the WAN interface without being encrypted. This reduces the
processing load on the Business Secure Router but is less secure since
the Contivity VPN clients’ unencrypted sessions make them vulnerable to
attacks.
Select
Enabled - Inverse
to force traffic not going to the network subnets
that you specify to be encrypted and sent through the VPN tunnel.
Select
Enable - Inverse (locally connected)
to force traffic not going to
directly connected networks, or the network subnets that you specify, to be
encrypted and sent through the VPN tunnel.
Configure
Network
Click this link to set up the list of networks to use as split or inverse split
networks.
Summary of Contents for BSR252
Page 28: ...28 Tables NN47923 500 ...
Page 44: ...44 Chapter 1 Getting to know your Business Secure Router NN47923 500 ...
Page 52: ...52 Chapter 2 Introducing the WebGUI NN47923 500 ...
Page 70: ...70 Chapter 3 Wizard setup NN47923 500 ...
Page 96: ...96 Chapter 5 System screens NN47923 500 ...
Page 114: ...114 Chapter 7 WAN screens NN47923 500 Figure 27 WAN IP ...
Page 120: ...120 Chapter 7 WAN screens NN47923 500 Figure 31 Dial Backup Setup ...
Page 128: ...128 Chapter 7 WAN screens NN47923 500 ...
Page 152: ...152 Chapter 9 Static Route screens NN47923 500 ...
Page 194: ...194 Chapter 11 Firewall screens NN47923 500 ...
Page 210: ...210 Chapter 13 VPN NN47923 500 Figure 67 Summary IP Policies ...
Page 222: ...222 Chapter 13 VPN NN47923 500 Figure 71 VPN Branch Office rule setup ...
Page 256: ...256 Chapter 13 VPN NN47923 500 Figure 81 VPN Client Termination advanced ...
Page 260: ...260 Chapter 13 VPN NN47923 500 ...
Page 264: ...264 Chapter 14 Certificates NN47923 500 Figure 83 My Certificates ...
Page 270: ...270 Chapter 14 Certificates NN47923 500 Figure 85 My Certificate create ...
Page 274: ...274 Chapter 14 Certificates NN47923 500 Figure 86 My Certificate details ...
Page 282: ...282 Chapter 14 Certificates NN47923 500 Figure 89 Trusted CA details ...
Page 298: ...298 Chapter 14 Certificates NN47923 500 ...
Page 316: ...316 Chapter 16 IEEE 802 1x NN47923 500 ...
Page 320: ...320 Chapter 17 Authentication server NN47923 500 Figure 106 Local User database edit ...
Page 328: ...328 Chapter 17 Authentication server NN47923 500 ...
Page 376: ...376 Chapter 20 Logs Screens NN47923 500 Figure 150 Log settings ...
Page 386: ...386 Chapter 20 Logs Screens NN47923 500 ...
Page 393: ...Chapter 21 Call scheduling screens 393 Nortel Business Secure Router 252 Configuration Basics ...
Page 394: ...394 Chapter 21 Call scheduling screens NN47923 500 ...
Page 410: ...410 Chapter 22 Maintenance NN47923 500 ...

