background image


10 

Initial Set-Up

Step 1. Inspect & Unpack 

Upon receipt, inspect air compressor for missing or 
damaged parts. Verify that it is the compressor you 
ordered. 


See 

“Component Identification”

 section of this manual 

for a diagram of the compressor and its components.  


For missing or damaged


components, please 

contact NorthStar Product Support at 1-800-270-
0810. 


If complete, fill out product serial number 
information. See 

“Limited Warranty” 

section of 

this manual. 


Step 2. Assembly 

Attach Air Filter 

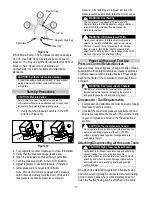
1.


Remove air filter from manual bag. 

2.


Remove plastic plug from air compressor inlet. 

(Figure 1) 


Figure 1 

3.


Unscrew wing nut, remove washer and air filter 

housing from base. (Figure 2)  


Figure 2 

4.


Screw base into air compressor inlet as shown. 
Tighten with appropriate tool on specified 

location. (Figure 3 & Figure 4) 


Figure 3 


Figure 4 

5.


Replace air filter housing and washer. Secure 

with wing nut, hand tighten only. (Figure 5) 


Figure 5 

Attach Regulator (Recommended) 

We recommend using a regulator with this compressor 
since the pre-set tank pressure ranges between 105 and 

135 PSI and is usually greater than what is needed by 
tools. 


Without the addition of a regulator, the pressure switch 

will maintain a tank pressure within the pre-set range 
that has a max of 150 PSI. This is considered an overly 
high pressure for many tools. A user-installed regulator 
can maintain a lower constant pressure in the outlet 

hose line and prevent over pressurization of tools.


WARNING: Bursting hazard 

Too much air pressure causes a hazardous risk of 

bursting. Check the manufacturer’s maximum pressure 
rating for air tools and accessories. Regulators must 
never be set to exceed the maximum pressure rating of 
tank or tools. 


Plastic plug 

Base 

Air Filter 
Housing 

Washer 

Wing Nut 

Grip here 
to tighten 

Summary of Contents for 47500

Page 1: ...nity Exceeding the maximum pressure for air tools or attachments could cause them to explode Burns Compressor pump motor and discharge tubing are hot surfaces that can cause burn injuries Electric Shock Operating equipment in wet conditions or where not properly grounded can cause electric shock Detailed safety information about these hazards appears throughout this manual Equipment Protection Qui...

Page 2: ...mpatibility 12 Wire Size 12 Circuit Breaker 13 Grounding 13 Model 47500 and 47501 230 Volt 3 5 HP 14 Operation 16 Follow Operation Safety Rules 16 Prepare for Operation 16 Check Add Oil to the Pump 16 Proper Air Hose and Tool Use 17 Pressure Control Related Devices 17 Compressor Tool Requirements 17 Attaching Disconnecting Air Hose and Tools 17 Using Compressor for Spraying 18 Flammable Materials ...

Page 3: ...500 Rev A 23 Parts List Model 47500 Rev A 24 792363 Pump Exploded View 25 792363 Pump Parts List 26 792363 Pump Kit List 27 Parts List Model 47501 Rev A 28 Parts List Model 47501 Rev A 29 792373 Pump Parts List 30 792373 Pump Parts List 31 792373 Pump Parts List 32 Appendix A Lubricants and Compatibility 33 Alternate Lubricants 33 Limited Warranty 34 ...

Page 4: ...n Personal Protection Wear safety apparel during operation including safety glasses with side and top protection Adult Control Only Only trained adults should set up and operate the air compressor Do not let children operate Under The Influence Never operate or let anyone else operate the air compressor while fatigued or under the influence of alcohol drugs or medication Keep this manual for refer...

Page 5: ...6 30R 6 30R Volts 230V 230V Amps 20A 30A Motor Horsepower 3 HP 5 HP DIMENSIONS COMPONENTS Length 24 25 24 25 Width 23 23 Height 71 63 Weight 251 lbs 340 lbs Mounting Hole Diameter 56 56 Suggested Mount Bolt Diameter 7 16 7 16 SUPPLIES REQUIRED not included Pump Oil shipped with oil but refills required SAE 30 non detergent pump oil 4043 SAE 30 non detergent pump oil 4043 Pump Oil Capacity 15 6 oz ...

Page 6: ...itch Auto Off switch In AUTO position compressor shuts off automatically when tank pressure reaches maximum preset pressure approximately 150 PSI In OFF position compressor will not operate Switch should be in OFF position when connecting or disconnecting power cord from electrical outlet NEVER attempt to adjust this pressure switch 8 Discharge Tube Carries compressed air from pump to safety check...

Page 7: ...ous situation which if not avoided will result in death or serious injury WARNING orange indicates a hazardous situation which if not avoided could result in death or serious injury CAUTION yellow used with the safety alert symbol indicates a hazardous situation which if not avoided could result in minor or moderate injury CAUTION yellow without the safety alert symbol is used to address practices...

Page 8: ...bel is missing or not legible order new labels from NorthStar Product Support at 1 800 270 0810 On Product Warning Labels Location Part numbers Description 1 792161 Air Compressor Instructions 2 792174 Breathing Hazard 3 792175 Belt Hazard 4 792176 Burn Hazard 5 792177 Corrosion Hazard 6 789060 Electrical Shock Hazard 1 2 3 6 5 4 ...

Page 9: ...9 Safety Decals To order replacement safety labels call NorthStar Product Support at 1 800 270 0810 1 2 6 3 4 5 ...

Page 10: ...ure 3 Figure 4 Figure 3 Figure 4 5 Replace air filter housing and washer Secure with wing nut hand tighten only Figure 5 Figure 5 Attach Regulator Recommended We recommend using a regulator with this compressor since the pre set tank pressure ranges between 105 and 135 PSI and is usually greater than what is needed by tools Without the addition of a regulator the pressure switch will maintain a ta...

Page 11: ...hase outlet having operating capacity of 20 amp Model 47500 3 HP or 30 amp Model 47501 5 HP Wiring Proper wire size should take into consideration length from distribution panel See Step 6 Wiring Installation for more information Ideal operating temperatures 40 and 100 F 4 and 37 C Operating Limitations 15 F 9 C or above 125 F 52 C If temperatures consistently drop below 32 F 0 C install within an...

Page 12: ...contractors with expertise in compressed air systems to plan and or install your distribution system WARNING Bursting hazard This unit can produce pressures in excess of 150 PSI which is beyond the capabilities of many piping types and pipe fittings Failure of undersized and or inadequate distribution components can lead to serious injury WARNING Restriction hazard If an aftercooler check valve bl...

Page 13: ...member the momentary starting current of an electric motor is greater than its full load current Time delay or slow blow circuit breakers are recommended Grounding This product and its associated conduit and junction box must be grounded Do not ground to a gas supply line WARNING Electrical shock hazard Improperly grounded motors are shock hazards Make sure all equipment is properly grounded Check...

Page 14: ... blow circuit breakers are recommended Wire Size The electrical wiring required between the building s power supply and the electric motor varies according to motor horsepower Power leads must be adequately sized to protect against excessive voltage drop during start up High voltage drops can cause motor to overheat and fail A qualified electrician should provide information for selecting proper w...

Page 15: ... building s power supply and the electric motor varies according to motor horsepower Power leads must be adequately sized to protect against excessive voltage drop during start up High voltage drops can cause motor to overheat and fail A qualified electrician should provide information for selecting proper wire size If other electrical equipment is connected to the same circuit the total electrica...

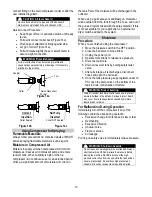
Page 16: ...ing Spray in a well ventilated area to prevent health and fire hazards Prepare for Operation Make sure that any regular maintenance has been performed as prescribed in Maintenance Repair section Drain receiver tank of any moisture Inspect for oil leaks Check for any unusual noise vibration Ensure the area around compressor is free from rags tools debris and flammable or explosive materials Ensure ...

Page 17: ...s It is easy to over pressurize them causing them to rupture Identify the inflation capacity of an object prior to filling it with air Use a gauge to check the pressure regularly when inflating anything Proper Air Hose and Tool Use Pressure Control Related Devices Never remove adjust bypass change modify or make substitutions for safety relief valves pressure switches or other pressure control rel...

Page 18: ...t acceptable for your application an external air dryer must be added to the system Shutdown Procedure When you are finished using the compressor 1 Move the pressure switch to the OFF position 2 Close the ball valve to stop airflow 3 Unplug the power cord 4 Operate tools briefly to release live pressure 5 Disconnect all tools 6 Drain air receiver tank by pulling safety relief valve 7 After all sto...

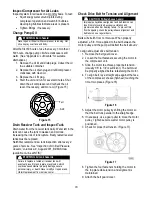
Page 19: ...fety hazards and will void the warranty Inspect Safety Relief Valve This valve should be inspected and tested on a weekly basis The safety valve automatically releases air if the tank pressure exceeds the preset maximum Check the safety relief valve by pulling the rings It is spring loaded and should not be stuck but come out about and then snap back into position when released Replace safety reli...

Page 20: ...ed air receiver tank will eventually result in tank rupture or explosion which could cause substantial property damage severe personal injury or death Never modify or repair a tank Obtain replacement from service center Check Drive Belt for Tension and Alignment CAUTION Pulley sheave hazard Improper pulley sheave alignment and belt tension can result in motor overload excessive vibration and prema...

Page 21: ...d cause damage to the engine and pump IMPORTANT If a part needs replacement only use parts that meet the manufacturer s part number specifications Replacement parts that do not meet specifications may result in a safety hazard or poor operation of the compressor Major service including installation or replacement of parts should be made by a qualified electrical service technician Contact NorthSta...

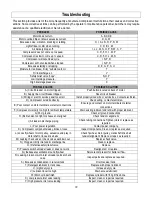
Page 22: ...e good contact on motor terminals or starter connections F Compressor viscosity too high for ambient temperature Drain existing lubricant and refill with proper lubricant G Poor ground Check all ground connections H Belt tension too tight or sheaves not aligned Check tension alignment i Air leaks in discharge piping Check tubing connections Tighten joints or replace as required J Poor power regula...

Page 23: ...23 Parts List Model 47500 Rev A Note NorthStar tank decal part 789000 no shown ...

Page 24: ...Water Drain Tube 1 16 Tube 1 Kit 1 Kit 4 Pressure Switch Kit 792377 Drain Tube Kit 792380 Ref Description Qty Kit Qty Ref Description Qty Kit Qty 6 Pressure Switch 1 1 17 Tube Fitting 1 1 8 Plug 2 29 Straight Tube Fitting 1 9 Pressure Gauge 1 30 Water Drain Tube 1 10 Nipple 1 Kit 5 25 Adaptor 1 Drain Valve Kit 792381 Kit 2 Ref Description Qty Kit Qty Check Valve Kit 792378 25 Adaptor 1 1 Ref Descr...

Page 25: ...25 792363 Pump Exploded View ...

Page 26: ... 1 15 788879 Oil draining plug 1 16 Kit 2 Front cover gasket 1 17 N A Front cover 1 18 N A Hex bolt 4 19 788880 Oil sight gauge 1 20 789386 Oil cap 1 21 792328 Bearing 1 22 N A Crankshaft and balancer 1 23 792329 Bearing 1 24 Kit 2 Rear bearing seat gasket 1 25 N A Rear bearing seat 1 26 N A Hex bolt 4 27 Kit 2 Oil seal 1 28 788882 Breather 1 29 789366 Pulley 1 30 Kit 6 Fender washer 1 31 Hex bolt...

Page 27: ...ription Qty Kit Qty 8 Stud Screw 4 2 Kit 4 Cylinder and Piston Kit 789342 Ref Description Qty Kit Qty 9 Cylinder 1 2 10 Cylinder gasket 1 11 Piston ring kit 1 12 Piston 1 Kit 5 Piston Ring Kit 789359 Ref Description Qty Kit Qty 10 Cylinder gasket 1 2 11 Piston ring kit 1 Kit 6 Washer and Bolt 789367 Ref Description Qty Kit Qty 30 Fender washer 1 1 31 Hex bolt 1 Kit 7 Exhaust Fitting and Tube Kit 7...

Page 28: ...28 Parts List Model 47501 Rev A Note NorthStar tank decal part 789000 no shown ...

Page 29: ... 4 Water Drain Tube 1 16 Kit 2 Nipple 1 Kit 1 Kit 4 Pressure Switch Kit 792377 Drain Tube Kit 792380 Ref Description Qty Kit Qty Ref Description Qty Kit Qty 5 Pressure Switch 1 1 19 Tube Fitting 1 1 8 Plug 2 29 Straight Tube Fitting 1 10 Nipple 1 30 Water Drain Tube 1 18 Pressure Gauge 1 Kit 5 25 Adaptor 1 Drain Valve Kit 792381 Kit 2 Ref Description Qty Kit Qty Check Valve Kit 792378 25 Adaptor 1...

Page 30: ...30 792373 Pump Parts List Wing nut for 30 not shown ...

Page 31: ... 1 12 788880 Oil sight gauge 1 13 789386 Oil cap 1 14 792333 Bearing 1 15 N A Crankshaft and balancer 1 16 789384 Magnetic plug 1 17 792329 Bearing 1 18 Kit 2 Rear bearing seat gasket 1 19 N A Rear bearing seat 1 21 N A Hex bolt 4 22 Kit 2 Oil seal 1 20 788882 Breather 1 23 789349 Pulley 1 24 Kit 6 Fender washer 1 25 Hex bolt 1 26 792335 Rod 1 27 Kit 7 Exhaust elbow 1 28 Exhaust fitting 1 29 79233...

Page 32: ...crew 4 3 Kit 4 Cylinder and Piston Kit 792343 Ref Description Qty Kit Qty 5 Cylinder 1 3 6 Cylinder gasket 1 7 Piston ring kit 1 8 Piston 1 Kit 5 Piston Ring Kit 792344 Ref Description Qty Kit Qty 6 Cylinder gasket 1 3 7 Piston ring kit 1 Kit 6 Washer and Bolt 789367 Ref Description Qty Kit Qty 24 Fender washer 1 1 25 Hex bolt 1 Kit 7 Exhaust Fitting Kit 792345 Ref Description Qty Kit Qty 27 Exhau...

Page 33: ...odified Alkyds indicates trademark of DuPont Corporation Neoprene Natural Rubber SBR Rubber Acrylic Paint Lacquer Varnish Polystyrene PVC ABS Polycarbonite Cellulose Acetate Latex EPR Acrylics Phenoxy Polysulfones Styrene Acrylonitile San Butyl Alternate Lubricants You may use a petroleum based lubricant that is premium quality does not contain detergents contains only anti rust anti oxidation and...

Page 34: ... of equal function Any misuse abuse alteration or improper installation or operations will void warranty Determining whether a part is to be replaced or repaired is the sole decision of NorthStar NorthStar will not provide for replacement of complete products due to defective parts Any costs incurred due to replacement or repair of items outside of a NorthStar approved facility is the responsibili...

Page 35: ...35 Assembled by Northern Tool Equipment Company Inc Burnsville MN 55306 NorthernTool com ...

Reviews: