background image


Page 3 of 30 

Table of Contents 

Intended Use .......................................................................................................................................... 4


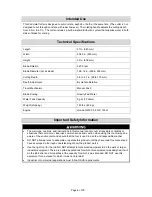
Technical Specifications ...................................................................................................................... 4


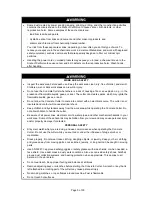
Important Safety Information ............................................................................................................... 4


Specific Operation Warnings ............................................................................................................... 7


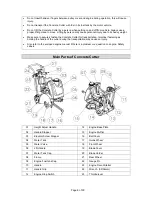
Main Parts of Concrete Cutter ............................................................................................................. 8


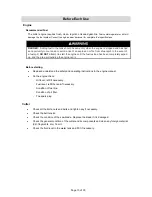
Before Each Use .................................................................................................................................. 10


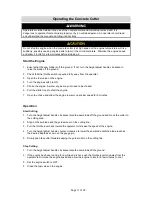
Operating the Concrete Cutter........................................................................................................... 11


Start the Engine .............................................................................................................................. 11


Operation ........................................................................................................................................ 11


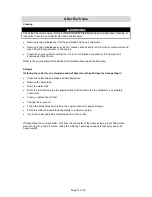
After Each Use ..................................................................................................................................... 12


Maintenance ........................................................................................................................................ 13


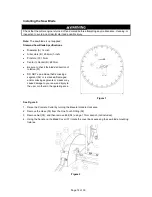
Installing the Saw Blade ................................................................................................................. 14


Setting the Saw Blade Depth .......................................................................................................... 17


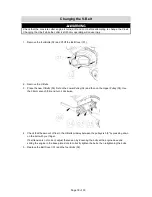
Changing the V-Belt ............................................................................................................................ 18


Parts Diagram ...................................................................................................................................... 19


Engine Mount .................................................................................................................................. 19


Blade Shaft ..................................................................................................................................... 21


Adjust Handle ................................................................................................................................. 23


Wheel Shafts .................................................................................................................................. 25


Frame & Water Tank ...................................................................................................................... 26


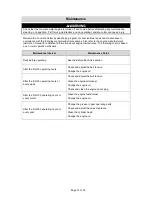
Troubleshooting .................................................................................................................................. 27


Replacement Parts .............................................................................................................................. 28


Limited Warranty ................................................................................................................................. 29


Summary of Contents for 49157

Page 1: ...tter Owner s Manual WARNING Read and understand all instructions warnings and cautions before using this product Failure to follow the instructions warnings and cautions may result in serious personal...

Page 2: ...__ Save the receipt warranty and this manual This concrete cutter is designed for certain applications only Northern Tool and Equipment cannot be responsible for issues arising from modification or us...

Page 3: ...8 Before Each Use 10 Operating the Concrete Cutter 11 Start the Engine 11 Operation 11 After Each Use 12 Maintenance 13 Installing the Saw Blade 14 Setting the Saw Blade Depth 17 Changing the V Belt...

Page 4: ...s 83 Kg Engine Honda GX160 5 5 HP 163cc Important Safety Information The warnings cautions and instructions in this manual cannot cover all possible conditions or situations that could occur Exercise...

Page 5: ...te Cutter to come into contact with an electrical source The cutter is not insulated and contact will cause electrical shock Keep children and bystanders away from the work area while operating the Co...

Page 6: ...adjustments changing accessories or storing the tool Such preventive safety measures reduce the risk of starting the tool accidentally Store the Concrete Cutter when it is not in use Store it in a dr...

Page 7: ...from other workers because cracked and bounced rock may injure other workers The operator has to give warning signs in case of an emergency situation The Concrete Cutter can only be operated when the...

Page 8: ...rtation Improper fastening as holding the handle of the cutter during the transportation may cause an injury Also refer to the enclosed engine manual if there is a problem or a question on engine Safe...

Page 9: ...Page 9 of 30 13 Elevate Bar...

Page 10: ...l the fuel residue has been completely wiped up and the area surrounding the engine is dry Before starting Read and understand the safety and operating instructions in the engine manual On the engine...

Page 11: ...the engine A warm engine may not need to be choked 6 Pull the starter rope to start the engine 7 Open the choke and allow the engine to warm up at slow speed for 5 minutes Operation Start Cutting 1 T...

Page 12: ...engine maintenance Storage If storing the cutter for an extended period of time more than 30 days or transporting it Clean the cutter and saw blade as described above Remove the saw blade Drain the wa...

Page 13: ...ing chart is based on a normal operation schedule Maintenance Interval Maintenance Point Daily before operating See the Before Each Use section After the first 20 operating hours Check and adjust the...

Page 14: ...to check the blade s direction of rotation 01 DO NOT use a blade that is missing a segment 02 or is cracked Damaged and or missing segments or cracks may cause damage to your saw and injury to the us...

Page 15: ...ace with the supplied 32mm wrench 08 6 Remove the Blade Holder Outer 09 Figure 3 See Figure 4 7 Install the Saw Blade 11 on the blade shaft 10 making sure that the pin hole in the Saw Blade engages th...

Page 16: ...of 30 See Figure 5 8 Replace the Blade Holder Outer 09 and Nut 06 9 Tighten Nut 06 to approximately 45 50 ft lb 61 68 N m Figure 5 10 Replace the blade cover and hose by performing steps 1 4 in revers...

Page 17: ...depth ground level Once the pin is set an accurate depth reading can be obtained when cutting concrete 1 Check that the saw blade is off the ground then put the concrete cutter on a level surface for...

Page 18: ...the new V Belts 03 first on the Lower Pulley 04 and then on the Upper Pulley 05 Use the 36mm wrench 06 and turn it clockwise 4 Check that the amount of flex in the V Belts midway between the pulleys...

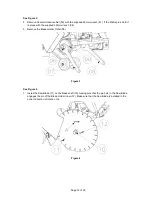
Page 19: ...Page 19 of 30 Parts Diagram Engine Mount...

Page 20: ...elt Cover 1 9 QWS PM8 Plain Washer 7 M8 10 QBL FM8x20 Flange Bolt 4 M8x20L 11 QBL M8x80 Bolt 1 M8X80L 12 QBL M8x70 Bolt 1 M8X70L 13 CA010 000B Engine Base Plate 1 14 FIX45 000 Engine Fixing Bolt 2 15...

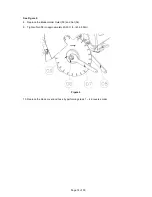
Page 21: ...Page 21 of 30 Blade Shaft...

Page 22: ...er 2 M12 15 QWS SM12 Spring Washer 2 M12 16 QNT M12 Nut 4 M12 17 CA040 25 41 Blade Shaft 1 25 4 18 CA040 25 4I Blade Holder Inner 1 25 4 19 CA040 25 4O Blade Holder Outer 1 25 4 20 QNT M24C Nut C C W...

Page 23: ...Page 23 of 30 Adjust Handle...

Page 24: ...pring Washer 2 M12 11 QBL KM10x20 Knob Bolt 3 M10x20L 12 QBL M10x30 Bolt 4 M10x30L 13 QWS SM10 Spring Washer 4 M10 14 QWS PM10 Plain Washer 4 M10 15 CA060 003 Elevator Screw 1 16 QBL M8x30 Bolt 1 M8x3...

Page 25: ...002 Rear Wheel 2 4 QWS PM10 Plain Washer 3 M10 5 QWS SPM10 Spring Washer 2 M10 6 QBL M10x25 Bolt 2 M10x25L 7 QBL M12x35 Bolt 4 M12x35L 8 QWS PM12 Plain Washer 4 M12 9 QWS SM12 Spring Washer 4 M12 10...

Page 26: ...n Qty Remark 1 PP700 002 Water Tank Cap 1 2 PC700 001B Water Tank 1 3 CA030 000 Frame 1 4 QBL M12x35 Bolt 4 M12x35L 5 QWS SM12 Spring Washer 4 M12 6 QWS PM12 Plain Washer 4 M12 7 QBV PT1 4BS Ball Valv...

Page 27: ...eplace the air filter Engine speed too low Check the engine speed with tachometer Adjust repair the engine to run at correct speed Note Refer to the engine manual Engine is running but no rotation of...

Page 28: ...for replacement The illustrations provided are a convenient reference to the location and position of parts in the assembly sequence When ordering parts the following will be required model number se...

Page 29: ...he original purchaser To make a warranty claim contact Us at 1 800 222 5381 identify the product by make and model number and follow the claim instructions that will be provided The product and the pu...

Page 30: ...Page 30 of 30 Distributed by Northern Tool and Equipment Company Inc Burnsville Minnesota 55306 NorthernTool com Made in Korea...

Reviews: