background image

Operation – Using the Sprayer


25 

Step One:  Assess wind conditions and clear work area. 


Before you decide to spray, you must determine whether wind conditions are suitable.  You must 
also restrict access to the work area to ensure the safety of bystanders.   


WARNING


Do not spray if wind speeds are greater than 4 MPH or if there are 
bystanders in the intended spray area. 


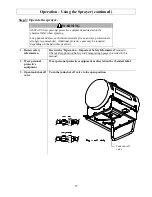
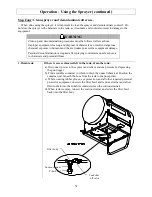
1. Assess wind speed 

Assess weather conditions to ensure that it is not too windy to spray.   


DO NOT SPRAY if wind speeds are greater than 4 MPH.   


Visible indication of wind speed

If leaves are in constant motion or there is any branch movement, DO NOT 
spray because the wind is too strong. 
 

2. Clear work area 

Clear the work area of all bystanders and pets.  


Restrict access by the public for the period recommended on chemical label. 


Step Two:  Fill the sprayer.


WARNING


ALWAYS wear personal protective equipment as directed on the 
chemical label when handling pesticides.   


Long pants and sleeves, chemical resistant gloves, and eye protection are 
strongly recommended.  Additional protective gear may be required 
depending on the particular pesticide. 


Fill the sprayer using the following steps: 
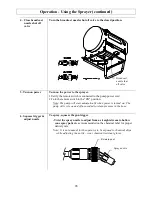
 

1.  Review safety 

information 

Review the "Operation – Important Safety Information"

 related to General 

Chemical Safety and Chemical Accident Procedures provided in this manual. 

2.  Choose safe 

mixing/ 
loading area 

Choose a safe pesticide mixing and loading area. 

- Choose an outdoor, well-ventilated area away from unprotected people, animals, 

food, and other items that might become contaminated. 
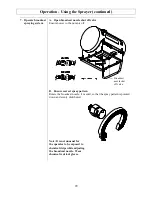
3. Wear personal 

protective 
equipment 

Wear personal protective equipment as directed on the chemical label. 

- Note that additional equipment may be specified for mixing and loading activities.    
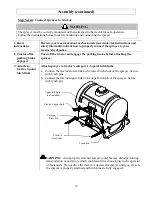
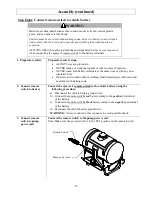
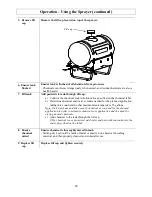
4.  Turn off 

sprayer and 
vehicle 

Turn OFF power to the sprayer before filling. 

- The vehicle should also be off, with brake set or wheels blocked to prevent 

unintended movement. 

Summary of Contents for M2681781B

Page 1: ...prayer overturning DO NOT TURN ON POWER to sprayer until ready to spray in order to avoid unintentional spray release Improper use of the sprayer or handling of chemicals could result in serious injur...

Page 2: ...Hazard Signal Word Definitions 2...

Page 3: ...onnect sprayer to tractor 14 Step Eight Connect remote switch to vehicle battery 15 Step Nine Check and test completed assembly 16 Machine Components 17 Operation Important Safety Information Operatio...

Page 4: ...gun and a broadcast spraying system Use the spot spray gun if you desire to apply pesticide only on selected plants Use the broadcast spraying system if you wish to spray large ground areas SPRAYING O...

Page 5: ...Aid instructions on the chemical label WEAR protective clothing eye protection and chemical resistant gloves when filling using and cleaning the sprayer Wear additional protective gear such as facemas...

Page 6: ...areas of the body with soap and water and remove and launder clothing DISPOSE OF or STORE remaining chemicals in secure storage with correctly marked container Transporting Safety READ safety instruc...

Page 7: ...the chemical label for reference Poisoning by ingestion or inhalation In case of poisoning from ingestion or inhalation If the victim has collapsed or is not breathing call 911 Otherwise 1 If you are...

Page 8: ...E CAUTION in vehicle handling Vehicle will be less stable and handle very differently with filled sprayer attached DO NOT TURN ON POWER to sprayer until ready to spray in order to avoid unintentional...

Page 9: ...all contents Note that some parts are shipped inside the tank If you have damaged components Contact the freight company that delivered the unit and file a claim If you have missing components Contac...

Page 10: ...19 10 x 1 2 Screw Qty 2 Part 82059 10 Nut Qty 2 Part 82065 Lance clip Qty 2 Part 52034 Lynch pin Qty 2 Part 39159 Hose guide Qty 1 Part 777110 Hose clamp Qty 2 Part 30746 Threaded hose hook Qty 2 Part...

Page 11: ...egs Line the holes of the legs up with the holes in the frame and fasten with 8 bolts and 8 nuts Step Two Install lance clips Fasten the two lance clips to the sprayer frame with the 2 screws and 2 10...

Page 12: ...hten the hose clamp 2 Attach one end of the gun hose to the pump hose barb Step Four Attach hose guide to frame and install hose hooks 1 Route gun hose through hose guide 2 Thread nuts onto hose hooks...

Page 13: ...2 Attach the end of the gun hose to the gun hose barb Step Six Attach broadcast nozzle 1 Insert anti drip nozzle filter into 11 16 x 1 2 Hose barb Note orientation 2 Thread larger 11 16 side of nozzl...

Page 14: ...s hydraulics 2 Tractor off parking brake engaged Turn off the tractor and engage the parking brake before attaching the sprayer 3 Attach to tractor 3 point hitch links Attach sprayer to tractor s cate...

Page 15: ...R touch both battery terminals at the same time or with any non insulated tools If battery acid contacts skin or clothing flush immediately with water and neutralize with baking soda 2 Connect remote...

Page 16: ...vehicle battery ground wire WARNING Always disconnect in this sequence to avoid possible shock Remember that on some vehicle models you may need to remove the sprayer to access the battery Step Nine...

Page 17: ...al flow to the spray gun and the broadcast nozzle 5 3 Point Frame Attaches to category 1 tractor 6 Pump Power Cord The pump power cord connects the sprayer pump to the remote switch It should be disco...

Page 18: ...ozzle Creates a single wide spray pattern for even coverage 11 Broadcast Nozzle Shut Off Valve When valve is open it will let chemical go out to broadcast nozzle and when the valve is closed it will s...

Page 19: ...to avoid inhaling or coming into contact with the chemical Personal protective equipment ALWAYS wear protective clothing eye protection and chemical resistant gloves when filling using and cleaning t...

Page 20: ...esticide Apply at a rate recommended by chemical manufacturer Excess pesticide can be dangerous to humans damage desirable plants and contaminate soil and water sources Never point gun NEVER point the...

Page 21: ...rgo on the sprayer On public roads If transporting the sprayer on a public road make sure to comply with all local state and federal requirements Unattended Turn off the tractor before leaving the spr...

Page 22: ...actical Treatment section 3 Call a poison control center for further advice In the U S call 1 800 222 1222 to be automatically linked to the nearest certified poison control center Have the chemical l...

Page 23: ...securely attached to the vehicle 2 Ensure tank empty Ensure the sprayer has been thoroughly flushed and drained of all residual chemical from prior uses 3 Clean suction strainer Clean the suction stra...

Page 24: ...nk and fittings for cracks and leaks Replace all damaged fittings with original NorthStar parts c Check to be sure retaining nut on gun nozzle is tight d Check to be sure all other nuts bolts and scre...

Page 25: ...l protective equipment as directed on the chemical label when handling pesticides Long pants and sleeves chemical resistant gloves and eye protection are strongly recommended Additional protective gea...

Page 26: ...application taking into consideration that maximum tank capacity is 55 gallons Note Only purchase and mix as much chemical as you need for the planned application in order to minimize chemical over ap...

Page 27: ...nded Additional protective gear may be required depending on the particular pesticide 1 Review safety information Review the Operation Important Safety Information related to Chemical Application Safe...

Page 28: ...l start automatically when power is turned on The pump will cycle on and off as needed to retain pressure in the hose 6 Squeeze trigger adjust nozzle To spray squeeze the gun trigger Twist the spray n...

Page 29: ...r to the pump is off B Ensure correct spray pattern Rotate the broadcast nozzle if needed so that the spray pattern is pointed down and evenly distributed Note It is not unusual for the operator to be...

Page 30: ...yer b Relieve system pressure by depressing the gun trigger c Turn off the vehicle Set brake or block the wheels 8 Discontinue use if clogged or inoperative If the sprayer becomes clogged or inoperati...

Page 31: ...after spraying to minimize unsafe exposure to chemicals and potential illness 1 Drain tank If there is excess chemical left in the tank drain the tank a Disconnect power to the sprayer and relieve sy...

Page 32: ...ws a Add fresh water to the tank b Reconnect power to the sprayer c Operate the spray gun and discharge all rinse water onto an area that can accept dilute pesticide application d Add 5 gallons of the...

Page 33: ...o the tank Note RV antifreeze is non toxic and biodegradable and generally safer for the environment than automotive antifreeze 2 Spray briefly Turn on the pump motor and squeeze the gun trigger brief...

Page 34: ...ion Operation Step Four In order to avoid accidental exposure to chemicals never attempt to unclog the suction strainer or service the spray gun nozzle until the tank has been emptied and the sprayer...

Page 35: ...omponent Materials Tank Polyethylene EPDM Fittings Polypropylene Nylon Hose PVC Pump Polypropylene Viton Santoprene Stainless Steel Valves Nylon Buna N Gun and Nozzle Nylon Polyacetal Aluminum Before...

Page 36: ...Exploded View 2681781 Rev B 36...

Page 37: ...ump 1 17 787195 QC x 1 2 MNPT 1 18 777848 Pressure gauge 1 19 5377 1 2 FPT tee 1 20 777445 1 2 MPT X 1 2 HB straight 1 21 35082 1 2 MPT X 3 8 HB elbow 1 22 30746 3 8 Hose clamp 2 24 777493 Wire harnes...

Page 38: ...788005 Motor assembly 1 2 786945 Base plate assembly 1 3 786981 Diaphragm assembly 1 4 778279 Valve plate assembly 1 5 787015 Quick connect clip 2 6 787011 Upper housing assembly 1 7 786948 Pressure s...

Page 39: ...MPH 3 MPH 4 MPH 5 MPH Gallons per 1000 Sq Ft based on 36 spraying height and 14ft spray pattern Application Rate 1 14 83 38 28 23 Speed To Drive 1 MPH 2 MPH 3 MPH 4 MPH 5 MPH Gallons per 100 Sq Ft ba...

Page 40: ...40 This page has intentionally been left blank...

Page 41: ...arranty This warranty covers parts only It will not provide for replacement of complete products due to defective parts Components not manufactured by NorthStar are guaranteed by their manufacturer an...

Page 42: ...42 Assembled by Northern Tool Equipment Company Inc Burnsville MN 55306 NorthernTool com...

Reviews: