background image

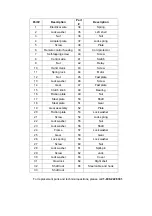
Part# 

Description 

Part

Description 

Electrical wire 

34 

Spring 

Lock washer 

35 

Left shell 

Nut 

36 

Nut 

Adapter plate 

37 

Lock spring 

Screw 

38 

Plate 

Remote control housing

39 

Cord protector 

Self-tapping screw 

40 

Screw 

Control wire 

41 

Switch 

Nut 

42 

Relay 

10 

Hand crank 

43 

Screw 

11 

Spring lock 

44 

Motor 

12 

Nut 

45 

Fast plate 

13 

Lock washer 

46 

Screw 

14 

Gear 

47 

Fast plate 

15 

Clutch knob 

48 

Bearing 

16 

Friction plate 

49 

Nut 

17 

Steel plate 

50 

Shaft 

18 

Steel plate 

51 

Gear 

19 

Gear assembly 

52 

Plate 

20 

Friction plate 

53 

Lock washer 

21 

Screw 

54 

Lock spring 

22 

Lock washer 

55 

Nut 

23 

Lock washer 

56 

Shaft 

24 

Frame 

57 

Lock washer 

25 

Gear 

58 

Gear 

26 

Lock spring 

59 

Lock washer 

27 

Screw 

60 

Nut 

28 

Lock washer 

61 

Split-pin 

29 

Screw 

62 

Jack 

30 

Lock washer 

63 

Cover 

31 

Claw lock 

64 

Right shell 

32 

Shaft lock 

65 

Steel cable and hook 

33 

Shaft lock 


For replacement parts and technical questions, please call 

1-800-222-5381

Summary of Contents for 141220

Page 1: ...RTABLE WINCH OWNER S MANUAL WARNING Read carefully and understand all INSTRUCTIONS before operating Failure to follow the safety rules and other basic safety precautions may result in serious personal...

Page 2: ...power 3 12 Volt powered for convenient use without extension cords or small gas engines 4 Portable with built in carrying handle and quick attach mounting plate TECHNICAL SPECIFICATIONS Item Descripti...

Page 3: ...s cautions and instructions discussed in this instruction manual cannot cover all possible conditions or situations that could occur It must be understood by the operator that common sense and caution...

Page 4: ...nd equipment Use safety goggles or safety glasses with side shields which comply with current national standards or when needed a face shield Wear heavy leather gloves when handling a wire rope Use as...

Page 5: ...ft and right housing Use any good quality waterproof grease Assembly Wiring your Electric Winch Your Winch may be used with temporary or permanent wiring NOTE Mount the winch prior to completing the w...

Page 6: ...ntinually recharge the battery However exercise extreme caution when working around a running vehicle See USING YOUR WINCH on page 7 of this manual Do not use a dirty corroded or leaking battery You m...

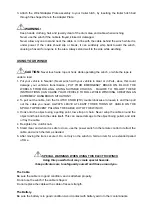
Page 7: ...TING AN EXTREMELY DANGEROUS SITUATION 2 To pull out the cable turn the CLUTCH KNOB 19 counterclockwise to loosen it and then pull out the cable you need ALWAYS LEAVE AT LEAST THREE TURNS OF CABLE ON T...

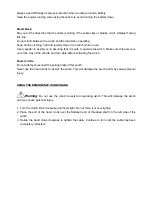
Page 8: ...on is out of the way of the vehicle and the cable before activating the winch Power Limits Do not attempt to exceed the pulling limits of this winch Never use the hand crank to assist the winch This w...

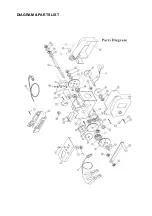
Page 9: ...DIAGRAM PARTS LIST...
Page 10: ...14 Gear 47 Fast plate 15 Clutch knob 48 Bearing 16 Friction plate 49 Nut 17 Steel plate 50 Shaft 18 Steel plate 51 Gear 19 Gear assembly 52 Plate 20 Friction plate 53 Lock washer 21 Screw 54 Lock spri...

Page 11: ...WARRANTY One Year Limited Warranty Distributed by Northern Tool Equipment Co Inc Burnsville MN 55337 0499 Made in China...

Reviews: