MAINTENANCE
Maintain your winch.
It is recommended that the general condition of your winch be examined
before it is used. Keep your winch in good repair by adopting a program of conscientious repair
and maintenance in accordance with the recommended procedures found in this manual. If any
abnormal vibrations or noise occurs, stop using the winch immediately and have the problem
corrected before further use. Check for damage to the cable, including bending, fraying or kinking.
Have necessary repairs made by qualified service personnel.
Cleaning.
Use only soap and a damp cloth to clean your winch. Many household cleaners are
harmful to plastics and other insulation. Never let liquid get inside a winch.
Replacement parts and accessories
. When servicing, use only identical replacement parts.
Use of any other parts will void the warranty. Only use accessories intended for use with this
winch.
!
Maintain winch with care
Follow instructions for lubricating and changing accessories. Inspect
power cord periodically and, if damaged, have it repaired by an authorized technician. Inspect all
moving parts and mounting bolts prior to use. Control handle and power switch must be kept
clean, dry and free from oil and grease at all times.
!
Lubricate the cable occasionally with light oil.
!
Grease the gears every 6 months. To do this, remove the clutch knob and separate the left and
right housing. Use any good quality waterproof grease.
Assembly
Wiring your Electric Winch
Your Winch may be used with temporary or permanent wiring
NOTE:
Mount the winch prior to completing the wiring.
Temporary Wiring
1.
Lift the rubber seal and plug the POWER CABLE (#39) into the PLUG (#36) on the right side of
the winch body. This plug is labeled “power.” Route the Power Cable from the winch to your
battery, being careful to avoid tangling it in moving equipment, or causing a tripping hazard.
2.
Connect the Black Clamp Handle of the POWER CABLE (#39) to the frame of your vehicle,
establishing a ground connection. Connect the Red Clamp Handle to the Positive (+/Red)
terminal of your battery.
Note:
Be sure you are using a 12V automotive battery or equivalent, in
good condition.
3.
Lift the rubber seal on the left side of winch body. Taking the Remote Control Unit, insert the
Socket at the end of the cord into the Plug on the left side of the winch body labeled “Remote
Control.”
4.
Set the remote control aside in a safe place until ready for use.
Permanent wiring
1.
Attach the OVER-CURRENT PROTECTOR (#31) to the Positive (+/Red) terminal of your battery,
using the battery terminal clamp bolt.
2.
Plan a route for the wiring from the point of the vehicle where the winch will be mounted or used
to the battery. This route must be secure, out of the way of moving parts, road debris, or any
possibility of being damaged by operation or maintenance of the vehicle. For example, you may
wish to route the wires under the vehicle, attaching it to the frame using suitable fasteners. Do
Summary of Contents for 141220
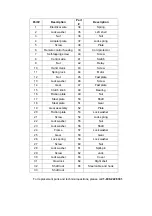
Page 9: ...DIAGRAM PARTS LIST...


