background image

Safety Warnings and Precautions   

WARNING: 

When


using tool, basic safety precautions should always be followed to 

reduce the risk of personal injury and damage to equipment. 

Read all instructions before using this tool! 


1. Keep work area clean. Cluttered areas invite injuries. 


2. Observe work area conditions. 

Do not use machines or power tools in damp or wet 

locations. Don’t expose to rain. Keep work area well lighted. Do not use electrically 
powered tools in the presence of flammable gases or liquids.   

3. Keep children away. 

Children must never be allowed in the work area. Do not let 

them handle machines, tools, or extension cords.   

4. Store idle equipment. 

When not in use, tools must be stored in a dry location to 

inhibit rust. Always lock up tools and keep out of reach of children.   

5. Do not force tool. 

It will do the job better and more safely at the rate for which 

it was intended. Do not use inappropriate attachments in an attempt to exceed the 
tool capacity.   

6. Use the right tool for the job. 

Do not attempt to force a small tool or 

attachment to do the work of a larger industrial tool. Do not use a tool for a 
purpose for which it was not intended.   

7. Dress properly. 

Do not wear loose clothing or jewelry as they can be caught in 

moving parts. Protective, electrically non-conductive clothes and non-skid 
footwear are recommended when working. Wear restrictive hair covering to 
contain long hair.   

8. Use eye and ear protection. 

Always wear ANSI approved impact safety 

goggles. Wear a full face shield if you are producing metal filings or wood chips. 
Wear an ANSI approved dust mask or respirator when working around metal, 
wood, and chemical dusts and mists.   

9. Do not overreach. 

Keep proper footing and balance at all times. Do not reach 

over or across running machines.   

10. Maintain tools with care. 

Keep tools sharp and clean for better and safer 

performance. Follow instructions for lubricating and changing accessories. 
Inspect tool cords periodically and, if damaged, have them repaired by an 
authorized technician. The handles must be kept clean, dry, and free from oil and 
grease at all times.   

11. Disconnect power. 

Unplug machine when not in use.   

12. Remove adjusting keys and wrenches. 

Check


that keys and adjusting 

wrenches are removed from the tool or machine work surface before plugging it 
in. 

Page 2 of 12 

Summary of Contents for 891340

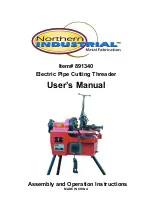
Page 1: ...Item 891340 Electric Pipe Cutting Threader User s Manual Assembly and Operation Instructions MADE IN CHINA...

Page 2: ...cation DO NOT use the machine until you have first contacted Northern Tool Equipment to determine if it can or should be performed on the product Before using the Electric Pipe Cutting Threader please...

Page 3: ...he work of a larger industrial tool Do not use a tool for a purpose for which it was not intended 7 Dress properly Do not wear loose clothing or jewelry as they can be caught in moving parts Protectiv...

Page 4: ...with grounded surfaces such as pipes radiators ranges and refrigerator enclosures 17 Replacement parts and accessories When servicing use only identical replacement parts Use of any other parts will v...

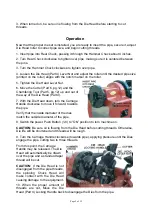
Page 5: ...e Die Head 3 Remove the Die Head assembly from carriage by moving up then down and pushing to the left 4 Set Die Head assembly on a flat surface with numbers facing up 5 Loosen Die Head lever nut and...

Page 6: ...ie Head Part 4 7 With the Die Head down turn the Carriage Handle clockwise to move it forward towards the pipe Verify that the inside diameter of the dies match the outside diameter of the pipe 8 Swit...

Page 7: ...en over pipe 4 Place Die Head Part 4 and Chamfering Tool Part 5 up in their resting position 5 Open Cutter Part 6 handle counterclockwise until it fits over pipe to be cut 6 Switch the power Push Butt...

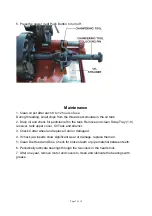
Page 8: ...an Scrap Tray 1 9 receiver tank upper cover Oil Tank and strainer 3 Check Cutter wheel and replace if dull or damaged 4 If chuck jaw inserts show significant wear or damage replace them all 5 Clean Di...

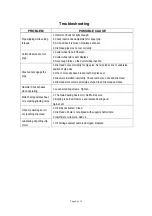
Page 9: ...have broken teeth Replace set 3 Dies were installed incorrectly Check numbers on Die and Die Head Dies cannot engage the pipe 4 Die Head slots contain small pipe chips Clean Die Head and Dies Hammer...

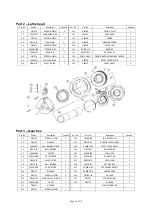
Page 10: ...NG 1 1 6 SQ50C 107 SAFETY CIRCLE 1 1 21 SQ50C 106 2 SLEEVE 1 1 7 SQ50C 110 PIN 1 1 22 SQ50C 106 1 NUT 1 1 8 KAO 5K PUSHBUTTON 1 1 23 SQ50C 106 4 VALVE 1 1 9 SQ50B 125 SCRAPS TRAY 1 1 24 SQ50C 106 7 TI...

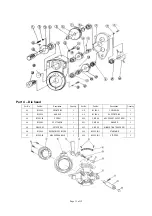
Page 11: ...t No Description Quantity Ser No Part No Description Quantity 3 1 GB70 76 SCREW 4 12MM 3 3 16 SQ50B 306 LOW GEAR SHAFT 1 3 2 GB97 76 WASHER 3 3 17 GB1096 79 PARALLEL KEY 6 14MM 1 3 3 SQ50B 307 BALL BE...

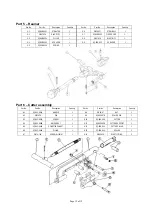
Page 12: ...2 BY501 4 HANDLE 1 4 9 BY504 4 SUPPORT DISK 1 4 3 BY501 03 SCREW 1 4 10 GB70 85 HEX SOCKET CAP SCREW 4 4 4 BY504 2 SCUTCHEON 1 4 11 GB97 85 WASHER 1 4 5 GB818 85 SET SCREW 2 4 12 GB71 85 WINBLE TIGHTE...

Page 13: ...SQ50B 0506 SPRING 1 Part 6 Cutter assembly Ser No Part No Description Quantity Ser No Part No Description Quantity 6 1 SQ50C 601A HANDLE 1 6 8 GB54 87 NUT 1 6 2 GB19 76 PIN 1 6 9 SQ50C 607B ROLLER PI...

Reviews: