background image

ASSEMBLY

SWITCH

The switch is located on the front of the grinder near the bottom. To turn the tool ON depress

the rocker switch at the top near the word ON. To turn the tool OFF depress the bottom por-

tion of the rocker switch near the word OFF. 

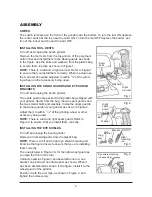
INSTALLING TOOL RESTS

Turn off and unplug the bench grinder. 
Remove the tool rests from the top portion of the poly-foam

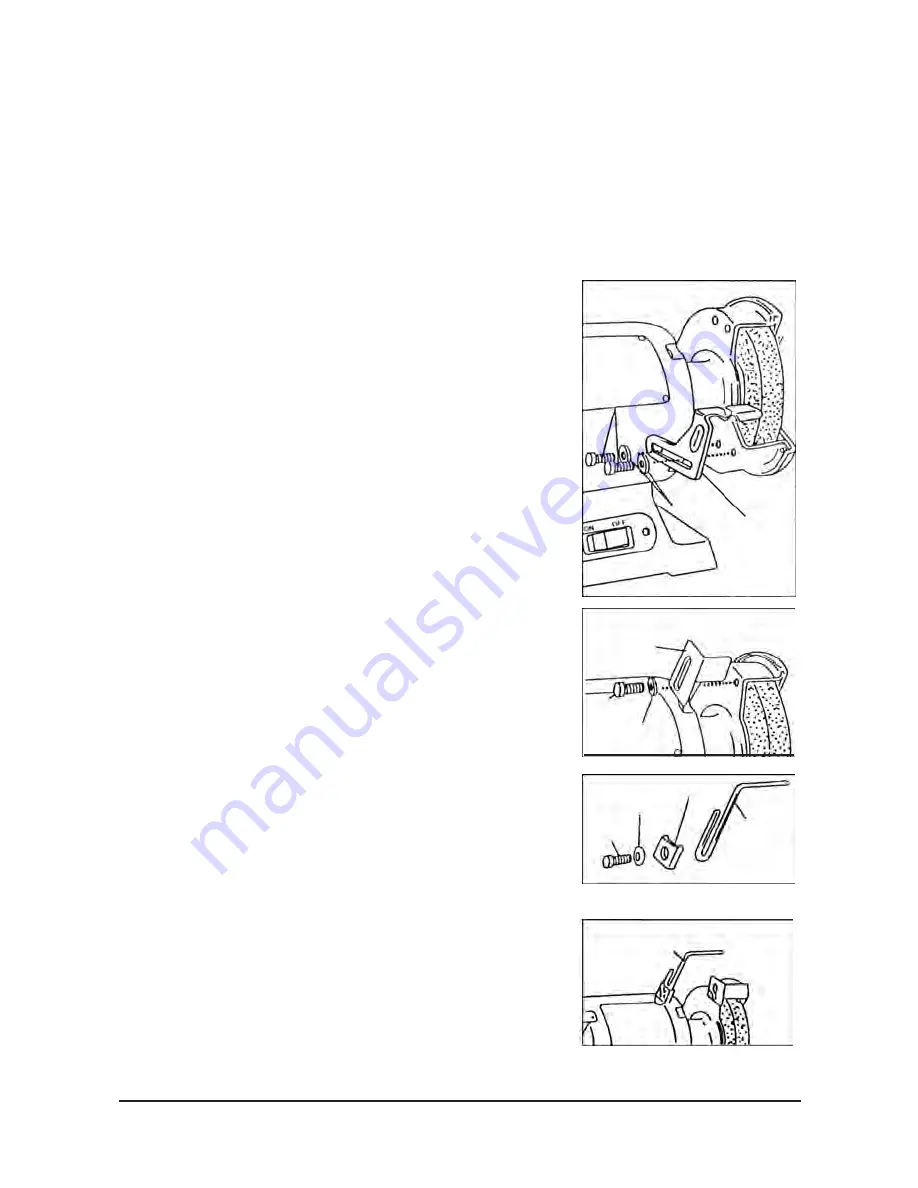
carton liner and install them to the wheel guards as shown

in the figure. Use the bolts and washers from the plastic bag

to secure them in place as shown in Figure 1.  

NOTE: 

There is a left and a right tool rest. Refer to Figure 1

to ensure that you install them correctly. When in actual use,

the tool rests should be adjusted to within 

1

/

4

" of the grind-

ing wheel or other accessory being used.

INSTALLING THE SPARK GUARDS AND EYE SHIELD

BRACKETS

Turn off and unplug the bench grinder.
The spark guards are packed in the plastic bag shipped with

your grinder. Select from the bag, the two spark guards and

the two smaller bolts and washers. Install the spark guards

to the wheel guards of your grinder as shown in Figure 2.
Adjust them to within 

1

/

16

" of the grinding wheel or other

accessory being used.

NOTE:

There is a left and right spark guard. Refer to

Figure 2 to ensure, that you install them correctly.

INSTALLING THE EYE SHIELDS

Turn off and unplug the bench grinder.
Remove all remaining parts from the plastic bag.

NOTE

: There is a left and a right eye shield mounting rod.

Examine the figure closely to ensure that you are installing

them correctly.
The one pictured in Figure 3 is for the right wheel guard as

you face the front of the tool.
Carefully examine Figure 3 and assemble one rod, one

bracket, one bolt and one flat washer as shown. When it

has been assembled as shown in the figure, install it to the

wheel guard of the grinder.  
Position it with the arm high, as shown in Figure 4. and

tighten the bolt securely.

5

Short 

bolts

Washers

Right

tool rest

Fig. 1

Fig. 2

Washer

Bolt

Right

spark

guard

Fig. 3

Fig. 4

Bracket

Flat

washer

Long

bolt

Right

mounting

rod

Eye shield mounting 

rod assembly


Summary of Contents for 143388

Page 1: ...INDER OWNER S MANUAL Item 143388 WARNING Read carefully and understand all INSTRUCTIONS before operating Failure to follow the safety rules and other basic safety precautions may result in serious personal injury ...

Page 2: ...800 222 5381 INTENDED USE This bench grinder is designed for general metal grinding and sharpening TECHNICAL SPECIFICATIONS Description Specifications Voltage Frequeney 120V 60Hz Power 3 4 HP Rated running speed 3550 RPM Wheel Size 8 x 7 x 5 8 GENERAL SAFETY RULES WARNING Read and understand all instructions Failure to follow all instructions listed below may result in electric shock fire and or s...

Page 3: ...a qualified electrician if you are in doubt as to whether the outlet is properly grounded Double insulated tools are equipped with a polarized plug one blade is wider than the other This plug will fit in a polarized outlet only one way If the plug does not fit fully in the outlet reverse the plug If it still doesn t fit contact a qualified electrician to install a polar ized outlet Do not change t...

Page 4: ...systems and hearing protection when appropriate Avoid accidental starting Ensure the switch is in the off position before plugging tool into power outlet In the event of a power failure while a tool is being used turn the switch off to prevent surprise starting when power is restored Do not overreach Keep proper footing and balance at all times Remove adjusting keys or wrenches before connecting t...

Page 5: ...ING When unpacking the Bench Grinder please check if any parts are missing or broken please call Northern Tool Equipment Carefully remove the grinder and related hardware from the carton and examine it thoroughly to insure it has not been damaged This carton should contain the following items Description Qty Bench Grinder 1 Eye Shields 2 Tool Restst 2 Spark Guards 2 Manual 1 Short bolts 4 Bolts 2 ...

Page 6: ... from the bag the two spark guards and the two smaller bolts and washers Install the spark guards to the wheel guards of your grinder as shown in Figure 2 Adjust them to within 1 16 of the grinding wheel or other accessory being used NOTE There is a left and right spark guard Refer to Figure 2 to ensure that you install them correctly INSTALLING THE EYE SHIELDS Turn off and unplug the bench grinde...

Page 7: ...ace General operation Step 1 Obtain a tray that is large enough for the workpiece to fit into fill it with water and place it near the Bench Grinder Step 2 Turn the Bench Grinder on Step 3 Once the GRINDING WHEEL has reached full speed bring the workpiece up to the wheel gently and without jarring Step 4 Use the TOOL REST to steady the workpiece Step 5 The workpiece will quickly become heated Freq...

Page 8: ...oper clearance is maintained GRINDING STONE To replace grinding wheel remove outer guard by removing 3 screws Fig 5 A Remove hex nut Fig 5B using appropriate wrench Remove and replace stone with a proper size stone of choice insuring that the speed rat ing of the stone is equal to or greater than the machine nameplate Assemble as shown in Fig 5 The nut should be tightened to a recommended 55 in pd...

Page 9: ... any abnormal vibrations or noise occurs turn the tool off immediately and have the problem corrected before further use Have necessary repairs made by qualified service personnel Keep cutting tools sharp and clean Properly maintained cutting tools with sharp cutting edges are less likely to bind and are easier to control Keep handles dry clean and free from oil and grease Cleaning Use only soap a...

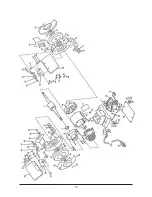
Page 10: ...9 DIAGRAM PARTS LIST ...

Page 11: ...10 ...

Page 12: ......

Reviews: