background image

7.  Control 

Syste

m:  your  winch  is  controled  through  a  solenoid  control  box  by 

press button of the ATV power switch. 

8.  Solenoid:  Power  from  the  vehicle  battery  flows  through  the  weather  sealed 

switch before being directed to the winch motor. 

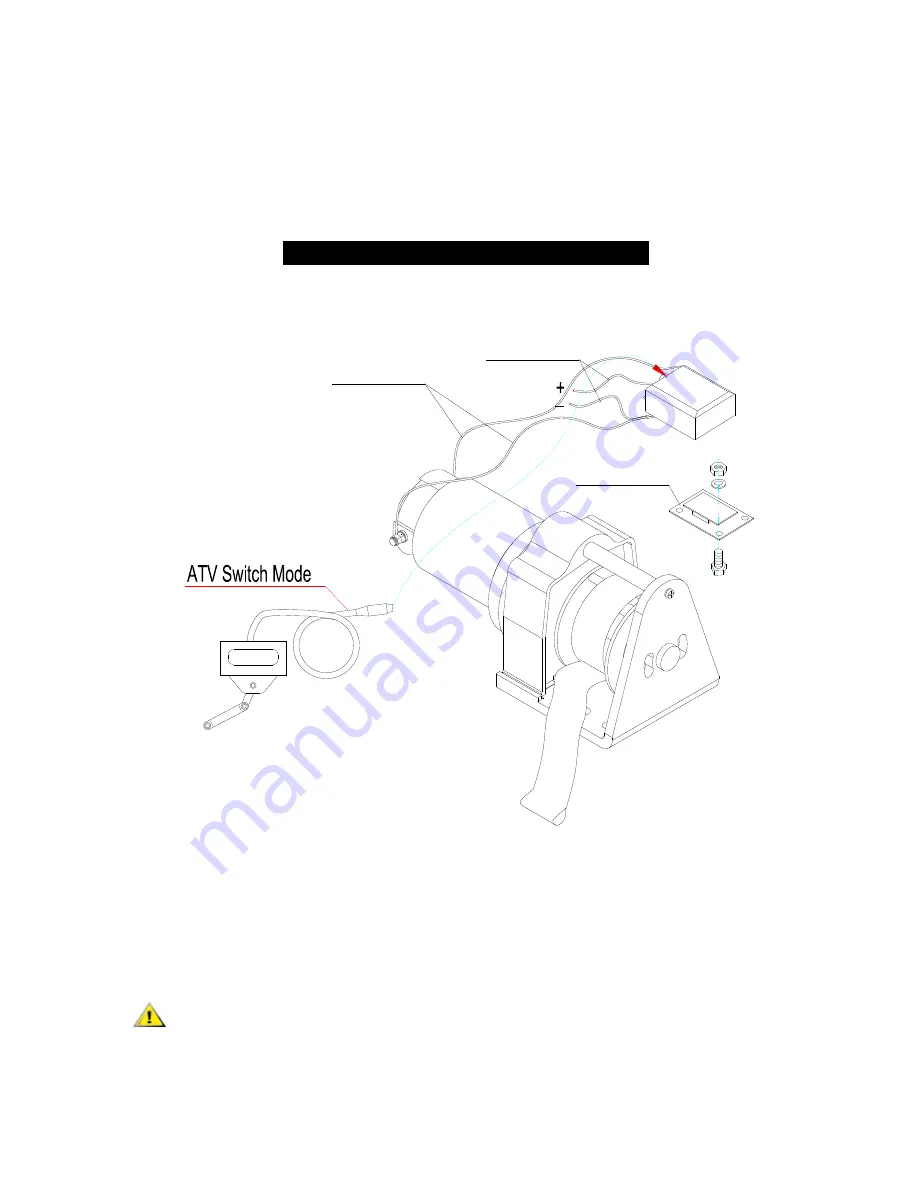
WINCH ASSEMBLY AND MOUNTING 


Fixing Panel

(1.96')

Black Motor -

Red Motor +

(5.9')

OUT

IN

Red B
Black Battery -


1.  Your winch is designed with a bolt pattern that is special in this case use of the 

winch. Proper alignment of the winch will allow even distribution of the full rated 

load. 

2.  Connect the battery and motor leads as the drawing above every type of winch 

is different each other.   


 CAUTION 

– 

Batteries  contain  gases  which  are  flammable  and  explosive.  

Wear eye protection during installation and remove all jewelry.  Do not lean over 

battery while making connections. 

Summary of Contents for NWB3000

Page 1: ...NWB3000 WINCH Assembly Operating Instructions...

Page 2: ...fely or improperly could result in property damage serious injury or death Throughout this manual you will find the following symbols for caution warning and danger Pay particular attention to the not...

Page 3: ...e gear mechanism which turns the drum and winds the wire rope 2 Winch Drum The winch drum is the cylinder on which the pulling strip is stored It can feed or wind the rope depending on the remote winc...

Page 4: ...Motor 5 9 OUT IN Red Battery Black Battery 1 Your winch is designed with a bolt pattern that is special in this case use of the winch Proper alignment of the winch will allow even distribution of the...

Page 5: ...fting or moving or persons WARNING Disconnect the remote control and battery leads when not in use WARNING Do not exceed maximum pull rating Avoid shock loads by using the control switch intermittentl...

Page 6: ...tight before each operation Store the remote control inside your vehicle in a place that it will not be damaged Any winch that appears to be damaged in any way is found to be worn or operates abnorma...

Page 7: ...and vehicle o The winch is meant for intermittent use Under full load with a single line rig do not power in for more than a minute without letting the motor cool down for a few minutes and then resu...

Page 8: ...OPE 1 If the strip has become worn or is beginning to show signs of strands breaking it must be replaced before being used again To do this remove the defective strip by free spooling Remove the screw...

Page 9: ...rt bursts without load until completely dry Motor runs but cable drum does not turn Clutch not engaged Turn clutch to the In position If problem persists a qualified technician needs to check and repa...

Page 10: ...9 WINCH ASSEMBLY DRAWING 12 Fixing Panel 1 96 Red Battery 5 9 Black Motor Black Battery IN OUT Red Motor...

Page 11: ...4 Spring Washer 4 9 NWB 300005 4 Phillip Screw M4 x 12 10 NWB 300006 1 Bush 11 NWB 300007 1 Drum 12 NWB 300008 1 Bush 13 NWB 300009 1 Tie Bar 14 NWB 300010 1 Base Plate 15 NWB300011 1 Screw M8 x 20 1...

Page 12: ...ht winch 13 2 lbs 6 0kgs Total Weight 16 1 lbs 7 3 kgs Line speed and motor current First layer Line pull Line speed ft min m min Motor current Amps Max lbs kN 12V DC 12V DC 0 14 4 5 10 250 1 1 11 5 3...

Page 13: ...sembly and operating instructions before use Failure to comply with these instructions or any improper use of the equipment will terminate the warranty Please ensure you record the information below D...

Reviews: