background image


17

Northstar 8000i 15" Monitor Installation Manual 


switch will start the Unit. The voltage required for remote power on needs to be greater than 
5 V DC. 

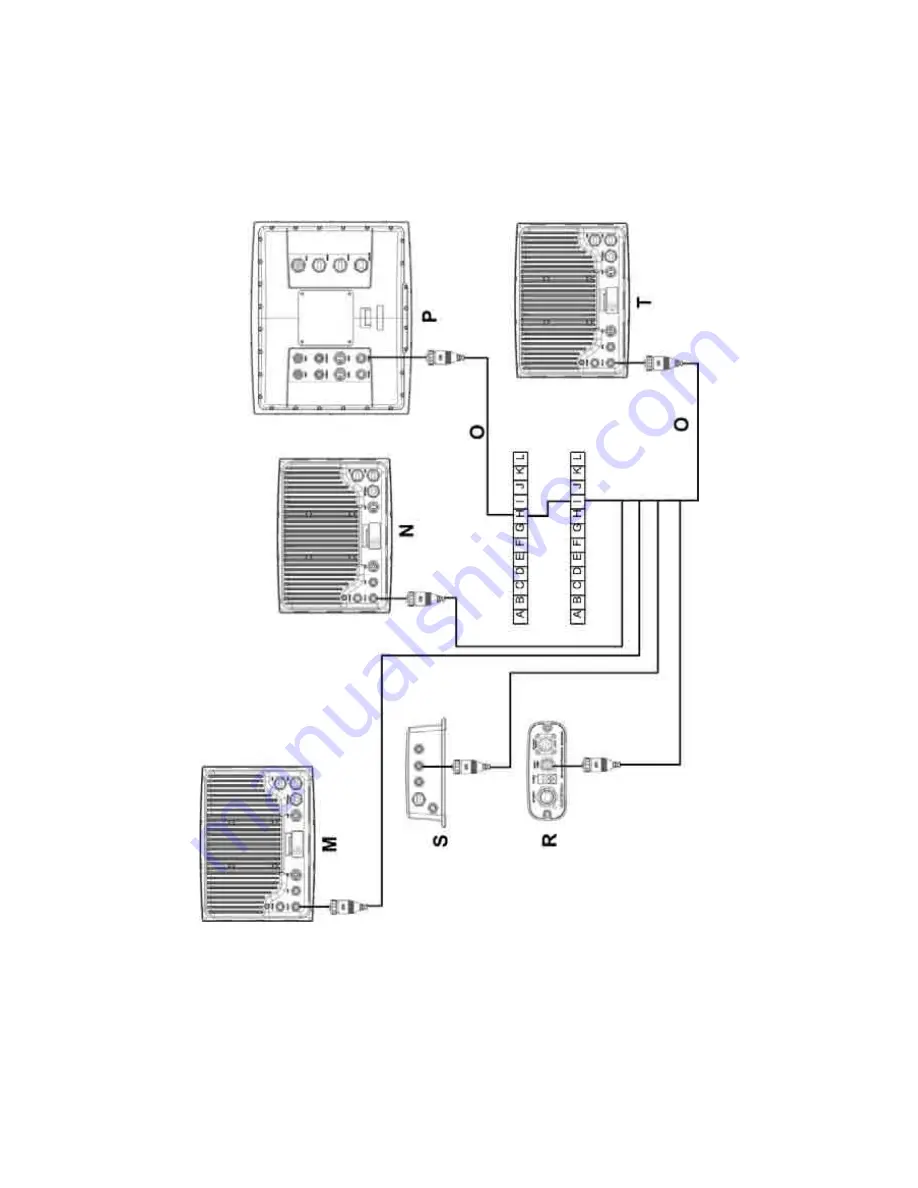
For example: Connect the Remote Power On wires (Light Green) of the (M)12" Processor 
(Upper Helm), (N) 12" Lower Helm, (T) Black Box Processor, (S) Sounder and (R) Radar to the 
External Wake Up of the  (P) 15" Monitor. When the monitor is turned on the rest of the 
system will also turn on.  


Summary of Contents for 8000I

Page 1: ...Northstar 8000i 15 Monitor Installation Manual www northstarnav com ...

Page 2: ...afety alert symbol indicates a potentially hazardous situation which if not avoided may result in property damage It is your sole responsibility to use the Northstar 8000i in a manner that will not cause accidents personal injury or property damage Always observe safe boating practices When navigating the vessel use the Northstar 8000i only as a navigational aid Proper navigation of the vessel is ...

Page 3: ...cation of the transducer and water conditions Ensure that the transducer is installed and used correctly The radar must be set up before it is used for the first time See Set up the radar before using it in the Radar Installation manual Never look directly into the scanner at close range while the radar is operating Radar scanners emit electromagnetic energy at a frequency that can be harmful at c...

Page 4: ... user of this product is solely responsible for observing safe boating practices BRUNSWICK NEW TECHNOLOGIES INC AND ITS SUBSIDIARIES AND AFFILIATES DISCLAIM ALL LIABILITY FOR ANY USE OF THIS PRODUCT IN A WAY THAT MAY CAUSE ACCIDENTS DAMAGE OR THAT MAY VIOLATE THE LAW Governing Language This statement any instruction manuals user guides and other information relating to the product Documentation ma...

Page 5: ...Monitor 9 4 1 Front view and keys 9 4 2 Back view and connectors 11 5 Mounting the Northstar 8000i 15 Inch Monitor 12 6 Utility 15 7 External Wake Up and Remote Power On 15 8 Video Types and Connectors 18 8 1 RGB1 and RGB2 18 8 2 DVI D 19 8 3 Composite1 and 2 BNC 1 and 2 20 8 4 S Video 1 and 2 20 9 Power 21 10 USB Out 23 11 USB In 23 12 Turn on the 15 inch Monitor 24 13 Turn off the 15 inch Monito...

Page 6: ...14 4 Set the touch control 27 14 5 Display the OSD Setup menu 28 14 5 1 Adjust the picture with Auto Setup 29 14 5 2 Adjust the color 30 14 5 3 Reset to defaults 31 14 5 4 Adjust the contrast 32 14 5 5 Adjust the panel brightness 33 14 5 6 Display the system information 34 15 Maintenance 35 15 1 Technical support service and repairs 35 16 15 inch Monitor Specifications 36 ...

Page 7: ...a entertainment and an onboard camera Whatever type of boat you have and however you use it you can customize the 8000i to meet your needs Flexible modular and innovative the 8000i delivers awesome performance Please take a few minutes to read through this manual before cutting holes or locating equipment NOTE The 8000i has several requirements that must be met to ensure safe and proper operation ...

Page 8: ...Sun Cover CV000075A G Cleaning Cloth MS000619A G Pack of Protective Caps for unused ports HR000100 Mounting Screws HR000090 Power Cable AS000453 G Utility Cable NS004801 Mounting Template LA000601A G Warranty Registration Card This Manual MN000607C G ...

Page 9: ...e 15 Monitor may also be used to display video fro 3rd party components such as PCs Cameras and DVD player This manual describes how to install the 15 Monitor and must be read with Northstar 8000i Black Box Processor and System Installation Manual 4 1 Front view and keys The keys on the front of the 15 Monitor are physical keys that you can depress Use these to turn the 15 Monitor on or off quickl...

Page 10: ... D MENU Press once to show the OSD options Press to exit the OSD options E OK Press to show the current video input source in the top left corner of the screen Press to select or accept changes to the OSD options and exit the OSD options F Left Arrow Press once to decrease the brightness one step or hold down to change it rapidly Press once to change an OSD setting such as contrast one step or hol...

Page 11: ...e 15 Monitor and an 8000i processor or third party RGB source G POWER Power source input from vessel H UTILITY Connect the utility cable to enable Remote Power On from a Black Box Processor I DVI D Receive DVI video input from an external video source such as a PC J USB IN Attach a USB peripheral K USB IN Attach a USB peripheral L USB OUT USB to an 8000i processor or other PC M Mount holes Use M4 ...

Page 12: ...e If the mounting location means that the unit is not easily within reach of the user in the helm chair you may wish to also install a 8000i Remote Keypad or third party USB Trackball to the helm chair Leave sufficient clearance space behind the 8000i 15 Monitor to connect all relevant cables Good ventilation is required behind the mounting panel Poor ventilation may cause the 8000i 15 Monitor to ...

Page 13: ...wing angle Change to sunlight palate for increased visibility wen viewing in Zone C Ensure that any holes cut are in a safe position and will not weaken the boat s structure If in doubt consult a qualified boat builder Do not mount any part where it can be used as a hand hold where it might be submerged or where it will interfere with the operation launching or retrieving of the boat ...

Page 14: ...on guidelines and the Wiring guidelines in the Northstar 8000i Black Box Processor and System Installation Manual 1 Find a suitable location for the 15 Monitor using the location guidelines 2 Tape the mounting template in place then cut the mounting hole and drill the screw holes in the panel 3 Hold the gasket in place on the back of the 15 Monitor Hold the 15 Monitor in place in the mounting hole...

Page 15: ...External wakeup output 12 Light Green Remote power on input 7 External Wake Up and Remote Power On External Wake Up sends a signal to another device to initiate Power On Connect External Wake to the Remote Power On of the other device The External Wake Up feature of the 8000i provides the ability for an 8000i Device to control the power state of another 8000i device that it is attached to For exam...

Page 16: ...Light Green Remote Power On wire connected to the Black Box Processor J Purple K Pink L Brown White M Northstar 8000i 15 Monitor N Northstar 8000i Black Box Processor O NS004801 Utility Cable Remote power is a feature of the 12 Display Processor Black Box Processor 15 Monitor Network Sounder and Network Radar This means that connecting the Remote Power On wire Light Green to a device that outputs ...

Page 17: ...e power on needs to be greater than 5 V DC For example Connect the Remote Power On wires Light Green of the M 12 Processor Upper Helm N 12 Lower Helm T Black Box Processor S Sounder and R Radar to the External Wake Up of the P 15 Monitor When the monitor is turned on the rest of the system will also turn on ...

Page 18: ...omposite Video NS004803 Cable has 8000i screw type connector to a 75 Ω BNC S Video 1 S Video NS004804 Cable has 8000i screw type connector to a female S Video Connector S Video 2 S Video NS004804 Cable has 8000i screw type connector to a female S Video Connector 8 1 RGB1 and RGB2 Use the NS004806 cable to connect the 15 Monitor to the 8000i Processor supplied with the 8000i Black Box Processor Fro...

Page 19: ...15 Monitor Installation Manual 8 2 DVI D Connect DVI D using optional NS004805 DVI D to RGB cable Northstar 8000i 15 Monitor Any third party PC or processor that has DVI D Video output A Connect to DVI D DVI D Connection ...

Page 20: ...o display composite video change the video input in the onscreen display menu Connect composite video sources using option NS004803 Composite video cable 6 5 ft 2 m Northstar 8000i 15 Monitor Connection Video Source A Northstar 15 Monitor BNC 1 Any Composite Video Source A Northstar 15 Monitor BNC 2 Any Composite Video Source 8 4 S Video 1 and 2 ...

Page 21: ... If you lengthen the power cable use an external fuse at the battery end as an added safety precaution The fuse size should be chosen to be appropriate for the size of the smallest conductor in the circuit See the NMEA or American Boating and Yachting Counsel specifications to find the correct fuse for your wiring For the best protection from noise connect the power wiring directly to the battery ...

Page 22: ...ay Processor 10 Amp 5 Amp 50W NS004710 Northstar 8000i 15 Monitor 10 Amp 5 Amp 50 W NS004730 Northstar 8000i Black Box Processor 10 Amp 5 Amp 45 W NS004740 Northstar 8000i DVD CD Player 5 Amp 3 Amp 7 W NS004741 Northstar 8000i 1 kW Sounder 5 Amp 3 Amp 7 2 W NS004720 Northstar 8000i 4 Port USB Hub 5 Amp 3 Amp 14 W Northstar 8000i 2 kW Radar Scanner and Processor 10 Amp 5 Amp 25 W Northstar 8000i 4 ...

Page 23: ...tor when connected to a 8000i processor Position the Monitor no more than a 16 5 ft 5 m cable run away from the processor Northstar 8000i Black Box Processor 11 USB In The 15 Monitor has two Type A connectors which are designed for Northstar 8000i USB Cables Each USB port s 5 V DC power output can provide up to 500 mA Connect a USB Accessory such as an 8000i System Remote Keypad or a Northstar 800...

Page 24: ...put source must also be set to RGB1 in the OSD menus Recommended Method When the Black Box Processor and the 15 Monitor are wired using the remote power on wires of the utility cable 1 Press the Power key on the 15 Monitor 2 The Northstar Marine Monitor OSD screen may appear briefly followed by the Northstar 8000i screen Alternative Method When the Black Box Processor and the 15 Monitor are wired ...

Page 25: ...sor for five seconds this will commence a system shut down 14 The On Screen Display OSD Use the OSD menus to change all or any of the following settings for the 15 Monitor itself Main Display Source DVI RGB1 RGB2 Composite1 Composite2 S Video 1 S Video 2 Brightness Setup menu Auto Setup Adjust Color Reset to Defaults Contrast Panel Brightness System Information Touch NOTE Without entering the OSD ...

Page 26: ... menu options When not accessing the OSD these buttons select the video inputs Select an option and exit from the OSD menus Exit from the OSD 14 2 Set the video input source Select the video source by using the UP DOWN arrows or use the OSD 1 Press the MENU key to show the OSD Main Display Source menu If you are displaying the Northstar 8000i system this continues to be shown in the background in ...

Page 27: ... the brightness setting to the required level You can press a key to change the brightness by one step or hold down a key to change the brightness more rapidly 4 Press the OK key to confirm the new brightness setting and to exit the OSD menus 14 4 Set the touch control The Touch option is used to activate or de activate the touch screen functionality of the 15 Monitor The default factory state is ...

Page 28: ...nctionality is de activated a TICK icon shows that it is activated 4 Press the OK key to change the setting Press OK again to toggle between the settings 5 When the Touch option is at the required setting press the MENU key to confirm the new setting and to exit the OSD menus 14 5 Display the OSD Setup menu 1 Press the MENU key to show the first level of OSD menus If you are displaying the Northst...

Page 29: ...5 1 Adjust the picture with Auto Setup Use this option to automatically adjust the position of the picture to give the optimum appearance using the input from the current display source This will run a colour calibration and reposition the displayed image to the centre of the screen if required ...

Page 30: ...l adjustments of the picture while the auto setup option is running This takes only a few seconds 3 When the picture has stabilized the auto setup is complete 14 5 2 Adjust the color Use this option to select a preset color balance option or to customize your own color balance settings The Original Panel Color is the recommended default setting 1 Display the OSD Setup menu 2 Use the up and down ar...

Page 31: ...Preset option three slider bars appear on the screen to show the current settings for Red Blue and Green 1 Use the up and down arrows to select the slider bar for the color that you want to change then use the left and right arrow keys to change the color setting to the required level You can press a key to change the brightness by one step or hold down a key to change the brightness more rapidly ...

Page 32: ...Press the OK key to start the reset process The screen may go black and or the picture may re adjust while the reset option is running This takes only a few seconds 4 When the screen has stabilized the reset process is complete 14 5 4 Adjust the contrast Use this option to adjust the contrast level of the 15 Monitor The default setting is the optimum level 1 Display the OSD Setup menu ...

Page 33: ...xit the OSD menus 14 5 5 Adjust the panel brightness Use this option to adjust the panel brightness of the 15 Monitor The default setting of 50 is the optimum level 1 Display the OSD Setup menu 2 Use the up and down arrow keys to select the Panel Brightness option The selected item is highlighted and a slider bar appears on the screen to show the current setting 3 Use the left and right arrow keys...

Page 34: ...e system information for the 15 Monitor 1 Display the OSD Setup menu 2 Use the up and down arrow keys to select the System Information option The selected item is highlighted and the system information is displayed on the right hand side of the screen 3 Press the MENU key to exit the OSD menus when you are finished ...

Page 35: ...se any part of a plastic transducer to gasoline or paint solvents as they may weaken the plastic material Wash only with water and detergent Through hull and transom mount depth and speed transducers may be coated with a thin layer of antifouling paint Only use water based antifouling paint 15 1 Technical support service and repairs Northstar products are manufactured and serviced by BNT Marine El...

Page 36: ...to 75 Hz or better at 1280 x 1024 SXGA Up to 85 Hz at 1024 x 768 XGA 800 x 600 SVGA and 640 x 480 VGA DVI D Up to 75 Hz at SXGA Up to 85 Hz at XGA SVGA and VGA Composite video S Video NTSC PAL SECAM with input format of component video S video and Composite USB Interface USB 2 0 and 1 0 1 1 compliant Image Scaling Scale up down a lower higher resolution image to fit a higher lower resolution panel...

Page 37: ...d Southampton SO14 5QY England Ph 44 2380 339922 Fax 44 2380 330345 northstaruk northstarnav com AUSTRALIA PO Box 479 Gladesville NSW 2111 Australia Ph 61 2 9879 9000 Fax 61 2 9879 9001 northstaraus northstarnav com NEW ZEALAND PO Box 68 155 Newton Auckland New Zealand Ph 64 9 481 0500 Fax 64 9 481 0590 northstarnz northstarnav com www northstarnav com ...

Page 38: ...www northstarnav com Made in New Zealand MN000607C G Northstar 8000i 15 Monitor Installation Manual ...

Reviews: