background image

User Manual: VisionShare Series   

24 


5.2


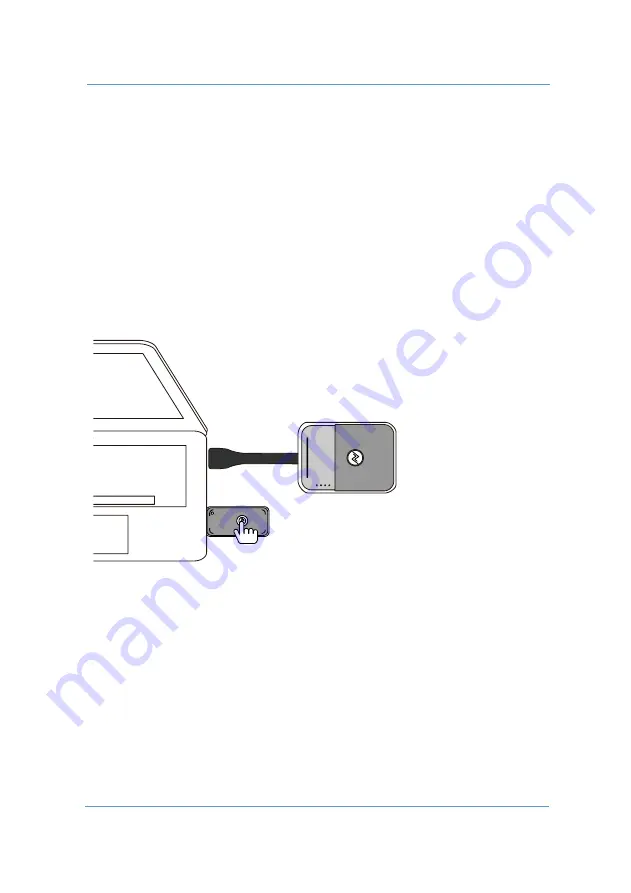
Connect and Initiate the Wireless Touch Dongle 


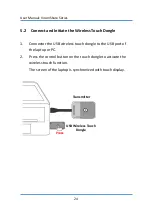
1.


Connector the USB wireless touch dongle to the USB port of 

the laptop or PC. 

2.


Press the control button on the touch dongle to activate the 

wireless touch function. 

The screen of the laptop is synchronized with touch display. 


Transmitter   

USB Wireless Touch 

Dongle 

Press 

Summary of Contents for A20

Page 1: ...User Manual VisionShare Series VisionShare Series Wireless Collaboration System User Manual A20 A30 A40 A45 Ver 1 0 2018 NorthVision Technology Inc All Rights Reserved www northvision com ...

Page 2: ...apter Set 13 B ESTABLISH YOUR COLLABORATION SYSTEM 14 1 Connect the Receiver 14 2 Connect the Transmitter 15 2 1 Display Port Adapter 16 2 2 Auxiliary Power Input 16 3 Establish the Connection 17 4 Start Your Presentation 18 4 1 Start the Presentation 18 4 2 Pause the Presentation 19 4 3 Standby Mode 20 4 4 Switching Your Presentation Sources 21 5 Wireless Touch A30 A45 ONLY 22 5 1 Connect the Rec...

Page 3: ... Wall Mount installation 27 2 2 Secondary HDMI Output 28 3 Configure Your Collaboration System 29 3 1 Device Name Device ID 30 3 2 Clock Setting 31 3 3 Background 32 3 4 Power Setting 33 3 5 Connection 34 3 6 System 35 4 Mirroring360 4 Split Screens 41 5 Indicator Lights Description 43 6 Specification 47 ...

Page 4: ...is publication and to make changes from time to time in the contents hereof without obligation of NorthVision Corporation to notify any person of such revision or changes This user manual aims to provide the most updated and accurate information to customers and thus all contents may be modified from time to time without prior notice Please visit www northvision com for the latest version of this ...

Page 5: ...fication DOA Dead on Arrival The DOA period is 60 days after shipment to an end user Products that cannot be turned on or cannot display and after testing will be considered DOA After the DOA product has been tested please return to the distributor with an RMA number and a replacement will be sent Products returned that are functioning properly will be returned to the end user and the cost of retu...

Page 6: ...is manual has been carefully checked and is believed to be accurate However NorthVision assumes no responsibility for any inaccuracies that may be contained in this manual In no event will NorthVision be liable for direct indirect special incidental or consequential damages resulting from any defect or omission in this manual even if advised of the possibility of such damages The technical informa...

Page 7: ...y Do not attempt to repair or dissemble the product on your own Opening or removing cover can expose you to dangerous voltage or other hazards Before plugging the power cord into the AC inlet of the power supply unit make sure that the voltage applied to the power outlet is within the specified range 100V 240V Improper power source voltage range will cause damage to the power supply unit or connec...

Page 8: ... or a vehicle in extremely hot conditions Otherwise it can overheat or fire or its performance will be degenerated and its service life will be decreased It is recommended that you use the battery within the ambient temperatures range of 15 30 degrees First Time Battery Charge Charge the transmitters for six hours before first time use ...

Page 9: ...se serious damage to the appliance Do not allow anything to rest on the power cord Do not locate the product where people may walk on the cord Do not make the power outlet and extension cords overload Overload can result in fire or electric shock If any of the following situations occurs unplug the product from the power outlet immediately and consult with a qualified service person 1 The power co...

Page 10: ...ce Compatible with all HDMI connectivity Intuitive True Plug Play Cable like experience by instant transmission 0 1 ms Free from 2 4GHz and 5GHz WiFi signal interference 4K Video Quality Easy Installation Power Embedded High performance of 4K video quality without compression loss Simple HDMI connectivity Intuitive set up without software installation Solves power and cabling issues ...

Page 11: ...ter X 2 Receiver Mini DP to HDMI Adapter HDMI Cable Micro USB Cable Universal Power Adapter Set x 2 Quick Installation Guide USB Wireless Touch Dongle Touch USB Cable Type A to Type B USB Wireless Touch Dongle and Touch USB Cable Type A to Type B are included in A30 and A45 ONLY ...

Page 12: ...ge the transmitters for six 6 hours before first time use Auxiliary Power Input Use the supplied Micro USB cable to obtain power from laptop or PC Please refer to Auxiliary Power Input Play Pause Button Battery Indicators Status Indicator HDMI Connector HDMI Connector Auxiliary Power Input Micro USB ...

Page 13: ...User Manual VisionShare Series 10 2 Receiver Touch Pairing Keyboard Mouse Reset LAN USB Touch DC IN 5V 4A HDMI OUT 2 AUDIO OUT HDMI OUT 1 Power Button Status Indicator Power Button ...

Page 14: ...User Manual VisionShare Series 11 Transmitter Recharge Slot Transmitter Recharge Slot DC IN 3 Power Station Micro USB Cable Slot USB Wireless Touch Dongle Slot Status Indicator ...

Page 15: ...User Manual VisionShare Series 12 4 USB Wireless Touch Dongle A30 A45 ONLY USB Control Button Status Indicator ...

Page 16: ...ug Adapter Power Adapter Change the Plug Adapter To install the plug adapter To detach the plug adapter Note 1 Make sure the plug adapter is firmly installed before plugging the power adapter to the power outlet 2 Store the unused plug adaptor securely for future use Snap In Latch Click ...

Page 17: ...onnect the Receiver 1 Connect the power adapter to the power outlet and Receiver 2 Connect the cable of HDMI to the Receiver and display device Display Device Receiver Power Outlet AUDIO HDMI DC IN Power Adapter HDMI HDMI Cable Audio Cable Optional Touch USB Cable A30 A45 only ...

Page 18: ...VisionShare Series 15 2 Connect the Transmitter 1 Connect the Transmitter to the laptop or PC 2 The Transmitter flashes RED and then turns BLUE to search for the Receiver LED Indicator Transmitter HDMI Static Flash ...

Page 19: ...ct to the display port Other adapters and dongles may be used but NorthVision is unable to guarantee their performance 2 2 Auxiliary Power Input You can use the supplied micro USB cable to obtain power for presentation and battery charging HDMI Micro USB Transmitter miniDP to HDMI Adapter Display Port Transmitter USB ...

Page 20: ...eceiver flashes RED and flash BLUE to sync to the Transmitter LED Indicator 3 Once the pairing of Transmitter and Receiver is established the indicators of the Transmitter and Receiver show static BLUE light and are ready for presentation Flash Flash Static BLUE LED Indicator Transmitter Receiver Power Button ...

Page 21: ...Presentation Press the PLAY button of the transmitter to start the presentation The status LED indicator of Receiver and Transmitter show static GREEN while the presentation is in progress Press PLAY Display Device Transmitter Laptop or PC Receiver LED Indicator Static GREEN ...

Page 22: ... Pause the Presentation Press the PLAY PAUSE button of the Transmitter to pause the presentation The LED indicator turns to BLUE as the presentation is paused Press PAUSE Display Device Transmitter Laptop or PC Receiver LED Indicator BLUE ...

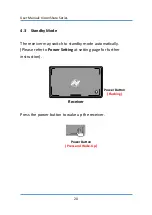
Page 23: ...ndby Mode The receiver may switch to standby mode automatically Please refer to Power Setting at setting page for further instruction Receiver Press the power button to wake up the receiver Power Button Flashing Power Button Press and Wake Up ...

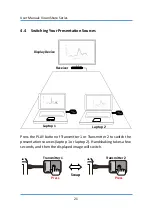
Page 24: ...s Press the PLAY button of Transmitter 1 or Transmitter 2 to switch the presentation sources laptop 1 or laptop 2 Handshaking takes a few seconds and then the displayed image will switch Swap Laptop 1 Transmitter 1 Laptop 2 Transmitter 2 Press Press Receiver Display Device ...

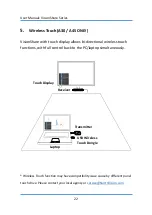
Page 25: ...irectional wireless touch functions with full control back to the PC laptop simultaneously Wireless Touch function may have compatibility issue cause by different panel touch drive Please contact your local agency or service NorthVision com Touch Display Transmitter Laptop USB Wireless Touch Dongle Receiver ...

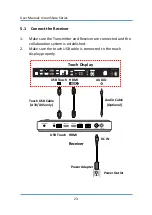
Page 26: ... and Receiver are connected and the collaboration system is established 2 Make sure the touch USB cable is connected to the touch display properly Touch Display Receiver Power Outlet AUDIO HDMI USB Touch DC IN Power Adapter HDMI USB Touch Touch USB Cable A30 A45 only Audio Cable Optional ...

Page 27: ...h Dongle 1 Connector the USB wireless touch dongle to the USB port of the laptop or PC 2 Press the control button on the touch dongle to activate the wireless touch function The screen of the laptop is synchronized with touch display Transmitter USB Wireless Touch Dongle Press ...

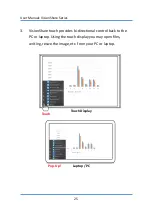
Page 28: ...are Series 25 3 VisionShare touch provides bi directional control back to the PC or laptop Using the touch display you may open files writing resize the image etc from your PC or laptop Touch Display Touch Laptop PC Pop Up ...

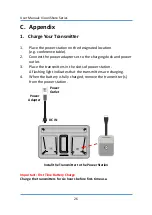
Page 29: ...ock and power outlet 3 Place the transmitters in the slots of power station A flashing light indicates that the transmitters are charging 4 When the battery is fully charged remove the transmitter s from the power station Install the Transmitter to the Power Station Important First Time Battery Charge Charge the transmitters for six hours before first time use DC IN Power Adapter Power Outlet ...

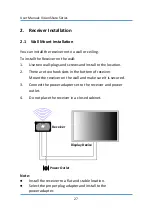
Page 30: ...nd install to the location 2 There are two hook slots in the bottom of receiver Mount the receiver on the wall and make sure it is secured 3 Connect the power adapter set to the receiver and power outlet 4 Do not place the receiver in a closed cabinet Note Install the receiver to a flat and stable location Select the proper plug adapter and install to the power adapter Receiver Power Outlet Displa...

Page 31: ...anual VisionShare Series 28 Wall Mount Opening of Receiver Bottom 2 2 Secondary HDMI Output Receiver Power Outlet DC IN Power Adapter HDMI 2 HDMI 1 HDMI Cable Secondary Display Device Projector Display Device ...

Page 32: ...are Series 29 3 Configure Your Collaboration System Click the setting icon red marker to configure the VisionShare system settings such as Device Name Device ID Clock Setting Background Power Setting Connection and System ...

Page 33: ...User Manual VisionShare Series 30 3 1 Device Name Device ID Each device is assigned an exclusive ID name for management Type the name of the device Click SAVE to confirm ...

Page 34: ...User Manual VisionShare Series 31 3 2 Clock Setting Setting the local time manually for the device Click and AM PM to set the proper local time Click SAVE to confirm ...

Page 35: ...User Manual VisionShare Series 32 3 3 Background Click on the red marker to import and select the background image via USB drive for your device Select the image Click SAVE to confirm ...

Page 36: ...onShare Series 33 3 4 Power Setting Setting a timer to standby mode if the device is not functioning during the designate time Click On to activate the standby mode Select the timer countdown time Click SAVE to confirm ...

Page 37: ...nShare Series 34 3 5 Connection IP address will show on the screen automatically after plug in LAN cable Or please click Ethernet button to set DHCP or Static IP manually Or please click Others to set to other settings ...

Page 38: ...User Manual VisionShare Series 35 3 6 System To configure the basic function on the device include Resolution Language Factory Reset and Advance function ...

Page 39: ...User Manual VisionShare Series 36 Resolution Resolution adjust the aspect ratio screen scale display interface HDMI resolution and video screen size Various resolutions can be selected ...

Page 40: ...User Manual VisionShare Series 37 Language Language language setting of the device ...

Page 41: ...User Manual VisionShare Series 38 Factory Reset Factory Reset restore the device to the default settings ...

Page 42: ...User Manual VisionShare Series 39 Advance Advance click Upgrade to upgrade the system Click Others can see the FileExplorer and Apps on the device ...

Page 43: ...User Manual VisionShare Series 40 ...

Page 44: ... of the VisionShare System to mirror your device s to the TV 1 Turn on the power switch of the TV 2 Turn on the receiver of the VisionShare collaboration system 3 Operate your device and activate the mirroring function 4 Find the mirror display device and follow the instructions to connect ...

Page 45: ...reen The VisionShare system can supply multiple device connection for up to 4 devices For Android Make sure you have installed the Mirroring360 on your Android device You can download it from the Play Store Mirroring360 https www northvision com download ...

Page 46: ...LUE The connection between Transmitter and the Receiver is established The Transmitter is ready for presentation Press the PLAY PAUSE button to start presentation Presentation Static GREEN Presentation is proceeding Press the PLAY PAUSE button to pause presentation Pause Static BLUE Presentation is paused No content sent to the display device Press the PLAY PAUSE button again to resume presentatio...

Page 47: ...t 50 One LED LOW BATTERY the battery capacity is about 25 and needs charging immediately TIP Check the Battery Capacity When the transmitter is not connected press the PLAY PAUSE button to check the battery capacity When the transmitter or the micro USB connecter for battery charge is connected the battery indicators light automatically to indicate the battery status Important First Time Battery C...

Page 48: ... the Receiver is established Presentation Static GREEN Presentation is proceeding Pause Static BLUE Presentation is paused ERROR Flashing RED The Receiver is in error or is not functioning properly Receiver Power Button with White LED Indicator Power Button Indicator Status Description Power OFF The Receiver is power off Static White The Receiver is powered on Flashing White The Receiver is in sta...

Page 49: ...ng RED The Power Station is in error or is not functioning properly USB Wireless Touch Dongle Status LED Indicator Description Power OFF The USB Wireless Touch Dongle is not connected to the computer Pairing Flashing BLUE The USB Wireless Touch Dongle is paring with the receiver Pairing Success Static BLUE The USB Wireless Touch Dongle has established the connection to the receiver Play Static GRE...

Page 50: ...A x 1 USB Wireless Touch N A X 1 N A X 1 Mirroring360 4 Split Screen Air Play Mirroring for Android Support MAC Windows iOS Android Chrome Max Output Resolution 1920 x 1080 Compressed Video Customized Start up Screen Yes Dual Display Output Yes Extended Desktop Yes Power Supply AC 100 240V 5V 4A Package Micro USB Cable x 1 HDMI Cable x 1 miniDP to HDMI Adapter x 1 Micro USB Cable x 1 HDMI Cable x ...

Reviews: