Page 20 of 35
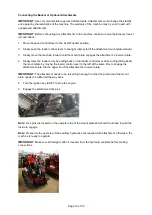
7. Move the auxiliary hydraulics lever forward, backward, and back to the neutral position to relieve
hydraulic pressure at the hydraulic couplers.
8. Remove protective covers from the hydraulic couplers on the machine. Connect covers together
to prevent contamination during operation.
9. Insert hydraulic connectors from attachment i
nto the machine’s couplers. Note – female
connector is connected onto male adaptor and male connector is inserted into female coupler.
10. Confirm that the connections are secure by pulling on the hoses.
Disconnecting
1. Lower the attachment onto a firm, level surface.
2.
Shut off the machine engine.
3. Move the auxiliary hydraulics lever forward, backward, and back to the NEUTRAL position to
relieve hydraulic pressure at the hydraulic couplers. This step can be disregarded if the bucket or
attachment does not utilize the hydraulic connectors.
4. Slide the collar back on the hydraulic coupler to release the connection and pull back on the
attachment’s couplers to disconnect the attachment couplers from the machine couplers.
Note:
If
collars are difficult to move, repeat step 3.
IMPORTANT:
Connect the attachment hoses together to prevent contamination during storage.
5. Re-Install protective covers onto the machine
’s hydraulic couplers.
6. Disengage the attachment lock pins by turning them to the outside.
7. Start the engine, tilt the mount plate forward, and back the machine away from the attachment.
After Each Use
Transporting and Securing
IMPORTANT
: When transporting the machine on a trailer, always use the following procedure.
1. Lower the loader arms.
2. Reduce engine speed to idle and Turn the ignition key to OFF to stop the engine.
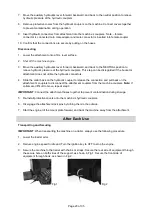
3. Secure the machine to the trailer with chains or straps. Secure the rear side of equipment through
the secure hole on both sides of the support, as shown in Fig 1. Secure the front side of
equipment through hook, as shown in Fig 2.
Fig 1
Fig 2


