background image

1

Safety Precautions

Read all of the instructions before using this appliance. When using this appliance, always 

exercise basic safety precautions, including the following:

1. 

Use this appliance only for its intended purpose as described in this operation manual.

2. 

This appliance must be properly installed in accordance with the installation 

instructions before it is used. See the installation section for more details.

3. 

This appliance must be connected to a proper electrical outlet with the correct 

electrical supply.

4. 

Proper grounding must be ensured to reduce the risk of shock and fire. Do not cut or 

remove the grounding plug! If you do not have a three-prong electric receptacle outlet 

in the wall, have a certified electrician install the proper outlet. The wall receptacle 

must be properly grounded.

5. 

Never unplug your appliance by pulling on the power cord. Always grasp the plug 

firmly and pull straight out from the outlet.

6. 

Immediately replace worn power cords, loose plugs and power outlets.

7. 

To reduce the risk of electric shock or fire, do not use extension cords or adapters to 

connect the unit to an electrical power source.

8. 

Unplug your appliance before cleaning or making any repairs.

9. 

We suggest that a certified technician perform the service if for any reason this 

product requires service.

10.  If your old appliance is being discarded, we recommend that you remove the door and 

leave the shelves in place. This will reduce the possibility of danger to children.

11.  This appliance should not be recessed or built into an enclosed cabinet. It is designed 

for freestanding installation only.

12.  Do not operate your appliance in the presence of explosive fumes.

13.  Do not tamper with the controls.

14.  Do not operate this appliance when parts are missing or broken.

15.  Do not use this appliance for commercial use.

16.  This appliance is designed for indoor use only and should not be used outdoors.

17.  To reduce is the risk of injury, do not allow children to play in or on the appliance. 

Close supervision is necessary when the appliance is used near children.

18.  The appliance door must be closed during operation. Do not leave the door open 

when children are near the dispenser.

19.  DO NOT not attempt to operate this unit with a damaged cord or plug. 

20.  DO NOT roll the KEGORATOR™

 with loaded beer kegs on carpet floor.


21.  This appliance is not intended for use by young children or infirm persons without 

supervision. 

22.  This appliance is NOT A TOY!

23.  Young children should be supervised to ensure that they do not play with this 

appliance.

Summary of Contents for KEGORATOR KRS-2000 SERIES

Page 1: ...Nostalgia Products Group LLC 1471 Partnership Dr Green Bay WI 54303 5685 Visit us online at www nostalgiaelectrics com 2009 Nostalgia Products Group LLC Rev 8 18 09 ...

Page 2: ...KEGORATOR KRS 2000 SERIES INSTRUCTION MANUAL FOR HOUSEHOLD USE ONLY READ THESE INSTRUCTIONS BEFORE USING THIS UNIT SAVE THESE INSTRUCTIONS ...

Page 3: ...eaning or making any repairs 9 We suggest that a certified technician perform the service if for any reason this product requires service 10 If your old appliance is being discarded we recommend that you remove the door and leave the shelves in place This will reduce the possibility of danger to children 11 This appliance should not be recessed or built into an enclosed cabinet It is designed for ...

Page 4: ...y from heat Store extra cylinders in a cool place preferably 70 F Secure fasten with a chain in an upright position when storing 7 Always ventilate and leave the area immediately if CO2 leakage has occurred 8 There are two safety devices in the pressure system in the form of a valve One safety feature is on the CO2 bottle The second is on the regulator 9 Never attempt to refill CO2 cylinder yourse...

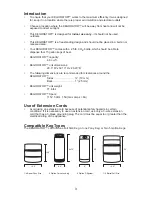
Page 5: ...RATOR capacity 4 6 cu ft KEGORATOR unit dimensions 20 3 W x 32 10 H x 26 20 D The following dimensions are recommended for clearances around the KEGORATOR Sides 19 mm Back 1 25 mm KEGORATOR unit weight 77 6 lbs KEGORATOR Specs 115V 50Hz 1 5A max amps 6A Use of Extension Cords Avoid using an extension cord because of potential safety hazards in certain conditions If it is necessary to use an extens...

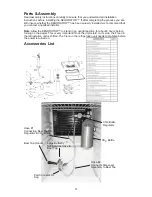
Page 6: ...on instructions before installing the KEGORATOR If after completing the process you are still unsure whether the KEGORATOR has been properly installed we recommend that you contact a qualified installer Note Allow the KEGORATOR to stand in an upright position for about 8 hours before turning on the power This is very important Once the unit is laid on it s side the Freon in the refrigeration unit ...

Page 7: ...nds per square inch as well as the volume of the Co2 gas in the Cylinder Output Pressure Gauge 0 60 PSI for measuring PSI of CO2 in tank Tank Pressure Gauge 0 3000 PSI for measuring PSI of CO2 outflow from Tank to Keg Screw adjusts the output pressure Pressure Relief Valve ...

Page 8: ... from the coupler prior to STEP 3 Installing the CO2 Regulator and the CO2 Cylinder Follow these steps to safely install the CO2 regulator and CO2 cylinder You must read and understand the following procedures for the CO2 cylinders before installation NOTE If all your rubber washers O rings are not pre installed please refer to your parts list pg 6 NOTE Your CO2 cylinder has DOT USA Department of ...

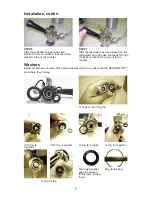
Page 9: ...erator and the hose line feeds through the bottom attach the wing nut to the coupler O rings on the CO2 line CO2 line to regulator CO2 line to coupler O ring for coupler O ring for regulator O ring for tap Tap tower washer goes in between refrigerator and tap tower CO2 tank band Washers Below are pictures of some of the extra washers that are included with the KEGORATOR and where they belong ...

Page 10: ...he work top Firmly grasp the cabinet plug twist and pull upward Note Keep this plug in a safe place it will be required when using the KEGORATOR as a refrigerator without a beer keg in use 2 There are notches on the bottom of the draft arm assembly that line up with grooves inside the opening in the top of the KEGORATOR Align the draft arm with the opening in the top of the unit then place inside ...

Page 11: ...nto the side of the coupler Attach the CO2 line see step 3 on pg 5 and hand tighten firmly Secure the tank with CO2 tank strap 4 Make sure the beer tower faucet is in the closed handle pointing straight back position before connecting the coupler to the keg To secure the tank connection pull the coupler handle out and push down until it locks into position Listen for the click of the pull handle w...

Page 12: ... completely before attempting to clean 2 Remove the hose from the coupler and carefully twist the dispenser faucet off the top of the KEGORATOR 3 Ensure that the dispenser handle is in the down position before flushing the hose If this is not set correctly water cannot flow through Hold the open end of the hose under running water for 3 5 minutes while the beer dispenser faucet drains into the sin...

Page 13: ...signed and built to provide many years of satisfactory performance under normal household use The distributor pledges to the original owner that should there be any defects in material or workmanship during the first 90 days of purchase we will repair or replace the unit at our option Our pledge does not apply to damages caused by shipping mishandling or unit being dropped A product deemed defecti...

Page 14: ...12 ...

Page 15: ...13 ...

Page 16: ...14 ...

Reviews:

Related manuals for KEGORATOR KRS-2000 SERIES