E
N
G
LI
S
H
5
PARTS & ASSEMBLY
Before you begin, get your PROFESSIONAL PEANUT BUTTER MAKER ready to use by
following the instructions under CLEANING & MAINTENANCE.
ASSEMBLY
Place the PROFESSIONAL PEANUT BUTTER MAKER on a dry, level surface near an electrical
outlet.
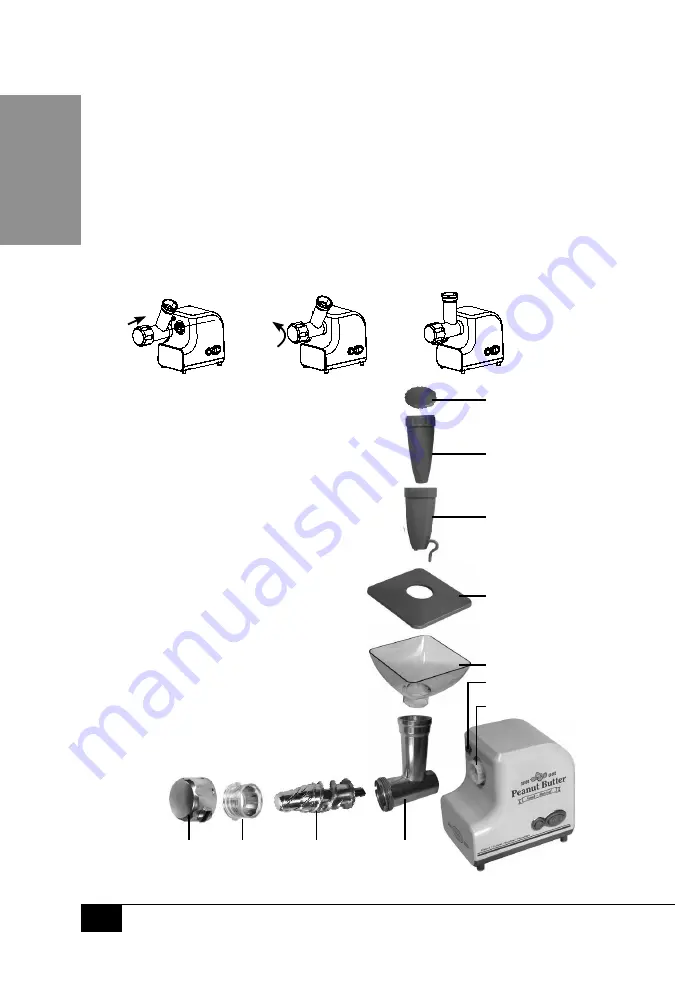
1.
While holding the Release Button, attach the Nut Chute to the Attachment Opening as
shown in the images below. Release the Release Button when Nut Chute is vertical and has
clicked into place.
2.
Place the Auger into the Nut Chute. Be sure the
pin of the Auger is completely inserted into the
notch located within the Attachment Opening.
3.
With the Auger in place, put the Nut Grinder Head into
the opening of the Nut Chute. Align the outside notches
so that the Nut Grinder Head is flush with the Nut Chute.
4.
Screw the Nut Dispenser clockwise onto
the Nut Chute to secure the assembly.
5.
Next, set the Nut Bin on top of the Nut Chute, and
place the Nut Bin Cover on top of the Nut Bin.
6.
Snap the Oil Dispenser Cover onto the Oil
Dispenser, and insert the Oil Dispenser into the
Nut Guide.
NOTE
: Control the flow of oil into your
nut butter by following the steps outlined
under CONTROLLING THE FLOW OF OIL
in the HOW TO OPERATE section.
7.
Lastly, insert the Nut Guide into the hole atop
the Nut Bin Cover.
Nut Bin
Attachment
Opening
Nut Bin
Cover
Oil Dispenser
Cover
Nut Guide
Oil Dispenser
Base
Nut
Dispenser
Nut Chute
Auger
Nut Grinder
Head
1)
2)
3)
Release Button


