background image

.5.

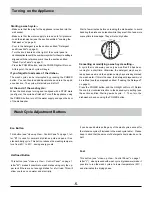
Turning  on the Appliance

Starting a wash cycle

- Make sure that the plug for the appliance is inserted into the

  wall socket.

- Make sure that the water supply is turned on to full pressure.

- Load the dishwasher (see the section entitled, "Loading the

  Dishwasher" on page 4).

- Pour in the detergent (see the section entitled, "Detergent

  and Rinse Aid" on page 3).

- Turn the knob located on the right of the control panel in

  clockwise direction until the number or symbol for the cycle setting is

  aligned with the reference mark (see the section entitled,

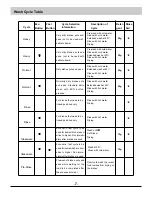
  "Wash Cycle Table" on page 7).

- Press the POWER button, and the POWER light will turn on.

  At this point, the wash cycle will begin.

Cancelling or modifying a wash cycle setting

A cycle that is underway can only be modified if it has been

running for a short time. Otherwise, the detergent may have al-

ready been used, and the appliance may have already drained

the wash water. If this is the case, the detergent dispenser must

be refilled (see the paragraph entitled, "Loading the Detergent"

on page 3).

Press the POWER button, and the ON light will turn off. Rotate

the knob in clockwise direction to the desired cycle setting (see

the section entitled: Starting a wash cycle

?F

. Then, turn the

dishwasher back on using the POWER button.

If you forget to load some of  the dishes

The wash cycle can be interrupted by pressing the POWER

button. You can then load additional dishes and turn the appli-

ance back on. The cycle will start where it left off.

Wait a few minutes before unloading the dishwasher to avoid

handling the dishes and utensils while they are still hot and more

susceptible to breakage. They will also dry better.

Wash Cycle Adjustment Buttons

Eco Button

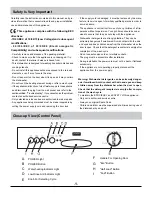
This button (see "close-up View - Control Panel" on page 1, let-

ter "G" ) is used for normal dirty dishes, pots and pans. It is a

standard daily cycle. This button reduces the washing tempera-

ture from 60

=

to 50

I=

saving energy costs.

Half load Button

This button (see "close-up View - Control Panel" on page 1,

letter "H" ) makes it possible to wash dishes using only the up-

per rack if there are not enough dishes for a full load. This will

allow you to save on water and electricity.

Fast

This button (see "close-up View - Control Panel" on page 1,

letter "I" ) , when pressed with wash cycle 4 (glassware) make it

possible to run the wash cycle at a lower temperature (50

)

and eliminates the drying phase.

It can be used before setting any of the wash cycles, except for

the intensive cycles (if included in the wash cycle table ).  Please

keep in mind that the amount of detergent should also be cut in

half.

At the end of  the wash cycle

When the knob stops turning and is aligned with a STOP mark

(see figure), the cycle has finished. Turn off the appliance using

the POWER button, turn off the water supply and open the door

of the dishwasher.

Summary of Contents for DW101N

Page 1: ...12 Place Setting Dishwasher Code 0120503609 DW101NWH DW101NSS ...

Page 2: ...ised service centre Only selected service centres are authorised to make repairs Any appliances being discarded must be made inoperable by cutting the power supply cord and removing the door lock If the supply cord is damaged it must be replaced by the manu facture its service agent of similarly qualified persons in order to avoid a hazard The appliance is not instruct for use of young children of...

Page 3: ...wer Rack E F G H Washing Filter Bottom Spray Arm Detergent and Rinse Aid Dispenser Technical Characteristics Width 60 cm Depth 60 cm Height 85 cm Capacity 12 standard place settings Mains water pressure 0 03 0 6MPa Power voltage 220 240V 50Hz 2200W Total absorber power Third Sprayer ...

Page 4: ... This product makes dishes sparkle and helps them to dry with out spotting The dispenser is located on the inside panel of the door and should be filled after every 80 wash cycle or when the rinse aid indicator light comes on for models with this feature Loading the Rinse Aid To open the dispenser turn the C cap in an anti clockwise direction and then pour in the rinse aid making sure not to overf...

Page 5: ... to allow the water to flow out The silverware basket can be doubled see fig A so that only one section may be used when the silverware load is light This also makes space for additional pots and pans and it can also be placed in the upper rack Silverware should be placed in the silverware basket with the handles at the bottom If the rack has side baskets the spoons should be loaded individually i...

Page 6: ...es The wash cycle can be interrupted by pressing the POWER button You can then load additional dishes and turn the appli ance back on The cycle will start where it left off Wait a few minutes before unloading the dishwasher to avoid handling the dishes and utensils while they are still hot and more susceptible to breakage They will also dry better Wash Cycle Adjustment Buttons Eco Button This butt...

Page 7: ...et No Solvents or Abrasive Cleaning Products To clean the exterior and rubber parts of the dishwasher do not use solvents or abrasive cleaning products Use only a cloth and warm soapy water To remove spots or stains from the surface of the interior use a cloth dampened with water and a little white vinegar or a clean ing product made specifically for dishwasher When You Go on Holiday When you go o...

Page 8: ...ash of dishes pots and pans while waiting for the load to be completed after the subsequent meal Pre wash with cold water Rinse with cold water Extended wash at 60 K Rinse with hot waterK Drying Pre wash with cold water Rinse with cold waterK Extended wash at 50 K Rinse with hot waterK Drying Rinse with cold water Extended wash at 60 K Rinse with hot waterK Drying Rinse with hot waterK Drying Wash...

Page 9: ...ug is pushed into the socket correctly the power is on in the house the door is closed properly the POWER switch is on ON the water supply is turned on The Dishwasher Does Not Load Water Have you checked whether the water is turned on and the hose is connected properly the water supply to the houses on and has sufficient pressure the water supply hose is crimped or bent the filter for the water su...

Page 10: ... been used for an extended period of time let the water run to make sure that the water is clear and free of impurities If this precaution is not taken there is a risk that the water inlet can get blocked and damage the appliance Hot Water Connection The water supply to the appliance can also be connected to the house s hot water line centralised system heating system as long as it does not exceed...

Page 11: ... 10 Installation Diagram ...

Reviews: