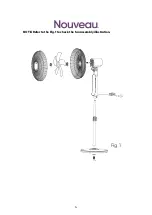
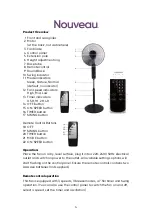
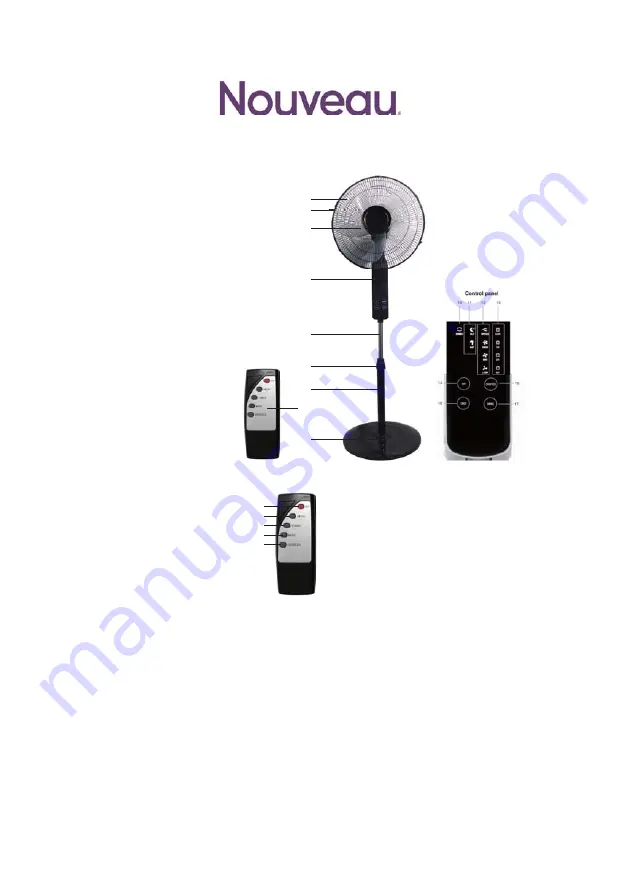
background image

4

Product Overview

1

2

3

4

5
6

7

8
9

10
1 1

12

13

14

15
16

17

Front and rear grilles
Motor
(at the back, not visible here)
Fan blade
Control panel
Extension pole
Height adjustment ring
Base tube
Remote control
Round Base
Swing indicator
Mode indicators:
Sleep, Nature, Normal
(default, no indicator)
Fan speed indicators:
High, Mid, Low
Timer indicators:
0.5H, 1H, 2H, 4H
OFF button
ON/SPEED button
TIMER button
SWING button

Remote Control Buttons

Operation:

Place the fan on a dry, level surface, plug it into a 220-240V 50Hz electrical 

outlet and switch on power to the outlet. All available settings options will 

start flashing on the control panel. Ensure the remote controls contains two 

AAA size batteries (not supplied).

Remote control operation

This fan is equipped with 3 speeds, 3 breeze modes, a 7.5hr timer and Swing 

operation. (You can also use the control panel to switch the fan on and off, 

select a speed, set the timer and oscillation.)
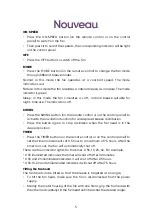
18
19
20
21
22

OFF
SWING button
TIMER button
MODE button
ON/SPEED button

18
19
20
21
22

2

1

3

4

5

6

7

9

8

Summary of Contents for 361424

Page 1: ...Fan Pedestal 40cm with remote control This manual applies to the following products SKU 361424 Model FS40 07R ...

Page 2: ...s Assembly Instructions Product Overview Operations ON Speed OFF Mode Swing Timer Tilting the Fan Head Disposal of Appliances and Batteries Please read this manual carefully before use and keep for further guidance Table of Contents ...

Page 3: ...rd TO REDUCE THE RISK OF FIRE OR ELECTRICAL SHOCK DO NOT USE THIS FAN WITH ANY SOLID STATE SPEED CONTROL DEVICE UNPLUG OR DISCONNECT THIS FAN FROM THE POWER SUPPLY BEFORE SERVICING When using electrical appliances basic precautions should always be followed to reduce the risk of fire electric shock and injury to persons including the following The fan is only for intended use as described in this m...

Page 4: ...vision if their physical sensory or mental capabilities prevent them from using it safely Children should be supervised to ensure that they do not play with the appliance If the supply cord is damaged it must be replaced by the manufacturer or its service agent or similarly qualified person in order to avoid a hazard DO NOT attempt to defect this safety feature 1 2 3 4 Unscrew the L shaped screw an...

Page 5: ...e holes Secure the rear guard by reattaching the guard nut and turning it clockwise to tighten If the motor shaft is covered with a protected sleeve remove the sleeve Slide the blade onto the motor shaft making sure to match the protrusions on the shaft with the slots in the blade Tighten the blade with the blade cap turning it anticlockwise to tighten it securely Test the fan by rotating the blad...

Page 6: ...4 Fig 1 NOTE Refer to the Fig 1 to check the fan assembly illustration ...

Page 7: ...ote Control Buttons Operation Place the fan on a dry level surface plug it into a 220 240V 50Hz electrical outlet and switch on power to the outlet All available settings options will start flashing on the control panel Ensure the remote controls contains two AAA size batteries not supplied Remote control operation This fan is equipped with 3 speeds 3 breeze modes a 7 5hr timer and Swing operation ...

Page 8: ... head The fan head can be tilted so that the breeze is targeted at an angle To tilt the fan head make sure the fan is disconnected from the power supply Steady the motor housing of the fan with one hand grip the fan head with the other and carefully tilt the fan head until it reaches the desired angle OFF Press the OFF button to switch off the fan MODE Normal In this mode the fan operates at a con...

Page 9: ...ironment Please remember to respect the local regulations hand in the non working electrical equipments to an appropriate waste disposal centre The packaging material is recyclable Dispose of the packaging in an environmentally friendly manner and make it available for the recyclable material collection service Environmentally friendly disposal ...

Reviews: