

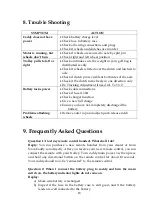

8. Trouble Shooting
SYMPTOM
ACTION
Caddy does not have
power
•
Check battery charge level
•
Check fuse in battery case
•
Check all wiring connections and plugs
•
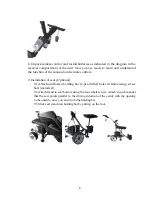
Check if wheels and clutches are in order
Motor is running, but
wheels don’t turn
•
Check if wheels are secured to axle by split pin
•
Check right and left wheel position
Trolley pulls to left or
right
•
Check and make sure the weight in your golf bag is
distributed evenly
•
Check if wheels is fitted over the clutch and latched to
axle
•
Check if clutch pin is visible at both sides of the axle
•
Check if the clutch turns freely in one direction only
•
Do Tracking Adjustment if need ref. To 3.3.2.
Battery lacks power
•
Check cable connections
•
Check if fuse is 30A
•
Check charger function
•
Give a new full charge
•
Ensure you have not completely discharged the
battery
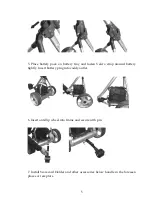
Problems attaching
wheels
•
Remove outer cap and adjust quick release catch
9. Frequently Asked Questions
Question 1: I lost my remote control handset. What shall I do?
Reply:
You can purchase a new remote handset from your dealer or from
NovaCaddy.com directly. After you receive your new remote control, you can
connect the remote with your trolley. Turn caddy main power on, then press
and hold any directional button on the remote control for about 10 seconds.
Your caddy should now be “connected” to the remote control.
Question 2: When I connect the battery plug to caddy and turn the main
switch on, the battery indicator lights do not come on.
Replay:
a)
Make sure battery is recharged.
b)
Inspect if the fuse in the battery case is still good, and if the battery
leads are well connected to the battery
18