background image

hazard, around bushes and trees, it is recommended to operate the caddy 
via manual control in order to prevent any collisions, damage or the need 
for complicated correction adjustment maneuvers.

5. Electronic Systems

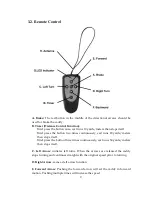
Remote control Range:

 We recommend do not to exceed 50 yards distance. 

The  greater  the  distance  between   you  and your  caddy,  the  greater  the 
chance of losing contact with it.

Microcomputer:

 The remote caddy has 3 microcomputer controls. The 1

st 

one   is   in   main   controller   box.   The   2

nd

  one   is   in   the   remote   control 

transmitter handset, and the 3

rd

 is in the receiver in the handle.

Safety Protection:

 When the temperature of the controller box reaches its 

upper limit in case of an overload, it will automatically shut down to cool 
off. Give the caddy a short time to cool down, then you can run it again. 
You can still use free-wheeling model (power off) to push the cart, and 
keep your game run.

Microprocessor   Controlled   Electronics   System:

  When   you   connect   the 

battery, the electronics system will automatically run through a start-up 
routine. Then you can press the main power on the handle turn the power 
ON. The battery status indicator lights will show you the battery level. If 
the   Green   indicator   illuminate,   battery   is   full.   If   only   Red   indicator 
illuminate, battery is run out and need to be recharged.

Important:

  The   electronics   controller   box   contains   no   user   serviceable 

parts. Therefore, it is sealed to reduce the risk of moisture entering and 
impacting the electronic system. Breaking this seal increased the risk of 
damaging the electronics and decreasing the reliability of your caddy. DO 
NOT attempt to open the controller case. Doing so will void the warranty!

Battery   Operation   and   Care:

  Follow   battery   charge   and   maintenance 

instructions at section 3.5.

6. General Maintenance

The steps below will ensure that you get a prolonged and reliable life out of 
your golf trolley.

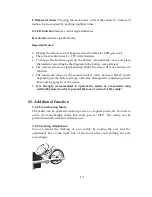
The Caddy has been designed so that the user can concentrate on playing 
golf, whilst the caddy does the work of carrying your bag. In order to keep 
your golf trolley looking at its best, we advise that you wipe any mud or 
grass from the frame, wheels and chassis after every round with a damp 
cloth or paper towel.

Do NOT

  use any high-pressure jet washers to prevent moisture entering 

the electronic systems, motors or gearboxes of the caddy.

15

Summary of Contents for X9R

Page 1: ...Digital Remote Electric Golf Trolley Model X9R X9R S X9R Lithium User Manual Nova Caddy Golf Products www novacaddy com Tel 1 905 209 9937...

Page 2: ...Assembly Instructions 4 3 Operating Instructions 7 4 Important Safety Instructions 14 5 Electronic System 15 6 General Maintenance 15 7 Technical Specifications 17 8 Trouble Shooting 18 9 Frequently A...

Page 3: ...reat Balance between Functionality Performance Practicality and Value To ensure operate the golf trolley properly please read this instruction before using your X9R 1 Packing List and Parts Glossary S...

Page 4: ...d Hold 13 Wheel Hub Cap 4 Upper Bag Holder 14 Rear Wheels 5 Upper Bag Strap 15 Dual Motors Gearbox Ass 6 Battery 16 Anti flip Wheel 7 Lower Bag Strap 17 Lower Folding Fixed Knob 8 Lower Bag Holder 18...

Page 5: ...he wheel onto the axle Push the wheel all the way in so that the two pins on the axle fit into the wheel to engage the clutch and release the quick catch The wheel should be fully secured If not locke...

Page 6: ...wheel into frame and secure with pin 7 Install Scorecard Holder and other accessories below handle in the foreseen places or receptors 8 Unpack remote control and install batteries as indicated in th...

Page 7: ...screw bolt included 9 2 Attach stand to seat bottom using the four small screws Attach in such manner that the seat points parallel to the driving direction of the caddy with the opening to the outsid...

Page 8: ...ON OFF Power ON OFF button controls the caddy s power supply Press for 2 5 seconds in order to switch the caddy ON or OFF After you have connected your battery you need to press ON and Power Indicator...

Page 9: ...display will show the preferred speed The speed level is from 1 to 5 3 1 5 Stop Start Button and Brake Function Easy scrolling action lets you choose your preferred speeds to suit your pace perfectly...

Page 10: ...ously cart runs 20 yards meters then stops itself Brief press the button three times continuously cart runs 30 yards meters then stops itself C Left Arrow initiates left turns When the arrows are rele...

Page 11: ...e not function The maximum range of the remote control varies between 80 120 yards depending on the battery charge obstacles atmospheric conditions power lines and topography of the course It is stron...

Page 12: ...trol Operation Turn the main power on by press POWER button on handle The manual functions of the caddy are controlled through the rheostat control knob on the right side of the handle Turn the knob f...

Page 13: ...s not get away By pressing the lower middle button test 10M 20M and 30M timer function 3 5 Battery Charging and Maintenance 3 5 1 Safety Instructions for Battery Use and Charging Please OBEY These Pre...

Page 14: ...empty battery or else it might become unusable Replacement batteries are available from your authorized NovaCaddy dealer or from NovaCaddy directly You can also order online at http www novacaddy com...

Page 15: ...rating our caddies Do not operate the caddy with the remote control in narrow or dangerous spaces places with valuables or any people gathering areas such as parking lots close to flowing traffic bag...

Page 16: ...the main power on the handle turn the power ON The battery status indicator lights will show you the battery level If the Green indicator illuminate battery is full If only Red indicator illuminate b...

Page 17: ...ny problem Always disconnect the battery when you store the caddy and always put your caddy together before re connecting the battery If you are not planning to play for at least a month store the bat...

Page 18: ...independent transmission Speed Max 8km hr 5 MPH 5 speed adjustable Distance Range per battery charge 20km 12 5 miles Climbing Capability 30 degree Max Load 34kg 75lb Battery and Charger Power 12V 36 A...

Page 19: ...peed Max 8km hr 5 MPH 5 speed adjustable Distance Range per battery charge 20km 12 5 miles Climbing Capability 30 degree Max Load 40kg 88lb Battery and Charger Power 24V 10 Ah Lithium Battery Battery...

Page 20: ...s 30A Check charger function Give a new full charge Ensure you have not completely discharged the battery Problems attaching wheels Remove outer cap and adjust quick release catch 9 Frequently Asked Q...

Page 21: ...caddy frequency may out of tune from remote Rebuild connection between remote and caddy ref to section 3 3 3 e Check antenna wire states good condition f If it still does not work open up the remote...

Page 22: ...provided by someone other that a NovaCaddy authorized service department Any return made under this warranty must be accompanied by the items listed below 1 Contact us to get a RMA Return Material Au...

Reviews:

Related manuals for X9R