


OnTime Clock
Installation and User Guide
Firmware Version 1
All claims based on information publicly available at time of printing. All other product or service names mentioned
in this document may be trademarks of the companies with which they are associated.
© 2015 Novanex, Inc. | All rights reserved | page 20
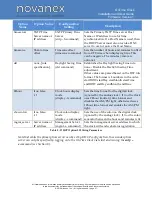
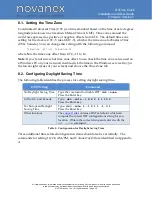
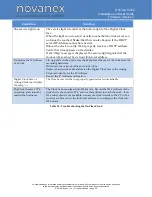
Setting
Description
Applies to…
Digital Analog
time.
Daylight Savings
Time (DST)
Sets the DST rule so that the clock
can automatically adapt to local
DST.
✓
✓
24-hour
Sets a 12- or 24-hour time display.
The factory default is 12 hour time.
✓
No effect
Show/hide
colon
Determines whether the colon is
shown on the display. The factory
default is to show a colon as a
separator between hours and
minutes.
✓
No effect
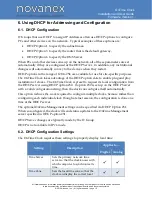
Table 4: DHCP Configuration Options
6.3. DHCP Configuration Test and Rollout
The recommended practice is to load the configuration string into the DHCP Server and
then try it with one clock by re-booting the clock. Once you are confident that the one
clock is properly configured using these settings, you can then plug in additional clocks
to add them to the network, knowing that they will automatically receive the proper
configuration settings as well.
Note
: A clock must be re-booted to request a new configuration string from the DHCP
Server. The clock
does not
automatically request a new configuration string at the
expiration of the DHCP lease interval.
6.4. Creating a DHCP Configuration String
Table 5 describes the six options that can be used in a configuration string when
establishing a DHCP Server option for automatically configuring the clock. The format
used is
option name=option value
, with the options separated by semicolons in the
configuration string. This string is added to the DHCP Server, as described in the next
section. (See Table 4 for example configuration strings).


