background image

Chapter 7   NovAtel Firmware and Software

SMART2 Installation and Operation Manual 1

59

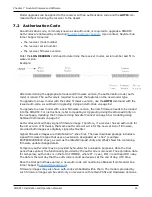
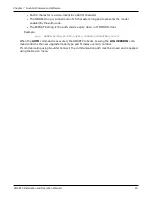
S3 records can be sent individually to the receiver using the

SOFTLOADSREC

command. Altern-

atively, the data from an S3 record can be parsed and packaged together with data from other
S3 records into a binary

SOFTLOADDATA

command. Packaging data parsed from multiple S3

records into a binary

SOFTLOADDATA

command can result in improved firmware update times

as each S3 record contains only a small number of bytes of firmware data. A single

SOFTLOADDATA

command can package up to 4096 bytes of firmware data from multiple S3

records, whereas a single

SOFTLOADSREC

command contains a maximum of 28 bytes of firm-

ware data from a single S3 record.

Multiple S3 records can be packaged into a single

SOFTLOADDATA

command as long as the

data from one S3 record follows immediately after the previous record. That is, the address
from the current S3 record must equal the address from the previous S3 record plus the data
length of the previous S3 record. If the data is not consecutive then the

SOFTLOADDATA

com-

mand can be sent with the amount of data it has packaged up to that point. Subsequent data can
be packaged in a new

SOFTLOADDATA

command. Within the

SOFTLOADDATA

command, the

"offset" field remains the address of the first S3 record and the "data" and "data length" are
updated to include the new data.

The *.shex file data may contain many gaps and jumps. For example, in many NovAtel *.shex
files, data for address 0x000_00000 is stored near the very end of the file.

Example Packaging Multiple S3 Records In A SOFTLOADDATA Command

Start a new

SOFTLOADDATA

command

S32100407AD48FCA63034B80F5CE0C36507DE3D8DCC0C6C0C00515D74BCACF2F2949E1

Address: 0x00407AD4 Num Data Bytes: 0x21 – 0x01 – 0x04 = 0x1C

S32100407AF04CCA4985F0F7B081E41D9B7D806C26989AE2D4E4CCBCB47C10FBFD3E43

Previous A Previous Num Bytes = 0x00 0x1C = 0x00407AF0

Address: 0x00407AF0 Num Data Bytes: 0x1C

Add data to existing

SOFTLOADDATA

command

S30D00407B0CDE0400A6374D5BFFC5

Previous A Previous Num Bytes = 0x00 0x1C = 0x00407B0C

Address: 0x00407B0C Num Data Bytes: 0x0D – 0x01 – 0x04 = 0x08

Add data to existing

SOFTLOADDATA

command

S3210000000007F0A7F1F4060000147B4000F49217813C7BB00014493F005C00000009

Previous A Previous Num Bytes = 0x00 0x08 = 0x00407B14

Address: 0x00000000 Num Data Bytes: 0x1C

Requires new

SOFTLOADDATA

command because address does not match previous a

previous number of data bytes

Send existing

SOFTLOADDATA

command, and start a new

SOFTLOADDATA

command

S3210000001C80040000E001000030000000082B0100D8060000E4060000C806000063

Address: 0x0000001C Num Data Bytes: 0x1C

Previous A Previous Num Bytes = 0x00 0x1C = 0x0000001C

Add data to existing

SOFTLOADDATA

command

The

SOFTLOADDATA

command must be sent as a NovAtel binary format command.

Summary of Contents for SMART2 Series

Page 1: ...OM 20000185 1 July 2019 SMART2 Installation and Operation User Manual ...

Page 2: ...ement or non disclosure agreement The software may be used or copied only in accordance with the terms of the agreement It is against the law to copy the software on any medium except as specifically allowed in the license or non disclosure agreement No part of this manual may be reproduced or transmitted in any form or by any means elec tronic or mechanical including photocopying and recording fo...

Page 3: ...tooth 17 2 4 Connect I O Signals to a SMART Antenna 18 2 5 Connect Power to the SMART2 18 2 5 1 Fuse for the Power Supply 18 2 6 Check that the SMART Antenna is Working 19 2 7 SMART Antenna Additional Equipment Required 19 SMART2 Operation 3 1 Communications with the Receiver 21 3 1 1 Serial Port Communications 21 3 1 2 CAN Bus Communications 22 3 1 3 Bluetooth Communications 23 3 2 Getting Starte...

Page 4: ...ure 39 4 3 SMART2 NMEA2000 Logging 39 4 3 1 How to Configure CAN1 to Transmit NMEA2000 Messages 39 Chapter 5 Built In Status Tests 5 1 RXSTATUSEVENT Log 40 5 2 RXSTATUS Log 40 5 2 1 Status Word 40 5 2 2 Error Word 41 5 2 3 Status Code Arrays 41 5 2 4 Receiver Status Code 42 5 2 5 Auxiliary Status Codes 42 5 2 6 Set and Clear Mask for all Status Code Arrays 42 Chapter 6 Troubleshooting 6 1 Examinin...

Page 5: ... Firmware Data 58 7 6 4 SoftLoad Update Method 60 7 6 5 SoftLoad Errors 61 7 7 Upgrading Using an Auth Code 62 7 7 1 Entering an Auth Code Using NovAtel Connect 62 7 7 2 Entering an Auth Code Using the Command Line 62 APPENDIX A SMART2 Technical Specifications A 1 SMART2 Performance Specifications 65 A 2 SMART2 Mechanical Specifications 67 A 3 SMART2 Environmental and Electrical Specifications 70 ...

Page 6: ...installation If this equipment does cause harmful interference to radio or television reception which can be determined by turning the equipment off and on the user is encouraged to try to correct the interference by one or more of the following measures l Re orient or relocate the SMART2 l Increase the separation between the equipment and the SMART2 l Connect the equipment to an outlet on a circu...

Page 7: ...mity may be obtained from the NovAtel web site at www novatel com products compliance eu declaration of conformity Radio Information Description of Service Bluetooth BR EDR BLE Operational Frequency 2400 MHz to 2480 MHz Modulation GFSK 4 DQPSK 8 DPSK Rated Power 13 0 dBm e i r p RoHS The SMART2 is in conformity with Directive 2011 65 EU of the European Parliament and of the council of 8 June 2011 ...

Page 8: ...lectronic equipment WEEE is a regulated area Where the generation of waste cannot be avoided it should be reused or recovered for its material or energy WEEE products may be recognized by their wheeled bin label See www novatel com products compliance environmental compliance for more information 1 1 SMART2 International Type Approval Brazil 04841 18 03402 Japan Korea ...

Page 9: ...inutes LOG RXSTATUSB onchanged LOG RAWEPHEMB onchanged LOG GLORAWEPHEMB onchanged LOG TRACKSTATB ontime 1 LOG BESTPOSB ontime 1 LOG RANGEB ontime 1 LOG RXCONFIGA once LOG VERSIONA once LOG PORTSTATS ontime 10 For issues with tracking L Band or TerraStar PPP convergence add the following logs to the above list in the file created on your computer LOG ALMANACB ONCHANGED LOG IONUTCB ONCHANGED LOG GLO...

Page 10: ... support request with NovAtel Customer Support using one of the following methods Log a Case and Search Knowledge Website www novatel com support Log a Case Search Knowledge and View Your Case History login access required Web Portal https novatelsupport force com community login E mail support novatel com Telephone U S and Canada 1 800 NOVATEL 1 800 668 2835 International 1 403 295 4900 ...

Page 11: ...ceiver l a high performance GNSS dual frequency antenna l a CAN port l three RS 232 COM ports l Bluetooth wireless technology optional l one LED status indicator l a PPS output l a Mark Input MKI Event1 l a water and dust tight enclosure l Emulated Radar output l Terrain Compensation optional l support for TerraStar L and TerraStar C correction services The SMART2 is available in several different...

Page 12: ...in Use Pin Use 1 COM1 TxD 8 COM3 TxD 2 COM1 RxD 9 Power Negative Return 3 COM2 TxD 10 ER_OUT Emulated Radar Output 4 COM2 RxD 11 MKI Mark Input 5 Signal Ground COM MKI PPS ER 12 PPS Pulse Per Second Output 6 CAN 13 COM3 RxD 7 CAN 14 Power Positive Source Table 2 SMART2 Connector Pin out 1 3 SMART2 LED The SMART2 has a single LED to indicate status Figure 2 SMART2 Status LED Label Description Model...

Page 13: ...ed Solid Continuous Receiver system error if indicator persists after 30 seconds Red Slow Flash 1 Hz Position quality warning unreliable high error Red Fast Flash 3 Hz Position unavailable unusable Table 4 SMART2 Status LED 1 4 Related Documents and Information After the receiver is set up the Agriculture Commands and Logs Reference Manual becomes the primary source for command and log information...

Page 14: ... components such as a computer or data ter minal using the communication ports See Connect the SMART2 to Data Communication Equipment on page 16 5 Connect the power leads on the interface cable to the power supply Ensure a 5 A slow blow fuse is incorporated in the power wiring Refer to SMART Antennas Interface Cable Optional Accessory on page 73 and SMART Antenna Additional Equipment Required on p...

Page 15: ...ber of constellations and signals tracked and the features enabled Refer to SMART Antennas Interface Cable Optional Accessory on page 73 for details about the power cable 2 2 Mounting and Orientating the SMART2 2 2 1 Mounting Plate Two mounting plates are available to facilitate mounting the receiver l a surface mounting plate l a pole mounting plate Refer to SMART2 Mechanical Specifications on pa...

Page 16: ...e the screw penetration does not exceed this specification Using excessively long screws can damage the SMART2 enclosure 2 Screw the mounting place onto a mount such as a range pole tribrach or tripod with a 1 x 14 thread screw A 5 8 to 1 bushing adapter is available NovAtel part number 12023275 2 3 Connect the SMART2 to Data Communication Equipment The SMART2 can communicate with other devices in...

Page 17: ...ommunication device 2 3 2 CAN Bus Port The SMART2 has a CAN Bus port available on the 14 Pin interface connector To connect to the CAN Bus port 1 Connect the SMART2 optional accessory cable or a custom made cable to the main 14 Pin interface connector For information about the SMART2 interface cable see SMART Antennas Interface Cable Optional Accessory on page 73 This section also has the connecto...

Page 18: ... for connector pin out and other details 2 5 Connect Power to the SMART2 To connect power to the SMART2 1 Connect the SMART2 Interface Cable 01019944 to the 14 Pin connector on the back of the SMART2 See SMART Antennas Interface Cable Optional Accessory on page 73 for inform ation about this cable 2 Connect the BATT and BATT bare wires of the interface cable to a 7 to 30 VDC power sup ply For deta...

Page 19: ... 43 DEFAULT_CONFIG ES2CR0602RN0000 2019 Jun 28 09 09 58 PACKAGE ES2PR0602RN0000 2019 Jun 28 09 09 49 ENCLOSURE SMART2 TB NMVK19060013V BLUETOOTH 0081F91AFBBF BT121 BT1210100RN0000 1 2 0 208 2019 05 09 15 16 47 IMUCARD IAM 20680 The Log version output will vary depending on SMART Antenna hardware option 3 Check that the Time Status is FINESTEERING which represents that time is fine set and being st...

Page 20: ...alent Littelfuse 0297005 24 V System Fuse High Reliability Harsh Environment standard size blade FKS ATO Blade Fuse 5A 80 V or equivalent Littelfuse 166 7000 450 Inline Fuse Holder for standard size blade Waterproof ATO Fuse Holder Littelfuse FHAC0001 Inline Fuse Holder for mini size blade Waterproof Mini Fuse Holder Littelfuse 0FHM0001 Table 6 SMART Antenna Recommended Fuse and Fuse Holders The R...

Page 21: ...er to the help file included with the application NovAtel Connect version 2 0 or greater is required for SMART2 Download the latest NovAtel Connect software and documentation from www novatel com novatel connect l Any console command line application To maximize the application of the receiver s capabilities become familiar with the commands and logs described in Agriculture Commands and Logs Refe...

Page 22: ...rial Ports Supported Change the COM Port Settings To change the settings on a COM port use the SERIALCONFIG command For example l To change the data rate of COM2 to 115200 enter SERIALCONFIG COM2 115200 l To change the data rate of COM1 to 57600 and enable even parity enter SERIALCONFIG COM1 57600 E Communicating using a Remote Terminal One method of communicating with the receiver is through a re...

Page 23: ...e pairing process check which Bluetooth Serial Port num ber has been assigned to the receiver by selecting Devices and Printers 6 Right click on the SMART2 device and select Properties 7 In the Properties window select the Services tab Ensure the Serial port box is checked and record the assigned COM port 3 2 Getting Started The receiver s software resides in flash memory When first powered it und...

Page 24: ... logging session or data will be lost 3 3 GLIDE NovAtel s GLIDE is a positioning algorithm for single frequency GPS and GPS GLONASS applic ations GLIDE produces a smooth position output tuned for applications where time relative accuracy pass to pass is more important than absolute accuracy Because of this it is well suited for agricultural applications Multipath signals tend to induce time varyin...

Page 25: ...m our web site at www novatel com support 3 4 Enabling SBAS Positioning SMART2 receivers are capable of SBAS positioning This positioning mode is enabled using the SBASCONTROL command sbascontrol enable auto When the command is entered the SMART2 automatically tracks the SBAS that is operating in the region e g WAAS or EGNOS and applies the corrections from the service On a simulator leave the tes...

Page 26: ...ple above the receiver serial number is BMWR19050037L To activate a subscription the receiver must be powered and tracking an L Band TerraStar satel lite prior to the planned activation time Use the ASSIGNLBANDBEAM command to configure the receiver to track the TerraStar satellite ASSIGNLBANDBEAM auto To confirm tracking of an L Band signal log the L Band tracking status information by entering th...

Page 27: ... 000 0 000 18 17 17 17 00 00 00 33 COM1 3 6 Terrain Compensation The Terrain Compensation feature corrects for errors in position caused by the roll and pitch of the vehicle The SMART Antenna senses the vehicle s roll and pitch angle and with the user entered height above ground compensates the position output to give the position under the vehicle rather than at the antenna Vehicle motion is requ...

Page 28: ...ion that needs to be applied is 61 cm In the example shown in Figure 7 Terrain Compensation Pitch above the pitch angle is 8 degrees so the position error that needs to be applied is 49 cm The following logs provide terrain compensated positions l BESTPOS log l BESTXYZ log l BESTUTM log l GPGGA log l GPGGALONG log l GPGLL log l GPRMC log l PGN129025 NMEA log l PGN129027 NMEA log l PGN129029 NMEA l...

Page 29: ... Save the Terrain Compensation configuration data Mount the SMART Antenna The SMART Antenna must be mounted as close to the center of the vehicle as possible as illus trated in Figure 8 SMART Antenna Installation below Figure 8 SMART Antenna Installation The SMART Antenna must be mounted with the connector facing the rear of the vehicle as shown in Figure 9 SMART Antenna Orientation below Figure 9...

Page 30: ...und to the bottom of the SMART Antenna The measurement accuracy should be within 2 5 to 5 0 cm Figure 10 Antenna Height Measurement After the measurement has been made use the TILTFILTER command to set the height of the SMART Antenna To set the height in metres enter the following command TILTFILTER switch antennaheight Where switch enables or disables Terrain Compensation antennaheight is the hei...

Page 31: ...e Terrain Com pensation configuration must be saved This is done so the height data and level setting are saved between power cycles To save Terrain Compensation configuration enter the following command TILTZERO SAVE For more information refer to the TILTZERO command 3 6 2 Configuring Terrain Compensation using NMEA Command Terrain Compensation can also be configured using the NMEA style command ...

Page 32: ...icle must be parked on flat ground when the level command is sent to the SMART Antenna To level the Terrain Compensation sensor enter the following command PMDT l 4D For more information refer to the PMDT command Saving the Terrain Compensation Configuration After the height has been set or the Terrain Compensation sensor has leveled the Terrain Com pensation configuration must be saved This is do...

Page 33: ...nd for detailed information After it is configured using the RADARCONFIG command Emulated Radar ER pulses are out put through the SMART Antenna interface cable and the RADARSTATUS log 3 8 Logging Using NovAtel Connect NovAtel Connect is a computer program used to configure and monitor NovAtel receivers The Logging Control Window in NovAtel Connect provides an interface to configure logging and to ...

Page 34: ... the log is col lected l Format Logs can be generated in Binary or ASCII format For information about these formats refer to Binary and ASCII l Trigger The trigger determines the schedule on which the log is collected The trigger selected depends on the information required and the type of log For more information about trig gers refer to Log Types and the LOG command l Destination The destination...

Page 35: ...sions you will be prompted whether you want to replace the existing file or add the new session to the existing log file To allow NovAtel Connect to generate a unique name for each logging session ensure the Auto check box is selected NovAtel Connect will generate a new file for each logging session The file is named with the product serial number PSN and the time when the logging session started ...

Page 36: ... the CAN bus l PGN 126992 System Time l PGN 129025 GNSS Position Rapid Update l PGN 129026 COG SOG Rapid Update l PGN 129027 Position Delta High Precision Rapid Update l PGN 129029 GNSS Position l PGN 129551 GNSS Differential Signal The following commands and logs are used for CAN configuration l CANCONFIG command controls the CAN transceiver hardware and places the receiver on bus or off bus l J1...

Page 37: ...ters are to be changed 2 Use the CANCONFIG command to place the receiver on bus 3 Optionally use the J1939STATUS log to monitor CAN status on the receiver 4 2 1 Configuration Notes l The J1939CONFIG and CANCONFIG commands can be entered in any order After the CANCONFIG command is used to place the receiver on the CAN bus J1939CONFIG com mands take effect immediately Until then J1939CONFIG can be e...

Page 38: ...ddress 4 2 3 Example of Modifying the CAN Bus Parameters 1 LOG J1939STATUS ONCHANGED 2 CANCONFIG CAN1 OFF 3 J1939CONFIG NODE1 CAN1 addresses 4 CANCONFIG CAN1 ON 5 SAVECONFIG J1939STATUS NODE1 DISABLED 0 0xFE J1939STATUS NODE1 CLAIMING 1 address J1939STATUS NODE1 CLAIMED attempt count address 4 2 4 Example of Detecting an Address Claim Failure and Reconfiguring 1 LOG J1939STATUS ONCHANGED 2 J1939CO...

Page 39: ...ress message sent by another ECU on the bus such as a tester unit The commanded address always overrides the address specified using J1939CONFIG command When the Commanded Address is received the receiver reports a status of CLAIMING followed by CLAIMED Restarting CAN using the J1939CONFIG command or CANCONFIG command clears the commanded address the Address Claim procedure will be executed again ...

Page 40: ...orrected the receiver must be reset to resume normal operation 5 1 RXSTATUSEVENT Log The RXSTATUSEVENT log is used to output event messages as indicated in the RXSTATUS log On start up the SMART2 is set to log RXSTATUSEVENTA ONNEW on all ports You can remove this message using the UNLOG command Refer to the RXSTATUSEVENT log in the Agriculture Commands and Logs Reference Manual for log and command...

Page 41: ...set the receiver The receiver can be configured to generate event messages triggered by status conditions Receiver Error words automatically generate event messages These event messages are output in the RXSTATUSEVENT log see also Set and Clear Mask for all Status Code Arrays on the next page The error word is the first field after the log header in the RXSTATUS log as shown in the example in Figu...

Page 42: ... an error bit Anything that results from an error bit becoming active also occurs if a receiver status and its associated priority mask bits are set 5 2 5 Auxiliary Status Codes The auxiliary status codes are only in the RXSTATUS log The four arrays that represent the aux iliary status codes indicate the receiver state for information purposes only The events rep resented by these bits typically d...

Page 43: ...te The clear mask is used to turn logging on temporarily while the bit changes from a 1 to a 0 state Note the error word does not have any associated mask words Any bit set in the error word results in a RXSTATUSEVENT log broadcast unless unlogged Refer also to the RXSTATUS log for a more detailed description ...

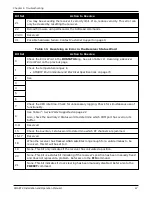
Page 44: ...eceiver is not properly powered Check the power cable Replace if faulty See The receiver cannot establish communication Check the serial cables and ports Replace if faulty See For SMART2 refer to SMART2 CAN Bus on page 36 Refer also to the SERIALCONFIG command The receiver is not tracking satellites Ensure that the antenna has an unobstructed view of the sky from horizon to horizon Check the RXSTA...

Page 45: ...s indicating that an invalid authorization code has been used Refer to the VERSION log or VALIDMODELS log and the MODEL command or AUTH command The receiver is being affected by jamming Move the receiver away from any possible jamming sources The receiver is being affected by interference Move the GNSS antenna away from the source of the interference signal If the interference mitigation feature i...

Page 46: ...0 The operating temperatures are ambient air temperatures The temperature sensors on the receiver PCB will reflect higher operating temperatures refer to the HWMONITOR log The PCB temperature sensors will trigger a receiver warning and receiver error at 100 C and 110 C respectively The warning and error conditions are captured using the RXSTATUS log 10 Possible hardware or environmental condition ...

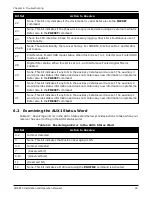
Page 47: ...e time Check for unnecessary logging Check for simultaneous use of functionality 8 See Table 7 Serial Ports Supported on page 22 Also check the Auxiliary 2 Status word to determine which COM port has overrun its buffer 9 11 Reserved 15 Check the Auxiliary 1 status word to determine which RF channels are jammed 16 17 Reserved 18 When the receiver has tracked GNSS satellites long enough for a valid ...

Page 48: ... word provides status information and does not contain any new information on problems Refer also to the FRESET command 30 None This bit indicates if any bits in the auxiliary 2 status word are set The auxiliary 2 word provides status information and does not contain any new information on problems Refer also to the FRESET command 31 None This bit indicates if any bits in the auxiliary 1 status wo...

Page 49: ...re an increase in the ambient air temperature or enabling additional features may cause the receiver to exceed its maximum operating temperature and generate a Temperature Status error When a Temperature Status error occurs the receiver idles all channels turns off the antenna and disables the RF hardware The communication interfaces continue to function so commands can be sent and logs received 6...

Page 50: ...e environment you can monitor the receiver temperature using the RXSTATUS and HWMONITOR logs 1 Log the RXSTATUS log and check Bit 1 of the Receiver Status word LOG RXSTATUS onchanged RXSTATUS USB1 0 81 5 FINESTEERING 1990 326146 020 0a104020 2ae1 14434 00000000 5 0a104020 00000000 00030000 00030000 Receiver Status 00062000 00001008 00000000 00000000 00000000 00000000 80000000 00000000 80000000 000...

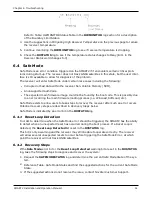
Page 51: ... error during the main firmware loading process i e WinLoad SoftLoad etc Safe Mode exists to allow users to take steps to recover the receiver after such an error occurs Potential recovery steps are described in Recovery Steps below Safe Mode is indicated by an error bit in the RXSTATUS log 6 4 1 Reset Loop Detection In order to determine when the Safe Mode error should be triggered the SMART2 has...

Page 52: ...lity available on the receiver The firmware download file contains l Firmware shex file l WinLoad software utility 7 1 Firmware Updates and Model Upgrades A local NovAtel dealer can provide all the information needed to upgrade or update a receiver Refer to www novatel com where to buy for contact information or contact sales novatel com or support novatel com directly 7 1 1 Firmware Updates Firmw...

Page 53: ...ng Using the WinLoad Utility on the next page Updating the Firmware Using NovAtel Connect on page 56 or Updating Using SoftLoad Commands on page 57 Auth codes work with any signed firmware image Therefore if a receiver has an auth code for the old version of firmware that same auth code will work for the new version of firmware provided both images are digitally signed by NovAtel Signed firmware i...

Page 54: ...iles winload exe WinLoad utility program howto txt Instructions on how to use the WinLoad utility whatsnew rtf Information on the changes made in the firmware since the last revision x x shex Firmware version upgrade file where x x defines the product name and release e g ES2PR0602RN0000 shex NovAtel Software License Agreement rtf License agreement for the firmware NovAtel has an online video tuto...

Page 55: ...MART2 Installation and Operation Manual 1 55 Figure 16 WinLoad s Open Window When a file is selected the filename appears in the main WinLoad display area and in the title bar Figure 17 Open File in WinLoad below Figure 17 Open File in WinLoad ...

Page 56: ...ain display power cycle the receiver 5 If the Authorization Code window appears enter the auth code and click OK See Author ization Code on page 53 for further information about the Authorization Code 6 The receiver finishes the download and then resets The process is complete when Done appears in the main display area 7 Close WinLoad If loading a firmware that is currently installed on a SMART2 i...

Page 57: ...USB ICOM etc can be used The SoftLoad process is made up of a set of commands and logs that are used to send new firmware data to a receiver and check the progress of the update Use SoftLoad if automated loading is desired or if a con nection is only possible through USB or Ethernet The receiver stops tracking GNSS satellites during the SoftLoad process Do not attempt to SoftLoad when GNSS satelli...

Page 58: ...ach pair of characters forms the ASCII representation of a binary byte The format is as follows S3LL AAAAAAAA DDDDDDDD DDDDDDDDCC Check Sum Little Endian Data These bytes are copied into the data field of the SOFTLOADDATA command 4 Byte Address Set this as the value of offset in the SOFTLOADDATA command Length This is the hexadecimal number of character pairs to follow in the record This value min...

Page 59: ...3 record and the data and data length are updated to include the new data The shex file data may contain many gaps and jumps For example in many NovAtel shex files data for address 0x000_00000 is stored near the very end of the file Example Packaging Multiple S3 Records In A SOFTLOADDATA Command Start a new SOFTLOADDATA command S32100407AD48FCA63034B80F5CE0C36507DE3D8DCC0C6C0C00515D74BCACF2F2949E1...

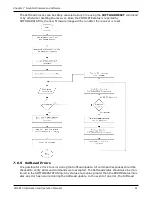
Page 60: ...e file a Send S0 S5 and S7 S Records directly to the receiver using the SOFTLOADSREC com mand The S Record must be enclosed in quotation marks SOFTLOADSREC S RECORD Data within S0 records can also be sent to the receiver by converting them to SOFTLOADSETUP commands Refer to the SOFTLOADSETUP command for details on how to convert from S0 S Records to SOFTLOADSETUP commands b S3 S Records should be ...

Page 61: ...ADSTATUS the new firmware image will be run after the receiver is reset 7 6 5 SoftLoad Errors It is possible for errors to occur during the SoftLoad update All command responses should be checked to verify all issued commands were accepted The SoftLoad status should also be mon itored in the SOFTLOADSTATUS log Any status enum value greater than the ERROR status indic ates an error has occurred dur...

Page 62: ...OM cable USB cable or Ethernet con nection 3 Start NovAtel Connect on the computer 4 Use NovAtel Connect to connect to the receiver For information about using NovAtel Connect refer to the help file in NovAtel Connect 5 Click the Firmware Update button The Update window appears 6 Enter the auth code in the Auth Code text box 7 Click the Upload button 7 7 2 Entering an Auth Code Using the Command L...

Page 63: ... enabled by the auth code l The EXPDATE string is the auth code s expiry date in YYMMDD format Example auth 7WBMBK 887CB6 K5J3FH 5DF5P2 42PW8G DSNLNNTMNG 121211 When the AUTH command is executed the SMART2 reboots Issuing the LOG VERSION com mand confirms the new upgrade model type and firmware version number If communicating using NovAtel Connect the communication path must be closed and reopened...

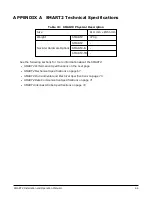
Page 64: ...ART2 TB Table 13 SMART2 Physical Description See the following sections for more information about the SMART2 l SMART2 Performance Specifications on the next page l SMART2 Mechanical Specifications on page 67 l SMART2 Environmental and Electrical Specifications on page 70 l SMART2 Data Communication Specifications on page 71 l SMART Antennas Strobe Specifications on page 72 ...

Page 65: ... RMS Code Carrier GPS L1 4 cm 0 5 mm L2 8 cm 1 0 mm GLONASS L1 15 cm 1 5 mm L2 8 cm 1 5 mm Table 14 SMART2 Receiver Performance 1Typical values Performance specifications in open sky conditions and are subject to GPS system characteristics US DOD operational degradation ionospheric and tropospheric conditions satellite geometry baseline length multipath effects and the presence of intentional or u...

Page 66: ...sition up to 20 Hz up to 20 Hz Time to First Fix Hot 35 s typical Almanac and recent ephemeris saved and approximate position and time entered Cold 50 s typical No almanac or ephemeris and no approximate position or time Signal Reacquisition L1 0 5 s typical L2 1 0 s typical Time Accuracy1 20 ns RMS Velocity Accuracy2 0 055 m s RMS 1Time accuracy does not include biases due to RF or antenna delay ...

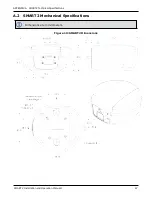
Page 67: ...APPENDIX A SMART2 Technical Specifications SMART2 Installation and Operation Manual 1 67 A 2 SMART2 Mechanical Specifications Dimensions are in millimeters Figure 19 SMART2 Dimensions ...

Page 68: ...APPENDIX A SMART2 Technical Specifications SMART2 Installation and Operation Manual 1 68 Figure 20 SMART2 Surface Mounting Plate 01018317 ...

Page 69: ...APPENDIX A SMART2 Technical Specifications SMART2 Installation and Operation Manual 1 69 Figure 21 SMART2 Pole Mounting Plate 01019142 ...

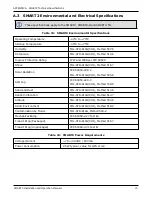
Page 70: ...ar Radiation IEC 60950 22 8 2 MIL STD 810G CH1 Method 505 6 Salt Fog IEC 60950 22 8 3 MIL STD 810G CH1 Method 509 6 Sand and Dust MIL STD 810G CH1 Method 510 6 Random Vibration MIL STD 810G CH1 Method 514 7 Altitude MIL STD 810G CH1 Method 500 6 Acidic Environment MIL STD 810G CH1 Method 518 2 Contamination by Fluids MIL STD 810G Method 504 2 Mechanical Bump IEC 60068 2 27 Test Ea Transit Drop Pac...

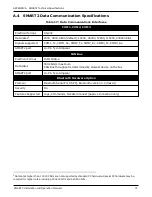
Page 71: ...N Bus Electrical Format ISO 11898 2 Data rates 500 kbits s maximum CAN Bus throughput is determined by slowest device on the bus SMART2 port 14 Pin Tyco Ampseal Bluetooth Hardware Option Protocol Bluetooth Serial Port SPP Bluetooth version 4 0 classic Security Pin Features Supported Logs Commands NovAtel Connect passive connection only Table 17 Data Communications Interfaces 1Data rates higher tha...

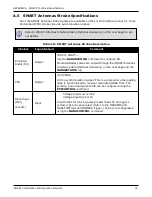
Page 72: ...ER Emulated Radar pulses are output through the SMART Antennas Interface Cable Optional Accessory on the next page and the RADARSTATUS log PPS Output 3 3V CMOS A time synchronization output This is a pulse where the leading edge is synchronized to receiver calculated GNSS Time The polarity period and pulse width can be configured using the PPSCONTROL command Mark Input MKI Event1 Input Voltage Inp...

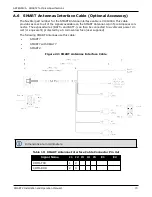
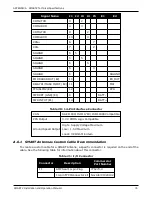
Page 73: ...able on the SMART Antenna 14 pin Tyco Ampseal con nector The exposed wires BATT and BATT can then be connected to a vehicular power cir cuit or equivalent protected by a 5 A slow blow fuse user supplied The following SMART Antennas use this cable l SMART7 l SMART7 with RELAY7 l SMART2 Figure 22 SMART Antennas Interface Cable Dimensions are in millimeters Signal Name J1 J2 J3 J4 J5 E1 E2 COM1 TXD 1...

Page 74: ...BATT CAN SAE J1939 ISO 11783 ISO 11898 Compatible PPS Output 3 3 V CMOS Logic Compatible Ground Speed Output High Supply Voltage Maximum Low 1 5 V Maximum Load 3K Ohm Minimum Table 20 14 Pin Interface Connector A 6 1 SMART Antennas Custom Cable Recommendation To create a custom cable for a SMART Antenna a specific connector is required on the end of the cable See the following table for informatio...

Page 75: ...ocal NovAtel dealer or NovAtel Cus tomer Support Tradename Description Part Number SMART2 SMART2 01020287 01020311 SMART2 B SMART2 with Bluetooth 01020291 01020309 SMART2 TB SMART2 with Bluetooth and Terrain Compensation 01020293 01020313 Table 22 SMART2 Hardware Options Part Number Description 01018317 Surface Mounting Plate for SMART2 01019142 Pole Mounting Plate for SMART2 01019944 SMART Antenn...

Page 76: ...SMART2 Installation and Operation Manual 1 76 ...

Reviews: