background image

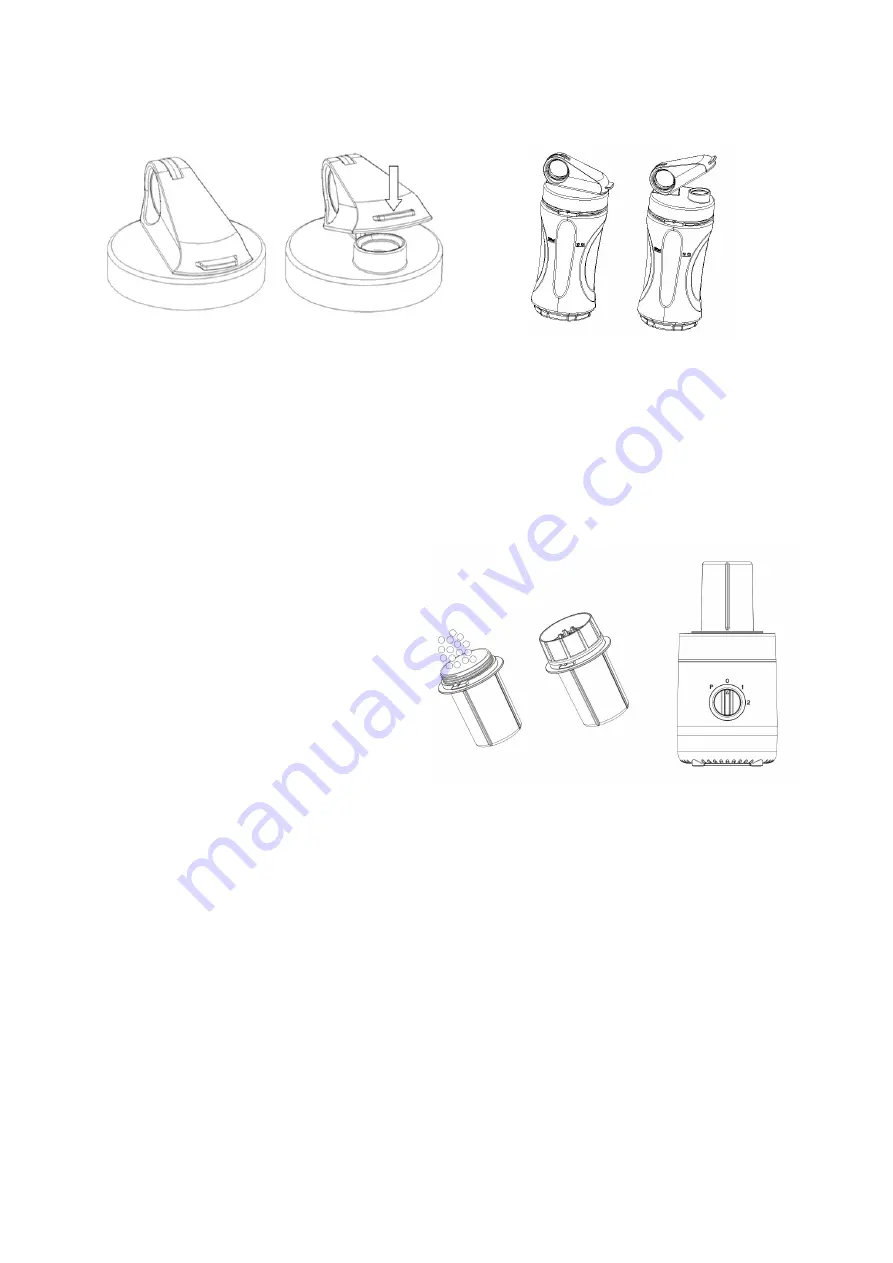
9. O uso da alça com bico “non drip”: coloque a bebida na garrafa e aperte a alça com o 

bico. Para consumo, levante o bico e beba a bebida.

USO DO MOEDOR

1. Você pode usar o moedor para picar ingredientes secos (por exemplo, arroz, nozes, 

ervas, pimenta, café, etc.). Coloque os grãos no recipiente do moedor (máximo 50g). A 

quantidade de ingredientes não deve exceder o volume máximo do recipiente. Em 

seguida, aparafuse o recipiente do moedor na alça da faca.

2. Fixe a tigela do moedor na base (vire à esquerda firmemente). Se o recipiente não for 

instalado corretamente, a trituradora não

funcionará (meio de segurança).

3. O tempo de operação recomendado

para o moedor é de um minuto.

USO DO BLENDER COM RECIPIENTE

(aplica-se aos modelos SB2000 i

SB2100)

1. Coloque a base do liquidificador sobre

uma superfície plana e seca. Antes de conectar à fonte de alimentação, certifique-se de 

que a voltagem elétrica esteja de acordo com os dados fornecidos na placa de 

identificação do dispositivo e que o interruptor esteja desligado.

2. Lave o recipiente do blender e certifique-se de que esteja limpo por dentro. Corte as 

frutas em pedaços medindo aproximadamente 15x15x15mm (tamanho máximo). Coloque 

os pedaços fatiados no recipiente e adicione a quantidade correta de água. Em seguida, 

coloque a tampa no recipiente do blender e aperte-a bem. Observe que a quantidade de 

água não deve exceder a capacidade máxima do recipiente. 

3. Coloque o recipiente na base do blender, aparafuse o recipiente do liquidificador no 

sentido anti-horário na base do blender e certifique-se 

59

Summary of Contents for SB1000

Page 1: ...INE BLENDER INSTRUKCJA OBS UGI BLENDER USE INSTRUCTIONS MIXER BEDIENUNGSANLEITUNG BLENDER POKYNY PRE PREV DZKU BLENDER INSTRUC IUNI DE UTILIZARE MIX R N VOD K OBSLUZE BATIDORA MANUAL DE INSTRUCCIONES...

Page 2: ...POLSKI STR 4 ENGLISH P 11 18 DEUTSCH S 25 SLOVENSK HLAVN 32 ROM N P 38 E TINA STR 46 ESPANOL PAG 51 PORTUGUES PAG 56 61 SB1000 1100 2000 2100 2...

Page 3: ...3...

Page 4: ...j wtyczk z gniazdka 10 Urz dzenie nie dzia a przy pustej b d zbyt przepe nionej butelce Nie u ywaj urz dzenia w spos b ci g y 11 Upewnij si e zasilanie jest wy czone podczas czyszczenia lub demonta u...

Page 5: ...jemnika 9 Pokr t o prze cznika 10 Baza blender 11 50 g m ynek do rozdrabniania zi orzech w itp 12 Adapter m ynka z udoskonalonym ostrzem INSTRUKCJA U YTKOWANIA BLEDNERA 1 Umie baz blendera na p askiej...

Page 6: ...znie wieci na niebiesko Nast pnie w cz blender Naci nij przycisk Pulse P kilkukrotnie aby przeprowadzi wst pne miksowanie Je li butelka jest zamontowana nieprawid owo urz dzenie nie b dzie dzia a jest...

Page 7: ...yt no a i pij bezpo rednio z butelki lub zakr uchwyt dziubkiem non drip i zabierz butelk ze sob 9 U ytkowanie uchwytu z dziubkiem non drip nalej nap j do butelki i zakr uchwyt z dziubkiem W celu spo y...

Page 8: ...czysty w rodku Pokr j owoce na kawa ki o wymiarach ok 15x15x15mm maksymalny rozmiar Umie pokrojone kawa ki w pojemniku i dodaj odpowiedni ilo wody Nast pnie dopasuj pokryw na pojemniku blendera i mocn...

Page 9: ...a 300 ml 3 x nakr tka 3 x Etui NAJCZ CIEJ SPOTYKANE PROBLEMY PROBLEM ROZWI ZANIE Urz dzenie nie dzia a Upewnij si e urz dzenie zosta o dobrze zmontowane Je li butelka m ynek nie s zainstalowane prawid...

Page 10: ...zycisk pulsacyjny przez ok 20 sek Nast pnie otw rz pokryw pojemnika dzbanka butelki m ynka wylej wod i przetrzyj ca o za pomoc wilgotnej szmatki UWAGA Je li pojemnik mia kontakt z t ust ywno ci np mi...

Page 11: ...ate with empty load or over load Do not continuously operate the product 11 Ensure that the power is off when wash or disassemble 12 The blade of this appliance is very sharp please handle it carefull...

Page 12: ...e crusher 8 Container socket 9 Switch knob 10 Base blender 11 50 g grinder for grinding herbs nuts etc 12 Grinder adapter with improved blade BLENDER USE INSTRUCTIONS 1 Put the motor base on flat dry...

Page 13: ...light blue After that switch on and then press the Pulse button P several times to perform the pre mixing If the bottle is not installed on the motor base properly the blender won t operate This is a...

Page 14: ...iance from the power supply Spin out the bottle 8 Screw the blade holder out from the bottle and then drink directly Or you can carry it anywhere with the convenient non drip spout 9 The usage of non...

Page 15: ...ctricity power match with the details given on the rating label of the blender and switch is off before connecting to the power 2 Wash the blender jar and make sure the blender jar is clean inside Cut...

Page 16: ...50g grinder 2 x 600 ml bottle 1 x 300 ml bottle 3 x cap 3 x case MOST COMMON PROBLEMS Problem Solution The device does not work If the bottle or grinder are not installed correctly the blender will n...

Page 17: ...lse button for about 20 seconds Then open the blender jar bottle grinder and pour out the water wipe it with a piece of wet cloth Note If the components get in touch with greasy food such as meat manu...

Page 18: ...GR 1 2 3 4 5 6 7 8 9 10 11 12 13 14 15 16 17 18...

Page 19: ...300 W 220 240V 50 60Hz BLENDER N OVEEN SPORT MIX FIT SB2000 SB2100 X line 500 W 220 240V AC 50Hz SB1000 SB1100 SB2000 SB2100 1 non drip 2 600 ml 3 300 ml SB2000 SB2100 4 SB2000 SB2100 5 SB2000 SB2100...

Page 20: ...3 4 Pulse P 20...

Page 21: ...5 3 2 6 P 1 2 3 7 8 non drip 9 non drip 21...

Page 22: ...1 50g 2 3 SB2000 SB2100 1 2 15x15x15mm 3 22...

Page 23: ...4 SB1000 i SB1100 1 x 1 x 1 x 50g 2 x 600 ml 2 x 2 x Etui SB2000 i SB2100 1 x 1x 800 ml 1 x 1 x 50g 2 x 600 ml 1 x 300 ml 3 x 3 x Etui 23...

Page 24: ...1 2 3 20 4 5 6 24...

Page 25: ...st nehmen Sie das Netzteil aus der Steckdose 10 Das Ger t funktioniert nicht wenn es leer bzw zu voll ist Benutzen Sie das Ger t nicht durchgehend 11 Gehen Sie sicher dass das Ger t nicht mehr angesch...

Page 26: ...d SB2100 7 Messereinsatz 8 Basis des Beh lters 9 Regulator 10 Basis Mixer 11 50g M hle zum Zerkleinern von Kr utern N ssen etc 12 Adapter M hle mit verbessertem Messer Bedienungsanleitung Mixer 1 Plat...

Page 27: ...cht montiert ist wird der Mixer blau aufleuchten Anschlie end schalten Sie den Mixer ein Drehen Sie den Knopf Pulse P mehrfach um das Mixen einzuleiten Sofern die Flasche nicht richtig montiert ist wi...

Page 28: ...Mixer ausschalten und das Netzteil vom Strom trennen Drehen Sie die Flasche ab 8 Drehen Sie die Fassung des Messers raus und trinken Sie danach direkt aus der Flasche oder verschlie en Sie sie mit de...

Page 29: ...immt bevor Sie das Ger t anschlie en 2 S ubern Sie die Flasche und vergewissern Sie sich dass sie innen sauber ist Schneiden Sie das Obst in St cke in der Gr e von 15x15x15mm maximale Gr e Platzieren...

Page 30: ...alt der Modelle SB1000 und SB1100 1x Mixer 1x Adapter zur Herstellung von crushed ice 1x M hle 50g 1x Flasche 600ml 2x Drehverschluss 2x Etui SB2000 und SB2100 1x Mixer 1x Kelch 800ml 1x Adapter zur H...

Page 31: ...en Sie die angemessene Menge warmes Wasser in den Beh lter Flasche M hle Verschlie en und montieren Sie den Beh lter auf der Basis des Mixers und dr cken Sie den Knopf f rs Pulsieren f r ca 20 Sekunde...

Page 32: ...ko na typovom t tku Ke sa zariadenie nepou va vytiahnite z str ku zo z suvky 10 Zariadenie nefunguje ak je f a a pr zdna alebo pr li pln Nepou vajte zariadenie nepretr ite 11 Pri isten alebo vyberan s...

Page 33: ...100 7 Dr iak no a 8 Obj mka n doby 9 Prep na 10 Z klad a mix r 11 50 g mlyn ek na mletie byl n orechov at 12 br sky s vylep enou epe ou N VOD NA POU ITIE BLOWNERU 1 Polo te z klad u mix ra na rovn a s...

Page 34: ...impulzu P aby ste vykonali po iato n mix Ak je f a a nespr vne nain talovan zariadenie nebude fungova jedn sa o z ruku 5 Nepou vajte mix r nepretr ite dlh ie ako 3 min ty Po uplynut tejto doby mix r...

Page 35: ...v v toku Na konzum ciu zdvihnite hubicu a vypite n poj POU ITIE BRUSI A 1 Na mletie such ch pr sad napr Ry e orechov byl n korenia k vy at Pou ite mlyn ek Vlo te fazu a d o n doby na mlyn ek maxim lne...

Page 36: ...e mno stvo vody by nemalo prekro i maxim lnu kapacitu lky 3 Nasa te lku na z klad u mix ra priskrutkujte n dobu mix ra proti smeru hodinov ch ru i iek k z kladni mix ra a uistite sa e prevodov stupe...

Page 37: ...pravidelne isti 3 Samo istenie Napl te n dobu f a e mlyn ek spr vnym mno stvom teplej vody Zatvorte n dobu f a u br sku a nain talujte ju na z klad u mix ra Pripojte mix r k zdroju nap jania a stla t...

Page 38: ...ta de evaluare Scoate i techerul atunci c nd nu l utiliza i 10 Nu opera i cu sarcin goal sau supra nc rcare Nu folosi i produsul n mod continuu 11 Asigura i v c alimentarea este oprit atunci c nd sp l...

Page 39: ...rt vas 9 Buton pornit oprit 10 Baz blender 11 Lam de 50 g pentru macinarea ierburilor nucilor etc 12 Adaptor toc tor cu lam mbun t it INSTRUC IUNI DE UTILIZARE BLENDER 1 Pune i baza motorului pe platf...

Page 40: ...cepe s func ioneze Dac sticla nu este instalat corect pe baza motorului blenderul nu va func iona Aceasta este o caracteristic de siguran 5 Ap sa i butonul de impuls de mai multe ori pentru pre ameste...

Page 41: ...uba i suportul lamei din sticl apoi be i direct Sau l pute i transporta oriunde cu duza convenabil f r picurare 8 Utilizarea canalului f r picurare Pune i sucul n sticl n uruba i capacul n borcan i mp...

Page 42: ...B2000 i SB2100 1 A eza i baza blenderului pe o suprafa plan i uscat nainte de conectarea acestuia la sursa de alimentare asigura i v c tensiunea electric este n concordan cu datele date pe pl cu a de...

Page 43: ...n vas n timpul func ion rii blenderului COMPONEN A MODELELOR SB1000 i SB1100 1 x blender 1 x adapter cu lam pentru zdrobirea ghe ii 1 x r ni 50g 2 x sticl 600 ml 2 x piuli 2 x Hus SB2000 i SB2100 1 x...

Page 44: ...orcanul blenderului sticl r ni cantitatea adecvat de ap cald acoperi i borcanul blenderului sticla r ni a i instala i l pe baza motorului Conecta i i ap sa i butonul de impuls timp de aproximativ 20 d...

Page 45: ...lar cu responsabilitatea deplin c produsul produsele men ionat e BLENDER N oveen model e s SB210 220 230 SB550 560 SB1000 1100 2000 2100 Respecta i urm toarele directive inclusiv toate modific rile i...

Page 46: ...pou van vyjm te z str ku ze z suvky 10 Spot ebi nefunguje p i pr zdn nebo p epln n n dob Nepou vejte spot ebi v nep etr it m re imu 11 P esv d te se e je vypnut nap jen b hem i t n nebo demont e 12 Os...

Page 47: ...let bylin o ech apod 12 adapt r ml nku se zdokonalen m ost m N VOD K OBSLUZE MIX RU 1 Um st te z kladnu mix ru na ploch a such podlo ce Ne jej p ipoj te k nap jen p esv d te se e elektrick v kon je v...

Page 48: ...ungovat je to pojistka 5 Nepou vejte mix ru nep etr it m zp sobem d le ne 3 minuty Pot mix r p ibli n na 2 minuty vypn te z d vodu chlazen motoru Pot je mo n znovu nastartovat spot ebi 6 P epn te n ko...

Page 49: ...oru ovan as pr ce ml nku je jedna minuta POU V N POH ROV HO MIX RU t k se model SB2000 a SB2100 1 Um st te z kladnu mix ru na ploch a such podlo ce Ne jej p ipoj te k nap jen p esv d te se e elektrick...

Page 50: ...k myt odpojte mix r od nap jec ho zdroje 2 Elementy kter maj kontakt s potravinami mus b t i t ny pravideln 3 Samo i t n Nalijte do z sobn ku n doby ml nku odpov daj c mno stv tepl vody Za roubujte z...

Page 51: ...ticas Retirar el enchufe de la toma cuando dispositivo no sea utilizado 10 El dispositivo no funciona con la botella vac a o totalmente llena No utilizar el dispositivo de forma continua 11 Comprobar...

Page 52: ...linillo con cuchillas mejoradas INSTRUCCIONES DE USO DE LA BATIDORA 1 Colocar la base de la batidora sobre una superficie plana y seca Antes de conectarla a la alimentaci n comprobar que la tensi n el...

Page 53: ...ranscurrido ese tiempo se debe apagar la batidora durante aproximadamente 2 minutos para enfriar el motor A continuaci n es posible volver a poner en marcha el dispositivo 6 Colocar el interruptor en...

Page 54: ...omendado de funcionamiento del molinillo es un minuto USO DE LA BATIDORA DE VASO hace referencia a los modelos SB2000 y SB2100 1 Colocar la base de la batidora sobre una superficie plana y seca Antes...

Page 55: ...a base La batidora comenzar a funcionar correctamente LIMPIEZA Y MANTENIMIENTO 1 Antes de iniciar la limpieza desconectar la batidora de la fuente de alimentaci n 2 Los elementos que est n en contacto...

Page 56: ...ositivo n o estiver em uso desconecte a ficha da tomada 10 O dispositivo n o funciona com uma garrafa vazia ou cheia demais N o use o dispositivo de maneira cont nua 11 Certifique se de que a alimenta...

Page 57: ...ES PARA O USO DO BLENDER 1 Coloque a base do liquidificador sobre uma superf cie plana e seca Antes de conectar a rede el trica certifique se de que a energia el trica esteja de acordo com os dados d...

Page 58: ...a 5 N o use o blender continuamente por mais de 3 minutos Ap s este tempo desligue o liquidificador por cerca de 2 minutos para esfriar o motor Logo voc poder reiniciar o dispositivo 6 Mova a chave pa...

Page 59: ...LENDER COM RECIPIENTE aplica se aos modelos SB2000 i SB2100 1 Coloque a base do liquidificador sobre uma superf cie plana e seca Antes de conectar fonte de alimenta o certifique se de que a voltagem e...

Page 60: ...corretamente LIMPEZA E CONSERVA O 1 Antes de limp lo desconecte o blender da fonte de alimenta o 2 As partes que entram em contato com os alimentos devem ser limpas regularmente 3 Autolimpeza Despeje...

Page 61: ...UA 1 2 3 4 1 2 3 4 5 6 7 61...

Page 62: ...SB1000 SB1100 SB2000 SB2100 1 2 600 3 300 SB2000 SB2100 4 SB2000 SB2100 5 SB2000 SB2100 6 SB2000 SB2100 7 8 9 10 11 50 12 1 2 15x15x15 62...

Page 63: ...3 4 P 5 3 3 2 6 1 2 3 7 8 9 63...

Page 64: ...1 50 2 3 SB2000 SB2100 1 2 15x15x15 3 4 64...

Page 65: ...1 2 3 20 4 5 6 65...

Page 66: ...a 29 lipca 2005r o ZSEiE zabronione jest umieszczanie cznie z innymi odpadami zu ytego sprz tu oznakowanego symbolem przekre lonego kosza U ytkownik chc c pozby si sprz tu elektronicznego lub elektryc...

Page 67: ...z Instrukcja Obs ugi usterek powsta ych w wyniku niew a ciwego monta u sprz tu samowolnych dokonywanych przez u ytkownika lub inne nieupowa nione osoby napraw przer bek lub zmian konstrukcyjnych u ywa...

Reviews: