background image

Managing Software RAIDs with EVMS

67

no

vd

ocx (

E

NU)


Jan
uar
y 2
007

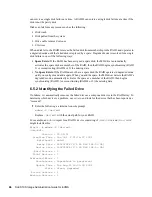
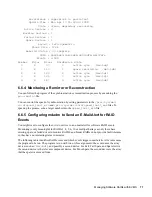
 Failed Devices : 0
  Spare Devices : 0
           UUID : 8a9f3d46:3ec09d23:86e1ffbc:ee2d0dd8
         Events : 0.174164
    Number   Major   Minor   RaidDevice State
       0       0        0        0      removed
       1       8       18        1      active sync   /dev/sdb2

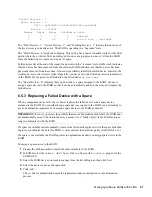
The “Total Devices : 1”, “Active Devices : 1”, and “Working Devices : 1” indicate that only one of 
the two devices is currently active. The RAID is operating in a “degraded” state. 

The "Failed Devices : 0" might be confusing. This setting has a non-zero number only for that brief 
period where the 

md

 driver finds a problem on the drive and prepares to remove it from the RAID. 

Once the failed drive is removed, it reads “0” again.

In the devices list at the end of the report, the device with the “removed” state for Device 0 indicates 
that the device has been removed from the software RAID definition, not that the device has been 
physically removed from the system. It does not specifically identify the failed device. However, the 
working device (or devices) are listed. Hopefully, you have a record of which devices were members 
of the RAID. By the process of elimination, the failed device is 

/dev/sda2

.

The “Spare Devices : 0” indicates that you do not have a spare assigned to the RAID. You must 
assign a spare device to the RAID so that it can be automatically added to the array and replace the 
failed device.

6.5.3  Replacing a Failed Device with a Spare

When a component device fails, the 

md

 driver replaces the failed device with a spare device 

assigned to the RAID. You can either keep a spare device assigned to the RAID as a hot standby to 
use as an automatic replacement, or assign a spare device to the RAID as needed. 

IMPORTANT: 

Even if you correct the problem that caused the problem disk to fail, the RAID does 

not automatically accept it back into the array because it is a “faulty object” in the RAID and is no 
longer synchronized with the RAID. 

If a spare is available, md automatically removes the failed disk, replaces it with the spare disk, then 
begins to synchronize the data (for RAID 1) or reconstruct the data from parity (for RAIDs 4 or 5). 

If a spare is not available, the RAID operates in degraded mode until you assign spare device to the 
RAID. 

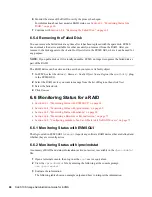
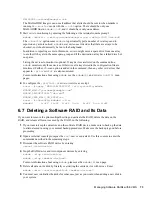
To assign a spare device to the RAID:

1

Prepare the disk as needed to match the other members of the RAID.

2

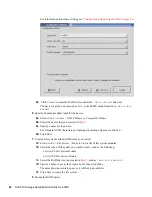
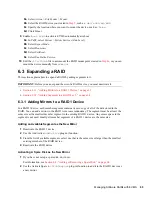
In EVMS, select the 

Actions > Add > Spare Disk to a Region

 (the 

addspare

 plug-in for the 

EVMS GUI).

3

Select the RAID device you want to manage from the list of Regions, then click 

Next

.

4

Select the device to use as the spare disk.

5

Click 

Add

.

The 

md

 driver automatically begins the replacement and reconstruction or synchronization 

process.

Summary of Contents for LINUX ENTERPRISE SERVER 10 - STORAGE ADMINISTRATION GUIDE FOR EVMS

Page 1: ...n o v e l l c o m novdocx ENU 9 January 2007 SLES 10 Storage Administration Guide for EVMS SUSE Linux Enterprise Server 1 0 F e b r u a r y 1 2 0 0 7 S T O R A G E A D M I N I S T R A T I O N G U I D E F O R E V M S ...

Page 2: ...e export or import deliverables You agree not to export or re export to entities on the current U S export exclusion lists or to any embargoed or terrorist countries as specified in the U S export laws You agree to not use deliverables for prohibited nuclear missile or chemical biological weaponry end uses Please refer to www novell com info exports for more information on exporting Novell softwar...

Page 3: ...tent in this document is copied distributed and or modified from the following document under the terms specified in the document s license EVMS User Guide January 18 2005 Copyright 2005 IBM License Information This document may be reproduced or distributed in any form without prior permission provided the copyright notice is retained on all copies Modified versions of this document may be freely ...

Page 4: ...novdocx ENU 9 January 2007 ...

Page 5: ...r 26 2 2 7 Verify that EVMS Manages the Boot Swap and Root Partitions 26 2 3 Configuring LVM Devices After Install to Use EVMS 26 2 4 Using EVMS with iSCSI Volumes 27 2 5 Using the ELILO Loader Files IA 64 27 2 6 Starting EVMS 28 2 7 Starting the EVMS Management Tools 28 3 Mounting EVMS File System Devices by UUIDs 29 3 1 Naming Devices with udev 29 3 2 Understanding UUIDs 29 3 2 1 Using UUIDs to ...

Page 6: ...n the etc multipath conf File 49 5 10 Managing I O in Error Situations 50 5 11 Resolving Stalled I O 50 5 12 Additional Information 51 5 13 What s Next 51 6 Managing Software RAIDs with EVMS 53 6 1 Understanding Software RAIDs on Linux 53 6 1 1 What Is a Software RAID 53 6 1 2 Overview of RAID Levels 54 6 1 3 Comparison of RAID Performance 55 6 1 4 Comparison of Disk Fault Tolerance 55 6 1 5 Confi...

Page 7: ...ating Nested RAID 10 0 1 with mdadm 78 7 3 Creating a Complex RAID 10 with mdadm 79 7 3 1 Understanding the mdadm RAID10 80 7 3 2 Creating a RAID10 with mdadm 82 7 4 Creating a Degraded RAID Array 83 8 Installing and Managing DRBD Services 85 8 1 Understanding DRBD 85 8 1 1 Additional Information 85 8 2 Installing DRBD Services 85 8 3 Configuring the DRBD Service 86 9 Troubleshooting EVMS Devices ...

Page 8: ...8 SLES 10 Storage Administration Guide for EVMS novdocx ENU 9 January 2007 ...

Page 9: ...system administrators Feedback We want to hear your comments and suggestions about this manual and the other documentation included with this product Please use the User Comments feature at the bottom of each page of the online documentation or go to www novell com documentation feedback html and enter your comments there Documentation Updates For the most recent version of the SUSE Linux Enterpri...

Page 10: ...10 SLES 10 Storage Administration Guide for EVMS novdocx ENU 9 January 2007 ...
Page 11: ...vides a plug in framework for flexible extensibility and customization Allows plug ins to extend functionality for new or evolving storage managers Supports foreign partition formats Is cluster aware 1 2 Plug In Layers EVMS abstracts the storage objects in functional layers to make storage management more user friendly The following table describes the current EVMS plug in layers for managing stor...

Page 12: ...ination of multiple storage objects LVM LVM2 for containers and region MD for RAIDs and DM for multipath I O EVMS Features Manages EVMS features Drive linking linear concatenation Bad Block Relocation BBR and Snapshot File System Interface Modules FSIM Manages the interface between the file system managers and the segment managers For information see Section 1 3 File Systems Support on page 12 Clu...

Page 13: ...tainer managed by the Cluster Resource Manager It is accessible to all nodes of a cluster An administrator can configure the storage objects in the cluster container from any node in the cluster Cluster containers can be private shared or deported Private The cluster container is exclusively owned and accessed by only one particular node of a cluster at any given time The ownership can be reassign...

Page 14: ...e for EVMS novdocx ENU 9 January 2007 A software RAID device dev md1 dev evms md md1 An LVM volume dev lvm_group lvm_volume dev evms lvm lvm_group lvm_volume Storage Object Standard Location the Device Node EVMS Location of the Device Node ...

Page 15: ...he Install on page 15 Section 2 1 2 During the Server Install on page 17 Section 2 1 3 After the Server Install on page 20 2 1 1 Before the Install System Device on page 15 Device Size Limits on page 16 Data Loss Considerations for the System Device on page 16 Storage Deployment Considerations for the System Device on page 16 System Device For the purposes of this install documentation a system de...

Page 16: ...n and Administration Guide http www novell com documentation sles10 Data Loss Considerations for the System Device This install requires that you delete the default Partitioning settings created by the install and create new partitions to use EVMS instead This destroys all data on the disk WARNING To avoid data loss it is best to use the EVMS install option only on a new device If you have data vo...

Page 17: ...rtition table on the system disk 3 Create a primary partition on the system disk to use as the boot partition During the install the boot partition must remain under LVM control so that the install completes successfully You do not modify the volume manager of the boot partition until after the install is complete 3a Click Create 3b From the list of devices select the device you want to use for th...

Page 18: ...ap is not required for systems with more than 1 GB of RAM You must have at least 1 GB of virtual memory RAM plus swap during the install but if the swap is more than 2 GB you might not be able install on some machines 4f Click OK The partition appears as a logical device in the devices list such as dev sda2 5 Modify the volume management type from LVM to EVMS for the second primary partition you c...

Page 19: ...t of devices Below is an example of the physical and logical devices that might be configured on your system Your setup depends on the number of devices in the server and the sizes you choose for your partitions 9 Click Next to return to the Installation Settings page You can dismiss the message warning that you should not mix EVMS and non EVMS partitions on the same device 10 Continue with the in...

Page 20: ... the partitions at boot time including the boot partition and it activates boot under the dev evms directory Therefore this makes boot a partition that is discovered by EVMS at startup and requires that the device be listed under dev evms in the fstab file so it can be found when booting with boot evms After the install you must edit the etc fstab file to modify the location of the boot partition ...

Page 21: ... option is automatically selected 4 Click Finish then click Yes The changes do not take affect until the server is restarted You reboot in the next task NOTE Effective in SUSE Linux Enterprise 10 the dev directory is on tmpfs and the device nodes are automatically re created on boot It is no longer necessary to modify the etc init d boot evms script to delete the device nodes on system reboot as w...

Page 22: ...the Boot Loader File on page 24 Section 2 2 5 Force the RAM Disk to Recognize the Root Partition on page 25 Section 2 2 6 Reboot the Server on page 26 Section 2 2 7 Verify that EVMS Manages the Boot Swap and Root Partitions on page 26 2 2 1 Disable the boot lvm and boot md Services You need to disable boot lvm handles devices for Linux Volume Manager and boot md handles multiple devices in softwar...

Page 23: ... the boot partition and it activates boot under the dev evms directory Therefore this makes boot a partition that is discovered by EVMS at startup and requires that the device s path be listed under dev evms in the fstab file so it can be found when booting with boot evms Make sure to replace sda1 sda2 and sda3 with the device names you used for your partitions IMPORTANT When working in the etc fs...

Page 24: ...rol Center 1 Log in as the root user or equivalent 2 In Yast select System Boot Loader 3 Modify the boot loader image so that the root file system is mounted as dev evms instead of dev 3a Select the boot loader image file then click Edit 3b Edit the device path in the Root Device field For example change the Root Device value from dev sda2 to dev evms sda2 Replace sda2 with the actual device on yo...

Page 25: ...s file system images for use as initial RAM disk initrd images These RAM disk images are often used to preload the block device modules SCSI or RAID needed to access the root file system You might need to force the RAM to update its device node information so that it loads the root partition from the dev evms path NOTE Recent patches to mkinitrd might resolve the need to do this task For the lates...

Page 26: ...e boot swap and root partitions as active in EVMS You should see the following devices mounted with your own partition names of course under the dev evms directory dev evms sda1 dev evms sda2 dev evms sda3 2 3 Configuring LVM Devices After Install to Use EVMS Use the following procedure to configure data devices not system devices to be managed by EVMS If you need to configure an existing system d...

Page 27: ...unt the storage objects they contain so the EVMS devices RAIDs and volumes might not be visible or accessible If EVMS starts before iSCSI on your system so that your EVMS devices RAIDs and volumes are not visible or accessible you must correct the order in which iSCSI and EVMS are started Enter the chkconfig command at the Linux server console of every server that is part of your iSCSI SAN 1 At a ...

Page 28: ...op evmsgui from running automatically on reboot 1 Close evmsgui 2 Do a clean shutdown not a restart 3 Start the server When the server comes back up evmsgui is not automatically loaded on reboot Command Description evmsgui Starts the graphical interface for EVMS GUI For information about features in this interface see EVMS GUI http evms sourceforge net user_guide GUI in the EVMS User Guide at the ...

Page 29: ...d for the device The udev tools examine every appropriate block device that the kernel creates to apply naming rules based on certain buses drive types or file systems For information about how to define your own rules for udev see Writing udev Rules http reactivated net writing_udev_rules html Along with the dynamic kernel provided device node name udev maintains classes of persistent symbolic li...

Page 30: ...nted You can use the UUID as criterion for assembling and activating software RAID devices When a RAID is created the md driver generates a UUID for the device and stores the value in the md superblock 3 2 2 Finding the UUID for a File System Device You can find the UUID for any block device in the dev disk by uuid directory For example a UUID looks like this e014e482 1c2d 4d09 84ec 61b3aefde77a 3...

Page 31: ...hen modify Fstab Options Edit the etc fstab file to modify the system device from the location to the UUID For example if the root volume has a device path of dev sda1 and its UUID is e014e482 1c2d 4d09 84ec 61b3aefde77a change line entry from dev sda1 reiserfs acl user_xattr 1 1 to UUID e014e482 1c2d 4d09 84ec 61b3aefde77a reiserfs acl user_xattr 1 1 IMPORTANT Make sure to make a backup copy of t...

Page 32: ... change root dev sda1 to root dev disk by uuid e014e482 1c2d 4d09 84ec 61b3aefde77a 6 Edit the boot efi SuSE elilo conf file to modify the system device from the location to the UUID For example change dev sda1 reiserfs acl user_xattr 1 1 to UUID e014e482 1c2d 4d09 84ec 61b3aefde77a reiserfs acl user_xattr 1 1 IMPORTANT Make sure to make a backup copy of the boot efi SuSE elilo conf file before yo...

Page 33: ...gers The most commonly used segment manager is the DOS Segment Manager The following table describes the segment managers available in EVMS Table 4 1 EVMS Segment Managers Segment Manager Description DOS The standard MS DOS disk partitioning scheme It is the most commonly used partitioning scheme for Linux NetWare Windows OS 2 BSD SolarisX86 and UnixWare GPT Globally Unique Identifier GUID Partiti...

Page 34: ... size so the limit also applies to the md plug in for EVMS Software RAID devices you create with EVMS can be larger than 2 TB of course because the md driver plug in manages the disks underneath that storage structure When you boot the server EVMS scans and recognizes all devices it manages If you add a new device to the server or create a device using mkfs EVMS automatically mounts it on reboot u...

Page 35: ...ibility volume For example a new disk sdb would show up as dev evms sdb Delete it from the Volumes list to force the disk to show up in Available Objects then create segments as desired 4 2 3 Adding a Segment Manager Use the following procedure to assign a segment manager to device for servers using x86 x64 and IA64 controllers This option is not available for S390 platforms so simply continue wit...

Page 36: ...t manager for the device you want to manage then click Next DOS Segment Manager the most common choice GPT Segment Manager for IA 64 platforms Cluster Segment Manager available only if it is a viable option for the selected disk For information about these and other segment managers available see Segment Managers on page 33 3 Select the storage object that you want to segment then click Next 4 Com...

Page 37: ...volume on the server By default this field is empty Mount read only Select the check box to enable this option It is deselected disabled by default If this option is enabled files and directories cannot be modified or saved on the volume No access time Select the check box to enable this option It is deselected disabled by default By default the Linux open 2 command updates the access time wheneve...

Page 38: ...a to the file system then enters the metadata in the journal Journal Writes data twice once to the journal then to the file system Writeback Writes data to the file system and writes metadata in the journal but the writes are performed in any order Access Control LIsts ACL Select this option to enable access control lists on the file system It is enabled by default Extended user attributes Select ...

Page 39: ...ters HBAs and the storage devices configure multipathing for the devices before creating software RAIDs or file system volumes on the devices For information see Chapter 5 Managing Multipath I O for Devices on page 41 If you want to configure software RAIDs do it before you create file systems on the devices For information see Chapter 6 Managing Software RAIDs with EVMS on page 53 ...

Page 40: ...40 SLES 10 Storage Administration Guide for EVMS novdocx ENU 9 January 2007 ...
Page 41: ... on page 51 Section 5 13 What s Next on page 51 5 1 Understanding Multipathing Section 5 1 1 What Is Multipathing on page 41 Section 5 1 2 Benefits of Multipathing on page 42 Section 5 1 3 Guidelines for Multipathing on page 42 Section 5 1 4 Device Mapper on page 42 Section 5 1 5 Device Mapper Multipath I O Module on page 43 Section 5 1 6 Multipath Tools on page 44 5 1 1 What Is Multipathing Multi...

Page 42: ...ultipathing If you change the partitioning in the running system Device Mapper Multipath I O DM MPIO does not automatically detect and reflect these changes It must be reinitialized which usually requires a reboot For software RAID devices multipathing should be configured prior to creating the software RAID devices because multipathing runs underneath the software RAID In the initial release of S...

Page 43: ...an autogenerated letter for the device beginning with a and issued sequentially as the devices are created such as dev sda dev sdb and so on If the number of devices exceeds 26 the letters are duplicated such that the next device after dev sdz will be named dev sdaa dev sdab and so on If multiple paths are not automatically detected you can configure them manually in the etc multipath conf file Fe...

Page 44: ...tioning Devices that Have Multiple Paths on page 45 Section 5 2 3 Configuring mdadm conf and lvm conf to Scan Devices by UUID on page 45 5 2 1 Preparing SAN Devices for Multipathing Before configuring multipath I O for your SAN devices prepare the SAN devices as necessary by doing the following Configure and zone the SAN with the vendor s tools Configure permissions for host LUNs on the storage ar...

Page 45: ...itioning operations on md devices fail if attempted If you configure partitions for a device DM MPIO automatically recognizes the partitions and indicates them by appending p1 pn to the device s UUID such as dev disk by id 3600601607cf30e00184589a37a31d911p1 To partition DM MPIO devices you must disable DM MPIO partition the normal device node such as dev sdc then reboot to allow DM MPIO to see th...

Page 46: ... multipath services and enable them to start at reboot 1 Open a terminal console then log in as the root user or equivalent 2 At the terminal console prompt enter chkconfig multipathd on chkconfig boot multipath on If the boot multipath service does not start automatically on system boot do the following 1 Open a terminal console then log in as the root user or equivalent 2 Enter etc init d boot m...

Page 47: ... multipathing and you later need to add more storage to the SAN use the following procedure to scan the devices and make them available to multipathing without rebooting the system 1 On the storage subsystem use the vendor s tools to allocate the devices and update its access control settings to allow the Linux system access to the new storage Refer to the vendor s documentation for details 2 On t...

Page 48: ... The following instructions assume the software RAID device is dev md0 which is its device name as recognized by the kernel Make sure to modify the instructions for the device name of your software RAID 1 Open a terminal console then log in as the root user or equivalent Except where otherwise directed use this console to enter the commands in the following steps 2 If any software RAID devices are...

Page 49: ... 253 0 0 active sync dev dm 0 1 253 1 1 active sync dev dm 1 2 253 2 2 active sync dev dm 2 5 9 Configuring User Friendly Names in the etc multipath conf File The default name used in multipathing is the UUID of the logical unit as found in the dev disk by id directory You can optionally override this behavior with user friendly names instead User friendly names can be set via the ALIAS directive ...

Page 50: ...path Replace the UUID 3600601607cf30e00184589a37a31d911 with the UUID for your device 3 Return to failover for the device I O by entering all on the same line dmsetup message 3600601607cf30e00184589a37a31d911 0 fail_if_no_path Replace the UUID 3600601607cf30e00184589a37a31d911 with the UUID for your device This command immediately causes all queued I O to fail To set up queuing I O for scenarios w...

Page 51: ...inal console prompt dmsetup message mapname 0 queue_if_no_path 5 12 Additional Information For more information about configuring and using multipath I O on SUSE Linux Enterprise Server see How to Setup Use Multipathing on SLES http support novell com techcenter sdb en 2005 04 sles_multipathing html in the Novell Technical Support Knowledgebase 5 13 What s Next If you want to use software RAIDs cr...

Page 52: ...52 SLES 10 Storage Administration Guide for EVMS novdocx ENU 9 January 2007 ...
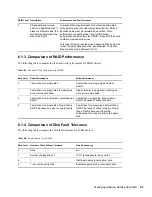
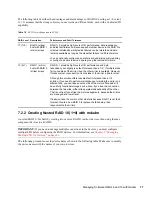
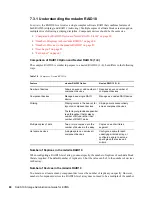
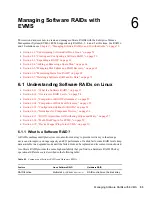
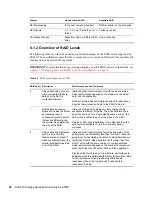
Page 53: ...s on page 54 Section 6 1 3 Comparison of RAID Performance on page 55 Section 6 1 4 Comparison of Disk Fault Tolerance on page 55 Section 6 1 5 Configuration Options for RAIDs on page 56 Section 6 1 6 Guidelines for Component Devices on page 56 Section 6 1 7 RAID 5 Algorithms for Distributing Stripes and Parity on page 57 Section 6 1 8 Multi Disk Plug In for EVMS on page 59 Section 6 1 9 Device Map...

Page 54: ...ors data by copying blocks of one disk to another and keeping them in continuous synchronization If disks are different sizes the smaller disk determines the size of the RAID Improves disk reads by making multiple copies of data available via different I O paths The write performance is about the same as for a single disk because a copy of the data must be written to each of the disks in the mirro...

Page 55: ...he parity disk is lost the parity data cannot be reconstructed The parity disk can become a bottleneck for I O Raid Level Read Performance Write Performance 0 Faster than for a single disk Faster than for a single disk and other RAIDs 1 Faster than for a single disk increasing as more mirrors are added Slower than for a single disk declining as more mirrors are added 4 Faster than for a single dis...

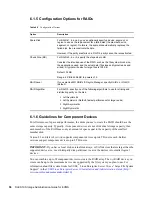
Page 56: ...For information about file system limits for SUSE Linux Enterprise Server 10 see Large File System Support in the SUSE Linux Enterprise Server 10 Installation and Administration Guide http www novell com documentation sles10 Option Description Spare Disk For RAIDs 1 4 and 5 you can optionally specify a device segment or region to use as the replacement for a failed disk the member device segment o...

Page 57: ... same brand and model introduces the risk of concurrent failures over the life of the product so plan maintenance accordingly The following table provides recommendations for the minimum and maximum number of storage objects to use when creating a software RAID Table 6 6 Recommended Number of Storage Objects to Use in the Software RAID Connection fault tolerance can be achieved by having multiple ...

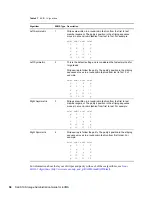
Page 58: ...his is the default setting and is considered the fastest method for large reads Stripes wrap to follow the parity The parity s position in the striping sequence moves in a round robin fashion from last to first For example sda1 sdb1 sdc1 sde1 0 1 2 p 4 5 p 3 8 p 6 7 p 9 10 11 12 13 14 p Right Asymmetric 3 Stripes are written in a round robin fashion from the first to last member segment The parity...

Page 59: ...e or multiple storage devices Areas can be of different sizes Snapshots Snapshots of a file system at a particular point in time even while the system is active thereby allowing a consistent backup The Device Mapper driver is not started by default in the rescue system 1 Open a terminal console then log in as the root user or equivalent 2 Start the Device Mapper by entering the following at the te...

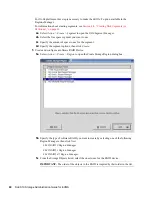
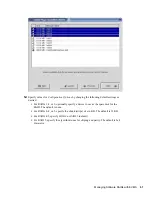
Page 60: ...o use 4c Specify the amount of space to use for the segment 4d Specify the segment options then click Create 5 Create and configure a software RAID Device 5a Select Action Create Region to open the Create Storage Region dialog box 5b Specify the type of software RAID you want to create by selecting one of the following Region Managers then click Next MD RAID 0 Region Manager MD RAID 1 Region Manag...

Page 61: ... settings as desired For RAIDs 1 4 or 5 optionally specify a device to use as the spare disk for the RAID The default is none For RAIDs 0 4 or 5 specify the chunk stripe size in KB The default is 32 KB For RAIDs 4 5 specify RAID 4 or RAID 5 default For RAID 5 specify the algorithm to use for striping and parity The default is Left Symmetric ...

Page 62: ... created in Step 5 6c Specify a name for the device Use standard ASCII characters and naming conventions Spaces are allowed 6d Click Done 7 Create a file system on the RAID device you created 7a Select Action File System Make to view a list of file system modules 7b Select the type of file system you want to create such as the following ReiserFS File System Module Ext2 3FS File System Module 7c Se...

Page 63: ...Section 6 3 2 Adding Segments to a RAID 4 or 5 on page 64 6 3 1 Adding Mirrors to a RAID 1 Device In a RAID 1 device each member segment contains its own copy of all of the data stored in the RAID You can add a mirror to the RAID to increase redundancy The segment must be at least the same size as the smallest member segment in the existing RAID 1 device Any excess space in the segment is not used...

Page 64: ...1 4 and 5 can tolerate at least one disk failure Any given RAID can have one spare disk designated for it but the spare itself can serve as the designated spare for one RAID for multiple RAIDs or for all arrays The spare disk is a hot standby until it is needed It is not an active member of any RAIDs where it is assigned as the spare disk until it is activated for that purpose If a spare disk is d...

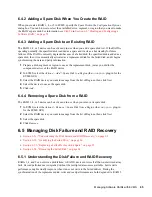
Page 65: ...dd Spare Disk to a Region the addspare plug in for the EVMS GUI 3 Select the RAID device you want to manage from the list of Regions then click Next 4 Select the device to use as the spare disk 5 Click Add 6 4 4 Removing a Spare Disk from a RAID The RAID 1 4 or 5 device can be active and in use when you remove its spare disk 1 In EVMS select the Actions Remove Spare Disk from a Region the remspare...

Page 66: ...egraded mode until you configure and add a spare When you add the spare the MD driver detects the RAID s degraded mode automatically activates the spare as a member of the RAID then begins synchronizing RAID 1 or reconstructing RAID 4 or 5 the missing data 6 5 2 Identifying the Failed Drive On failure md automatically removes the failed drive as a component device in the RAID array To determine wh...

Page 67: ... assign a spare device to the RAID so that it can be automatically added to the array and replace the failed device 6 5 3 Replacing a Failed Device with a Spare When a component device fails the md driver replaces the failed device with a spare device assigned to the RAID You can either keep a spare device assigned to the RAID as a hot standby to use as an automatic replacement or assign a spare d...

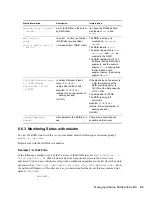
Page 68: ... Region the remfaulty plug in the EVMS GUI 2 Select the RAID device you want to manage from the list of Regions then click Next 3 Select the failed disk 4 Click Remove 6 6 Monitoring Status for a RAID Section 6 6 1 Monitoring Status with EVMSGUI on page 68 Section 6 6 2 Monitoring Status with proc mdstat on page 68 Section 6 6 3 Monitoring Status with mdadm on page 69 Section 6 6 4 Monitoring a Re...

Page 69: ...u have two RAIDs defined with labels of raid5 and raid4 md0 active raid5 sdg1 0 sdk1 4 sdj1 3 sdi1 2 device active not active RAID label you specified storage object RAID order The RAID is active and mounted at dev evms md md0 The RAID label is raid5 The active segments are sdg1 sdi1 sdj1 and sdk1 as ordered in the RAID The RAID numbering of 0 to 4 indicates that the RAID has 5 segments and the se...

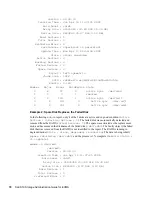
Page 70: ...161 4 active sync dev sdk1 Example 2 Spare Disk Replaces the Failed Disk In the following mdadm report only 4 of the 5 disks are active and in good condition Active Devices 4 Working Devices 5 The failed disk was automatically detected and removed from the RAID Failed Devices 0 The spare was activated as the replacement disk and has assumed the diskname of the failed disk dev sdh1 The faulty objec...

Page 71: ...parameters in the proc sys dev raid speed_limit_min and proc sys dev raid speed_limit_max files To speed up the process echo a larger number into the speed_limit_min file 6 6 5 Configuring mdadm to Send an E Mail Alert for RAID Events You might want to configure the mdadm service to an e mail alert for software RAID events Monitoring is only meaningful for RAIDs 1 4 5 6 10 or multipath arrays as o...

Page 72: ...ing is no longer rebuilding either because it finished normally or was aborted syslog priority Warning Fail Yes An active component device of an array has been marked as faulty syslog priority Critical Fail Spare Yes A spare component device that was being rebuilt to replace a faulty device has failed syslog priority Critical Spare Active No A spare component device which was being rebuilt to repl...

Page 73: ...o monitored For more information about using mdadm see the mdadm 8 and mdadm conf 5 man pages 4 To configure the etc init d mdadmd service as a script suse egrep MAIL RAIDDEVICE etc sysconfig mdadm MDADM_MAIL yourname example com MDADM_RAIDDEVICES dev md0 MDADM_SEND_MAIL_ON_START no suse chkconfig mdadmd list mdadmd 0 off 1 off 2 off 3 on 4 off 5 on 6 off 6 7 Deleting a Software RAID and Its Data ...

Page 74: ...74 SLES 10 Storage Administration Guide for EVMS novdocx ENU 9 January 2007 ...

Page 75: ...llows for additional fault tolerance by using a second independent distributed parity scheme dual parity Even if one of the hard disk drives fails during the data recovery process the systems continues operational with no data loss RAID6 provides for extremely high data fault tolerance by sustaining multiple simultaneous drive failures It handles the loss of any two devices without data loss Accor...

Page 76: ...e etc fstab file to add an entry for the RAID 6 device dev md0 6 Reboot the server The RAID 6 device is mounted to local 7 Optional Add a hot spare to service the RAID array For example at the command prompt enter mdadm dev md0 a dev sde1 7 2 Creating Nested RAID 10 Devices with mdadm Section 7 2 1 Understanding Nested RAID Devices on page 76 Section 7 2 2 Creating Nested RAID 10 1 0 with mdadm on...

Page 77: ...r device in the RAID 0 is mirrored individually multiple disk failures can be tolerated and data remains available as long as the disks that fail are in different mirrors You can optionally configure a spare for each underlying mirrored array or configure a spare to serve a spare group that serves all mirrors 10 0 1 RAID 1 mirror built with RAID 0 stripe arrays RAID 0 1 provides high levels of I O...

Page 78: ...ystem 5 Edit the etc mdadm conf file to add entries for the component devices and the RAID device dev md2 6 Edit the etc fstab file to add an entry for the RAID 1 0 device dev md2 7 Reboot the server The RAID 1 0 device is mounted to local 8 Optional Add hot spares to service the underlying RAID 1 mirrors For information see Section 6 4 Adding or Removing a Spare Disk on page 64 7 2 3 Creating Nes...

Page 79: ... 1 device At the command prompt enter the following command using the software RAID 0 devices you created in Step 2 mdadm create dev md2 run level 1 raid devices 2 dev md0 dev md1 4 Create a file system on the RAID 0 1 device dev md2 such as a Reiser file system reiserfs For example at the command prompt enter mkfs reiserfs dev md2 Modify the command if you want to use a different file system 5 Ed...

Page 80: ... required The default number of replicas is 2 but the value can be 2 to the number of devices in the array Number of Devices in the mdadm RAID10 You must use at least as many component devices as the number of replicas you specify However number of component devices in a RAID10 level array does not need to be a multiple of the number Feature mdadm RAID10 Option Nested RAID 10 1 0 Number of devices...

Page 81: ...for the mdadm RAID10 yields read and write performance similar to RAID 0 over half the number of drives Near layout with an even number of disks and two replicas sda1 sdb1 sdc1 sde1 0 0 1 1 2 2 3 3 4 4 5 5 6 6 7 7 8 8 9 9 Near layout with an odd number of disks and two replicas sda1 sdb1 sdc1 sde1 sdf1 0 0 1 1 2 2 3 3 4 4 5 5 6 6 7 7 8 8 9 9 10 10 11 11 12 Far Layout The far layout stripes data ov...

Page 82: ...0 Option 1 In YaST create a 0xFD Linux RAID partition on the devices you want to use in the RAID such as dev sdf1 dev sdg1 dev sdh1 and dev sdi1 2 Open a terminal console then log in as the root user or equivalent 3 Create a RAID 10 command At the command prompt enter all on the same line mdadm create dev md3 run level 10 chunk 4 raid devices 4 dev sdf1 dev sdg1 dev sdh1 dev sdi1 4 Create a Reiser...

Page 83: ...ready has data on it In that case you create a degraded array with other devices copy data from the in use device to the RAID that is running in degraded mode add the device into the RAID then wait while the RAID is rebuilt so that the data is now across all devices An example of this process is demonstrated in the following procedure 1 Create a degraded RAID 1 device dev md0 using one single driv...

Page 84: ...84 SLES 10 Storage Administration Guide for EVMS novdocx ENU 9 January 2007 ...
Page 85: ... deploy a virtual private network VPN solution for the connection 8 1 1 Additional Information The following open source resources are available for DRBD DRBD org http www drbd org DRBD references at the Linux High Availability Project http linux ha org DRBD by the Linux High Availability Project For information about installing and configuring HeartBeat 2 for SUSE Linux Enterprise Server 10 see t...

Page 86: ...ained in the examples in the usr share doc packages drbd drbd conf file 2 Copy the etc drbd conf file to the etc drbd conf location on the secondary server node 2 3 Configure the DRBD service for node 1 3a Open a terminal console for node 1 then log in as the root user or equivalent 3b Initialize DRBD on node 1 by entering modprobe drbd 3c Test the configuration file by running drbdadm with the d ...

Page 87: ...Create a file from the primary node by entering touch r0mount from_node1 10 Test the DRBD service on node 2 10a Dismount the disk on node 1 by typing the following command on node 1 umount r0mount 10b Downgrade the DRBD service on node 1 by typing the following command on node 1 drbdadm secondary r0 10c On node 2 promote the DRBD service to primary by entering drbdadm primary r0 10d On node 2 chec...

Page 88: ...ode 1 promote the DRBD service to primary by entering drbdadm primary r0 12d On node 1 check to see if node 1 is primary by entering service drbd status 13 To get the service to automatically start and fail over if the server has a problem you can set up DRBD as a high availability service with HeartBeat 2 ...

Page 89: ... server console of every server that is part of your iSCSI SAN to correct the order that iSCSI and EVMS are started 1 At a terminal console prompt enter chkconfig boot evms on This ensures that EVMS and iSCSI start in the proper order each time your servers reboot 9 2 Device Nodes Are Not Automatically Re Created on Restart Effective in SUSE Linux Enterprise 10 the dev directory is on tmpfs and th...

Page 90: ... 10 Storage Administration Guide for EVMS novdocx ENU 9 January 2007 echo en nDeleting devices nodes rm rf dev evms mount n o remount ro rc_status v 3 Save the file 4 Continue with Reboot the Server on page 21 ...

Page 91: ...ges appear in reverse chronological order according to the publication date Within a dated entry changes are grouped and sequenced according to where they appear in the document itself Each change entry provides a link to the related topic and a brief description of the change This document was updated on the following dates Section A 1 February 1 2007 Updates on page 91 Section A 2 December 1 200...

Page 92: ...nge Section 1 4 Terminology on page 12 Changes were made for clarification Section 1 5 Location of Device Nodes for EVMS Storage Objects on page 13 Changes were made for clarification Location Change Section 2 2 3 Edit the etc init d boot evms Script on page 23 Effective in SUSE Linux Enterprise Server 10 this procedure is no longer necessary Section 2 2 5 Force the RAM Disk to Recognize the Root ...

Page 93: ...CES should be DEVICE Section 5 2 3 Configuring mdadm conf and lvm conf to Scan Devices by UUID on page 45 DEVICES should be DEVICE Section 5 6 Configuring Multipath I O for the Root Device on page 47 This section is new Location Change Section 6 1 8 Multi Disk Plug In for EVMS on page 59 Technical corrections were made Section 6 1 9 Device Mapper Plug In for EVMS on page 59 Technical corrections w...

Reviews: