Managing Software RAIDs 6 and 10 with mdadm
83
no
vd
ocx (
E
NU)
9
Jan
uar
y 2
007
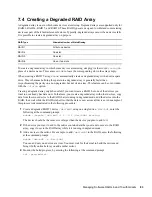
7.4 Creating a Degraded RAID Array
A degraded array is one in which some devices are missing. Degraded arrays are supported only for
RAID 1, RAID 4, RAID 5, and RAID 6. These RAID types are designed to withstand some missing
devices as part of their fault-tolerance features. Typically, degraded arrays occur when a device fails.
It is possible to create a degraded array on purpose.
To create a degraded array in which some devices are missing, simply give the word
missing
in
place of a device name. This causes
mdadm
to leave the corresponding slot in the array empty.
When creating a RAID 5 array,
mdadm
automatically creates a degraded array with an extra spare
drive. This is because building the spare into a degraded array is generally faster than
resynchronizing the parity on a non-degraded, but not clean, array. This feature can be over-ridden
with the
--force
option.
Creating a degraded array might be useful if you want create a RAID, but one of the devices you
want to use already has data on it. In that case, you create a degraded array with other devices, copy
data from the in-use device to the RAID that is running in degraded mode, add the device into the
RAID, then wait while the RAID is rebuilt so that the data is now across all devices. An example of
this process is demonstrated in the following procedure:
1
Create a degraded RAID 1 device
/dev/md0
, using one single drive
/dev/sd1
, enter the
following at the command prompt:
mdadm --create /dev/md0 -l 1 -n 2 /dev/sda1 missing
The device should be the same size or larger than the device you plan to add to it.
2
If the device you want to add to the mirror contains data that you want to move to the RAID
array, copy it now to the RAID array while it is running in degraded mode.
3
Add a device to the mirror. For example, to add
/dev/sdb1
to the RAID, enter the following
at the command prompt:
mdadm /dev/md0 -a /dev/sdb1
You can add only one device at a time. You must wait for the kernel to build the mirror and
bring it fully online before you add another mirror.
4
Monitor the build progress, by entering the following at the command prompt:
cat /proc/mdstat
RAID Type
Allowable Number of Slots Missing
RAID 1
All but one device
RAID 4
One slot
RAID 5
One slot
RAID 6
One or two slots
Summary of Contents for LINUX ENTERPRISE SERVER 10 - STORAGE ADMINISTRATION GUIDE FOR EVMS
Page 4: ...novdocx ENU 9 January 2007 ...
Page 8: ...8 SLES 10 Storage Administration Guide for EVMS novdocx ENU 9 January 2007 ...
Page 10: ...10 SLES 10 Storage Administration Guide for EVMS novdocx ENU 9 January 2007 ...
Page 40: ...40 SLES 10 Storage Administration Guide for EVMS novdocx ENU 9 January 2007 ...
Page 52: ...52 SLES 10 Storage Administration Guide for EVMS novdocx ENU 9 January 2007 ...
Page 74: ...74 SLES 10 Storage Administration Guide for EVMS novdocx ENU 9 January 2007 ...
Page 84: ...84 SLES 10 Storage Administration Guide for EVMS novdocx ENU 9 January 2007 ...

