


102
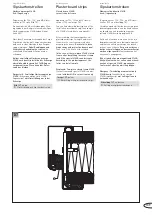
Zarge einbauen
Blockzarge
Schraubmontage
in F60-A-/F90-A-Montagewand
Einbau T30- / MZ- / RC-Türen nach DIN 4102
Teil 4, Tabelle 10.2 und weitere Montage-
wände F60-A / F90-A nach Allg. bauauf-
sichtlichem Prüfzeugnis (siehe Zulassung).
Vergewissern Sie sich, dass das Abschluss-
profil der Wand bei T30-Türen dreiseitig,
d.h. schloss- und bandseitig sowie oben
quer, aus 2 mm-U/A-Profil besteht.
Stirn-
seitig muss die Laibung doppelt beplankt
sein.
Zarge zusammenschrauben, falls sie nicht
verschweißt ist (siehe Seite 45).
Blockzarge in die Öffnung schieben und
entsprechend Meterriss ausrichten.
Zarge zur Wand druckfest mit Mineral-
wolle-Streifen (min. 150 kg/m³) hinter-
füllen. Relevante Befestigungsstellen zu-
sätzlich druckfest hinterfüttern.
Zarge mit beiliegenden Bohrschrauben
6,3 x 60 lose am U/A-Profil befestigen. Bitte
achten Sie darauf, dass sich die Zargen-
profile beim Befestigen nicht verdrehen.
Zarge nochmals auf lot- und waagerechten
Sitz prüfen, Bohrschrauben fest anziehen.
Zarge gemäß Zulassung hinterfüllen (siehe
Seite 104ff.).
Löcher mit Stopfen verschließen.
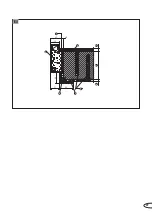
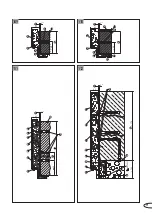
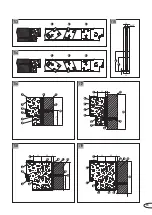
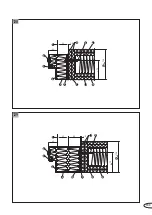
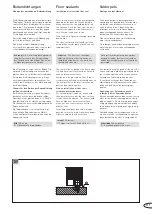
Bilder 128+129,
rechte Seite
(1) Baurichtmaß
(2) Blockzarge
(3) Zargendichtung
(4) Zargenhinterfüllung
(5) Bohrschraube 6,3 x 60 DIN 7504
(6) U-Profil min. 75 x 40 x 2
(7) Hinterfüllung mit Mineralwolle-
Streifen min.150 kg/m³
(8) Stopfen
(9) Anschraublasche
(10) Besatzprofil
(11) Laibungsbeplankung 2 x 12,5 GKF
(Gipskartonfeuerschutzplatte)
(12) GKF-Wand min. 150 x 12,5 (2 x je Seite)
(13) GKF-Wand min. F60-A
(14) Wanddicke
Blockzarge Typ 1
Bild 128,
rechte Seite
Blockzarge Typ 2 mit Besatzprofil
Bild 129,
rechte Seite
Fortsetzung auf Seite 48
Fitting frame
Block frame
Fixation using screws
in F60-A / F90-A dry partition wall
Installation T30 / MZ / RC doors conforming
to DIN 4102 Part 4, Table 10.2 and other dry
partition walls F60-A / F90-A according to
general building code test certificates (see
Approval).
Make sure that the butt profile of the wall
for T30 doors is three-sided; that is that it
consists of 2-mm U/A profile on both the
latch and hinge side as well as on top.
The
frontal face of the jamb must be doubly
covered.
Screw the frame together where it is not
welded (see page 45).
Move the block frame into the opening and
line it up using the guide marking.
Backfill the gap between frame and wall
until it no longer yields using mineral wool
strips (min. 150 kg/m³). Further backfill the
relevant fixation points until they no longer
yield.
Fasten the frame loosely onto the U/A pro-
file using the 6.3 x 60 self-drilling screws
provided. Please make sure that the frame
profiles do not rotate while they are being
fastened down.
Check the frame for correct horizontal and
vertical positioning and tighten up the self-
drilling screws.
Backfill the frame in accordance with
approval documentation (see page 104ff.).
Close up holes with plugs.
Images 128+129,
on right-hand side
(1) Coordinating size
(2) Block frame
(3) Frame sealing
(4) Frame backfilling
(5) Self-drilling screw 6.3 x 60 DIN 7504
(6) U-Profile min.75 x 40 x 2
(7) Backfill using mineral wool strips,
min.150 kg/m³
(8) Plugs
(9) Screw mounting bracket
(10) Edging
(11) Jamb planking 2 x 12.5 fire-resistant
plasterboard
(12) Fire-resistant plasterboard wall
min. 150 x 12.5 (2 per side)
(13) Fire-resistant plasterboard wall
min. F60-A
(14) Wall thickness
Block frame Type 1
Image 128,
on right-hand side
Block frame Type 2 with edging
Image 129,
on right-hand side
Continued on page 48
Kozijn inbouwen
Blokkozijn
Schroefmontage
in F60-A-/F90-A-metal-stud
Inbouw T30- / MZ- / RC-deuren conform
DIN 4102 Deel 4, tabel 10.2 en overige
montagemuren F60-A / F90-A conform
algemeen keuringsrapport bouwinspectie
(zie attest).
Zorg ervoor, dat het afsluitprofiel van de
muur voor T30-deuren driezijdig is, d.w.z.
dat het bestaat uit een 2 mm-U/A-profiel
aan zowel de kant van het slot en het
scharnier, alsook aan de bovenkant.
Aan de
voorkant dient de dagkant dubbel bekleed
te zijn.
Schroef het kozijn samen indien het niet is
gelast (zie pagina 45).
Schuif het blokkozijn in de opening en
breng in lijn met de metermarkering.
Zorg voor een vulling voor het kozijn met
mineraalwolstroken (min. 150 kg/m
3
) tot er
geen speling meer is. Vul ook de overige
relevante bevestigingspunten tot er geen
speling meer is.
Bevestig het kozijn losjes aan het U/A-pro-
fiel met de meegeleverde 6,3 x 60-boor-
schroeven. Let er a.u.b. op, dat de kozijn-
profielen bij het bevestigen niet draaien.
Controleer het kozijn nogmaals op een cor-
recte horizontale en verticale positionering
en draai de boorschroeven stevig aan.
Zorg voor de vulling van het kozijn conform
het attest (zie pagina 104ff.).
Vul de gaten met de pluggen.
Afbeeldingen 128+129,
rechterkant
(1) Bestelmaat
(2) Blokkozijn
(3) Kozijnafdichting
(4) Kozijnvulling
(5) Boorschroef 6,3 x 60 DIN 7504
(6) U-profiel min.75 x 40 x 2
(7) Vulling met mineraalwolstroken
min. 150 kg/m³
(8) Pluggen
(9) Schroefhaak
(10) Randprofiel
(11) Dagkantbekleding 2 x 12,5 GKF
(brandwerende gipskartonplaat)
(12) GKF-muur min. 150 x 12,5
(2 x per kant)
(13) GKF-muur min. F60-A
(14) Muurdikte
Blokkozijn type 1
Afbeelding 128,
rechterkant
Blokkozijn type 2 met randprofiel
Afbeelding 129,
rechterkant
Vervolg op pagina 48
Summary of Contents for NovoPorta Premio E-S-1
Page 47: ...13 14 15 18 19 20 21 22 1 2 12 16 17 11 47 ...
Page 49: ...2 1 25 23 24 1 1 2 3 4 5 1 49 ...
Page 51: ...2 5 mm 30 31 1 29 28 27 26 51 ...
Page 53: ...1 2 3 1 2 3 1 1 2 2 3 3 33 34 35 36 37 38 32 53 ...
Page 55: ...41 42 43 44 45 1 1 8 9 4 2 3 7 6 10 5 11 45 5 5 lt 39 40 55 ...
Page 57: ...84 5 45 34 50 48 3 2 1 4 5 6 5 6 7 8 46 57 ...
Page 59: ...47 50 52 55 48 51 53 56 49 54 59 ...
Page 61: ...60 62 65 58 61 63 66 59 64 57 61 ...
Page 63: ...67 70 73 74 68 71 69 72 63 ...
Page 65: ...45 39 48 1 6 8 9 5 10 2 3 4 75 65 ...
Page 67: ...76 77 79 80 81 82 83 78 67 ...
Page 69: ...1 1 5 5 1 1 1 4 3 2 7 6 8 5 9 10 42 53 1 3 2 1 84 85 86 87 69 ...
Page 71: ...1 2 3 1 2 3 1 1 2 2 3 3 1 2 3 4 6 9 6 8 5 11 7 10 42 5 5 88 89 71 ...
Page 73: ...1 9 4 2 3 5 11 10 7 6 8 42 5 5 93 94 90 91 92 73 ...
Page 77: ...1 4 7 3 2 5 8 9 6 42 5 5 100 98 77 ...
Page 79: ...1 9 8 2 7 4 3 6 10 11 5 42 5 5 45 1 7 4 8 2 3 6 5 10 11 9 42 39 max 69 99 100 79 ...
Page 81: ...1 9 7 6 3 10 8 2 4 5 11 12 42 5 5 1 2 1 2 101 81 ...
Page 83: ...1 2 4 3 9 8 5 6 7 10 48 82 100 50 102 103 1 83 ...
Page 85: ...1 10 9 7 4 3 2 6 8 5 11 12 42 5 5 104 85 ...
Page 87: ...1 2 3 4 5 1 2 3 4 105 1 8 4 9 5 6 3 7 2 10 40 45 1 8 11 9 6 6 2 3 7 4 5 10 40 106 107 87 ...
Page 89: ...1 7 6 9 5 6 2 4 8 42 x5 30 31 50 40 108 89 ...
Page 95: ...97 61 1 3 2 6 5 4 7 120 95 ...
Page 97: ...1 4 3 2 6 9 10 5 7 42 39 max 69 1 4 3 2 9 10 5 7 6 42 39 max 69 121 122 97 ...
Page 101: ...1 8 6 5 9 4 2 3 7 42 39 max 69 127 101 ...
Page 105: ...130 131 132 105 ...
Page 107: ...133 135 134 107 ...
Page 115: ...4 1 2 3 4 1 2 3 9 7 2 3 8 4 1 149 150 151 152 6 1 5 115 ...
Page 123: ...1 2 3 4 5 5 167 123 ...
Page 129: ...129 ...
Page 130: ...130 ...
Page 131: ...131 ...


