78
Zarge einbauen
Eck- / Gegenzarge
Anschweißmontage
in Mauerwerk / Beton
Zarge zusammenschrauben, falls sie nicht
verschweißt ist (siehe Seite 45).
Eckzarge einbauen wie auf Seite 74 be-
schrieben.
Zarge gemäß Zulassung hinterfüllen (siehe
Seite 104ff.).
Die Eckzarge ist in der Nut werkseitig vor-
gelocht. Die Gegenzarge mit den mitgelie-
ferten Bohrschrauben an der Eckzarge be-
festigen.
Beim Verschrauben darauf achten, dass
die beiden Zargen anliegend montiert sind.
Eck- und Gegenzarge an die Befestigungs-
laschen anschweißen.
Die Schweißnähte müssen entschlackt,
kaltverzinkt und grundiert werden.
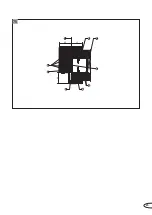
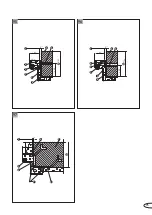
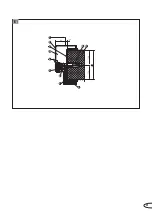
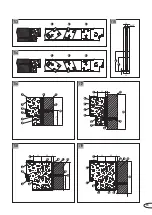
Zargenanschluss bei durchgehender Wand
Bild 99,
rechte Seite
(1) Baurichtmaß
(2) Eckzarge
(3) Zargendichtung
(4) Zargenhinterfüllung
(5) Dübel nach bauaufsichtl. Zulassung
(6) Verschraubt, wahlweise geschweißt
oder genietet
(7) Anschweißdistanz-Blendstück,
dreiseitig umlaufend
(8) Gegenzarge
(9) Bei Wanddicke >_ 240 mm zweite
Schraube erforderlich
(10) Mauerwerk / Beton
(11) Wanddicke (s. Tabelle auf Seite 6)
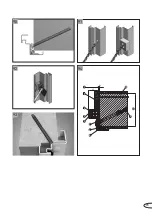
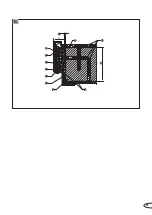
Zargenanschluss in der Laibung
Bild 100,
rechte Seite
(1) Baurichtmaß
(2) Eckzarge
(3) Zargendichtung
(4) Zargenhinterfüllung
(5) Dübel nach bauaufsichtl. Zulassung
(6) Befestigungslasche
(7) Anschweißdistanzstück
(8) Gegenzarge
(9) Gegenzarge leer, wahlw. hinterfüllt
(10) Mauerwerk / Beton
(11) Wanddicke (s. Tabelle auf Seite 6)
Fortsetzung auf Seite 48
Screw the frame together where it is not
welded (see page 45).
Assemble corner frame as described on
page 74.
Backfill the frame in accordance with
approval documentation (see page 104ff.).
The groove in the corner frame is factory
pre-perforated. Fix the counterframe to the
corner frame with the self-drilling screws
provided.
When screwing in, make sure that the two
frames are mounted snugly against each
other.
Weld the corner and counterframe to the
fixation brackets.
Paint must be removed form weld joints
and they must be cold galvanised and
primed.
Frame connection in case of
continuous wall
Image 99,
on right-hand side
(1) Coordinating size
(2) Corner frame
(3) Frame sealing
(4) Frame backfilling
(5) Wall plug conforming to general
construction approval
(6) Screwed, either welded or riveted
(7) Welding spacer facing piece,
on three sides
(8) Counterframe
(9) Two screws required
on wall thicknesses >_ 240 mm
(10) Masonry / concrete
(11) Wall thickness (see table on page 20)
Frame connection in the jamb
Image 100,
on right-hand side
(1) Coordinating size
(2) Corner frame
(3) Frame sealing
(4) Frame backfilling
(5) Wall plug conforming to general
construction approval
(6) Fixation bracket
(7) Weld separation piece
(8) Counterframe
(9) Empty counterframe, backfilled if
desired
(10) Masonry / concrete
(11) Wall thickness (see table on page 20)
Continued on page 48
Fitting frame
Corner / counterframe
Weld fixation
into masonry / concrete
Schroef het kozijn samen indien het niet is
gelast (zie pagina 45).
Monteer het hoekkozijn zoals beschreven
op pagina 74.
Zorg voor de vulling van het kozijn conform
het attest (zie pagina 104ff.).
De gleuf in het hoekkozijn is al in de fabriek
voorgeboord. Bevestig het tegenkozijn aan
het hoekkozijn met behulp van de meegele-
verde boorschroeven.
Let er bij het vastschroeven op, dat de
twee kozijnen strak tegen elkaar aan
komen te zitten.
Las het hoek- en tegenkozijn vast aan de
bevestigingsankers.
De lasnaden moeten worden ontdaan van
verf, koud verzinkt en gegrond.
Kozijnaansluiting in geval van een
doorlopende muur
Afbeelding 99,
rechterkant
(1) Bestelmaat
(2) Hoekkozijn
(3) Kozijnafdichting
(4) Kozijnvulling
(5) Plug conform bouwkundige attest
(6) Geschroefd, gedeeltelijk gelast of
geniet
(7) Lasafstandsstuk, aan drie zijden
(8) Tegenkozijn
(9) Bij muurdikte >_ 240 mm is een
tweede schroef nodig
(10) Metselwerk / beton
(11) Muurdikte (zie tabel op pagina 34)
Kozijnaansluiting in de dagkant
Afbeelding 100,
rechterkant
(1) Bestelmaat
(2) Hoekkozijn
(3) Kozijnafdichting
(4) Kozijnvulling
(5) Plug conform bouwkundige attest
(6) Bevestigingsanker
(7) Lasafstandsstuk
(8) Tegenkozijn
(9) Tegenkozijn leeg, met vulling indien
gewenst
(10) Metselwerk / beton
(11) Muurdikte (zie tabel op pagina 34)
Vervolg op pagina 48
Kozijn inbouwen
Hoek- / tegenkozijn
Lasmontage
in metselwerk / beton
Summary of Contents for NovoPorta Premio E-S-1
Page 47: ...13 14 15 18 19 20 21 22 1 2 12 16 17 11 47 ...
Page 49: ...2 1 25 23 24 1 1 2 3 4 5 1 49 ...
Page 51: ...2 5 mm 30 31 1 29 28 27 26 51 ...
Page 53: ...1 2 3 1 2 3 1 1 2 2 3 3 33 34 35 36 37 38 32 53 ...
Page 55: ...41 42 43 44 45 1 1 8 9 4 2 3 7 6 10 5 11 45 5 5 lt 39 40 55 ...
Page 57: ...84 5 45 34 50 48 3 2 1 4 5 6 5 6 7 8 46 57 ...
Page 59: ...47 50 52 55 48 51 53 56 49 54 59 ...
Page 61: ...60 62 65 58 61 63 66 59 64 57 61 ...
Page 63: ...67 70 73 74 68 71 69 72 63 ...
Page 65: ...45 39 48 1 6 8 9 5 10 2 3 4 75 65 ...
Page 67: ...76 77 79 80 81 82 83 78 67 ...
Page 69: ...1 1 5 5 1 1 1 4 3 2 7 6 8 5 9 10 42 53 1 3 2 1 84 85 86 87 69 ...
Page 71: ...1 2 3 1 2 3 1 1 2 2 3 3 1 2 3 4 6 9 6 8 5 11 7 10 42 5 5 88 89 71 ...
Page 73: ...1 9 4 2 3 5 11 10 7 6 8 42 5 5 93 94 90 91 92 73 ...
Page 77: ...1 4 7 3 2 5 8 9 6 42 5 5 100 98 77 ...
Page 79: ...1 9 8 2 7 4 3 6 10 11 5 42 5 5 45 1 7 4 8 2 3 6 5 10 11 9 42 39 max 69 99 100 79 ...
Page 81: ...1 9 7 6 3 10 8 2 4 5 11 12 42 5 5 1 2 1 2 101 81 ...
Page 83: ...1 2 4 3 9 8 5 6 7 10 48 82 100 50 102 103 1 83 ...
Page 85: ...1 10 9 7 4 3 2 6 8 5 11 12 42 5 5 104 85 ...
Page 87: ...1 2 3 4 5 1 2 3 4 105 1 8 4 9 5 6 3 7 2 10 40 45 1 8 11 9 6 6 2 3 7 4 5 10 40 106 107 87 ...
Page 89: ...1 7 6 9 5 6 2 4 8 42 x5 30 31 50 40 108 89 ...
Page 95: ...97 61 1 3 2 6 5 4 7 120 95 ...
Page 97: ...1 4 3 2 6 9 10 5 7 42 39 max 69 1 4 3 2 9 10 5 7 6 42 39 max 69 121 122 97 ...
Page 101: ...1 8 6 5 9 4 2 3 7 42 39 max 69 127 101 ...
Page 105: ...130 131 132 105 ...
Page 107: ...133 135 134 107 ...
Page 115: ...4 1 2 3 4 1 2 3 9 7 2 3 8 4 1 149 150 151 152 6 1 5 115 ...
Page 123: ...1 2 3 4 5 5 167 123 ...
Page 129: ...129 ...
Page 130: ...130 ...
Page 131: ...131 ...


