88
Zarge einbauen
Umfassungszarge
Dübelmontage
in Mauerwerk / Beton
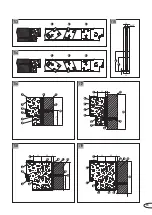
Zarge zusammenschrauben, falls sie nicht
verschweißt ist (siehe Seite 45).
Adapter mit beiliegenden gewindefurchen-
den Schrauben an den Aufnahmeelementen
befestigen.
Gegenadapter auf den Adapter schrauben.
Die in der Umfassungszarge angebrachten
Dübellaschen so weit herausbiegen, dass
die Zarge in die Öffnung geschoben werden
kann.
Umfassungszarge in die Öffnung schieben
und entsprechend Meterriss ausrichten.
Dübellöcher durch den werkseitig vorge-
lochten Adapter bohren und Dübel einset-
zen.
Dübellaschen so biegen, dass sie an der
Wand anliegen. Dübel löcher bohren und
Dübel einsetzen.
Zarge auf beiden Seiten der Wand mit bei-
liegenden Schrauben lose befestigen. Bitte
achten Sie darauf, dass sich die Zargen-
profile beim Befestigen nicht verdrehen.
Zarge gemäß Zulassung hinterfüllen (siehe
Seite 104ff.).
Zarge nochmals auf lot- und waagerechten
Sitz prüfen, Schrauben fest anziehen.
Bei der Dübelmontage müssen Gegen-
adapter und Befestigungslaschen komplett
eingeputzt werden.
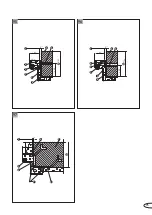
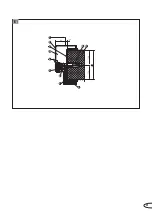
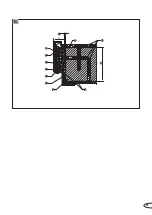
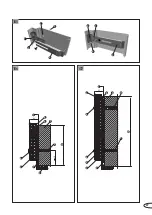
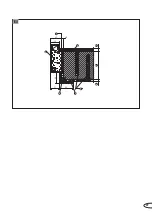
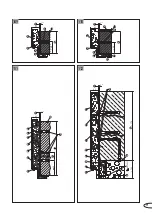
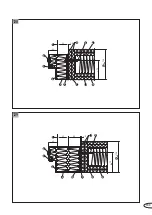
Bild 108,
rechte Seite
(1) Baurichtmaß
(2) Umfassungszarge
(3) Zargendichtung
(4) Zargenhinterfüllung
(5) Dübel nach bauaufsichtl. Zulassung
(6) Schraube M6 x 12 DIN 7991
(7) Putz
(8) Mauerwerk / Beton
(9) Wanddicke (s. Tabelle auf Seite 6)
Fortsetzung auf Seite 48
Screw the frame together where it is not
welded (see page 45).
Fasten adapters to the base elements using
the self-tapping screws provided.
Screw the counteradapter onto the adapter.
Bend out the wall plug brackets on the
closed frame as far as you need to allow
the frame to be pushed into the opening.
Move the closed frame into the opening and
line it up using the guide marking.
Drill the wall plug holes through the factory
pre-holed adapter and insert the wall
plugs.
Bend the wall plug brackets so that they
are flush against the wall. Drill holes for
wall plugs and insert wall plugs.
Fasten the frame loosely onto the wall on
both sides with the screws provided. Please
make sure that the frame profiles do not
rotate while they are being fastened down.
Backfill the frame in accordance with
approval documentation (see page 104ff.).
Check the frame for correct horizontal and
vertical positioning and tighten up the
screws.
Where installing using wall plugs, the
counteradapter and fixation bracket must
be entirely plastered over.
Image 108,
on right-hand side
(1) Coordinating size
(2) Closed frame
(3) Frame sealing
(4) Frame backfilling
(5) Wall plug conforming to general
construction approval
(6) Screw M6 x 12 DIN 7991
(7) Plaster
(8) Masonry / concrete
(9) Wall thickness (see table on page 20)
Continued on page 48
Fitting frame
Closed frame
Fixation using wall plugs
into masonry / concrete
Schroef het kozijn samen indien het niet is
gelast (zie pagina 45).
Bevestig de adapters aan de basiselemen-
ten met behulp van de meegeleverde zelf-
tappende schroeven.
Schroef de tegenadapter op de adapter.
Buig de in het muuromvattende kozijn aan-
gebrachte plughaken zo ver eruit, tot het
kozijn in de opening kan worden geschoven.
Schuif het muuromvattende kozijn in de
opening en breng in lijn met de meter-
markering.
Boor de pluggaten door de in de fabriek
voorgeboorde adapter en breng de pluggen
in.
Buig de plughaken zo, dat ze tegen de
muur komen te liggen. Boor de pluggaten
en breng de pluggen in.
Bevestig het kozijn losjes aan de muur aan
beide zijden met behulp van de meegele-
verde schroeven. Let er a.u.b. op, dat de
kozijnprofielen bij het bevestigen niet draai-
en.
Zorg voor de vulling van het kozijn conform
het attest (zie pagina 104ff.).
Controleer het kozijn nogmaals op een cor-
recte horizontale en verticale positionering
en draai de schroeven stevig aan.
Bij plugmontage dienen de tegenadapter
en de bevestigingsankers compleet te
worden overgepleisterd.
Afbeelding 108,
rechterkant
(1) Bestelmaat
(2) Muuromvattend kozijn
(3) Kozijnafdichting
(4) Kozijnvulling
(5) Plug conform bouwkundige attest
(6) Schroef M6 x 12 DIN 7991
(7) Pleister
(8) Metselwerk / beton
(10) Muurdikte (zie tabel op pagina 34)
Vervolg op pagina 48
Kozijn inbouwen
Muuromvattend kozijn
Plugmontage
in metselwerk / beton
Summary of Contents for NovoPorta Premio E-S-1
Page 47: ...13 14 15 18 19 20 21 22 1 2 12 16 17 11 47 ...
Page 49: ...2 1 25 23 24 1 1 2 3 4 5 1 49 ...
Page 51: ...2 5 mm 30 31 1 29 28 27 26 51 ...
Page 53: ...1 2 3 1 2 3 1 1 2 2 3 3 33 34 35 36 37 38 32 53 ...
Page 55: ...41 42 43 44 45 1 1 8 9 4 2 3 7 6 10 5 11 45 5 5 lt 39 40 55 ...
Page 57: ...84 5 45 34 50 48 3 2 1 4 5 6 5 6 7 8 46 57 ...
Page 59: ...47 50 52 55 48 51 53 56 49 54 59 ...
Page 61: ...60 62 65 58 61 63 66 59 64 57 61 ...
Page 63: ...67 70 73 74 68 71 69 72 63 ...
Page 65: ...45 39 48 1 6 8 9 5 10 2 3 4 75 65 ...
Page 67: ...76 77 79 80 81 82 83 78 67 ...
Page 69: ...1 1 5 5 1 1 1 4 3 2 7 6 8 5 9 10 42 53 1 3 2 1 84 85 86 87 69 ...
Page 71: ...1 2 3 1 2 3 1 1 2 2 3 3 1 2 3 4 6 9 6 8 5 11 7 10 42 5 5 88 89 71 ...
Page 73: ...1 9 4 2 3 5 11 10 7 6 8 42 5 5 93 94 90 91 92 73 ...
Page 77: ...1 4 7 3 2 5 8 9 6 42 5 5 100 98 77 ...
Page 79: ...1 9 8 2 7 4 3 6 10 11 5 42 5 5 45 1 7 4 8 2 3 6 5 10 11 9 42 39 max 69 99 100 79 ...
Page 81: ...1 9 7 6 3 10 8 2 4 5 11 12 42 5 5 1 2 1 2 101 81 ...
Page 83: ...1 2 4 3 9 8 5 6 7 10 48 82 100 50 102 103 1 83 ...
Page 85: ...1 10 9 7 4 3 2 6 8 5 11 12 42 5 5 104 85 ...
Page 87: ...1 2 3 4 5 1 2 3 4 105 1 8 4 9 5 6 3 7 2 10 40 45 1 8 11 9 6 6 2 3 7 4 5 10 40 106 107 87 ...
Page 89: ...1 7 6 9 5 6 2 4 8 42 x5 30 31 50 40 108 89 ...
Page 95: ...97 61 1 3 2 6 5 4 7 120 95 ...
Page 97: ...1 4 3 2 6 9 10 5 7 42 39 max 69 1 4 3 2 9 10 5 7 6 42 39 max 69 121 122 97 ...
Page 101: ...1 8 6 5 9 4 2 3 7 42 39 max 69 127 101 ...
Page 105: ...130 131 132 105 ...
Page 107: ...133 135 134 107 ...
Page 115: ...4 1 2 3 4 1 2 3 9 7 2 3 8 4 1 149 150 151 152 6 1 5 115 ...
Page 123: ...1 2 3 4 5 5 167 123 ...
Page 129: ...129 ...
Page 130: ...130 ...
Page 131: ...131 ...

